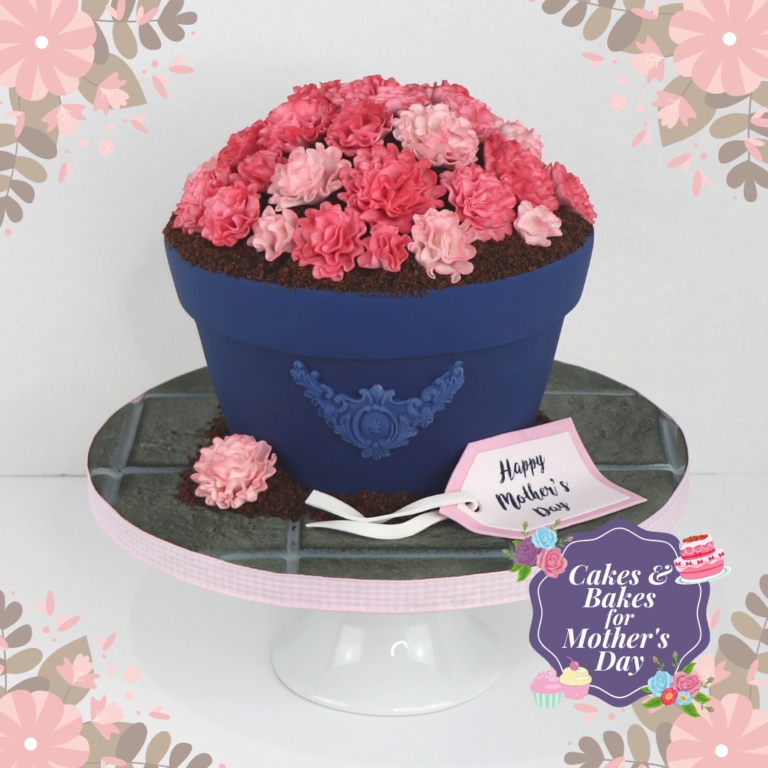
Flower Pot Cake by Rob Baker-Gall
Rob Baker-Gall is a baker, cake decorator and an online content creator, who regularly channels his passion for all things sugarcraft into both writing one of the UK’s top-rated cake decorating blogs and creating videos for his YouTube channel. As part of our countdown to Mother’s Day this weekend, we challenged Rob to design a very special cake inspired by his own mother…
“Neither my mother or I are much in the way of gardeners, but that doesn’t stop either of us completely filling our homes with an abundance of fresh flowers all year round. Mummy Baker’s absolute favourite flowers are carnations and, having bought her countless bunches of the real thing over the years, they provided the perfect inspiration to create my Mother’s Day Flowers cake. Oh, and you’ll be pleased to know that you won’t need any specialised cutters or veiners to replicate my simplified ‘fantasy take’ on the popular blooms.
As a self-confessed mummy’s boy at heart, I loved being asked to create a special cake inspired by my mother and I hope you will enjoy finding lots of different ways to customise my design with different flowers and finishes to celebrate the special person in your life this Mother’s Day.”
We’re sure Mummy Baker will love this flower pot cake made using the Renshaw 2020 Colour of the Year: Sapphire Blue.
Uploaded by Cameron Collings
Skill Level
Intermediate
Decorating ingredients
- 500 g Renshaw White Extra Ready to Roll Icing
- 1 kg Renshaw 2020 Colour of the Year Sapphire Blue Ready to Roll Icing
- 500 g Renshaw Chocolate Flavour Ready to Roll Icing
- 250 g Renshaw White Flower and Modelling Paste
- 250 g Renshaw Rose Pink Flower and Modelling Paste
- Rainbow Dust ProGel Grey
- Rainbow Dust Powder Colour Rose
- Rainbow Dust Powder Colour Strawberry
- Rainbow Dust Liquid Colour Black
- 2 x 7" cakes
- Filling of your choice (Rob used chocolate ganache - find his recipe at Mr Bakers Cakes: The Blog
- Food grade alcohol (such as dipping solution)
- Half a packet of Oreo biscuits
- Half a small packet of bourbon cream biscuits
Instructions
Prepare your Equipment:
Step 1
You will need: 12” cake board, 1m pink ribbon, Cocktail sticks (toothpicks), Sharp serrated knife (for carving), Palette knife, Edge Scraper, Flexi smoothers, Cake smoother, Sharp kitchen knife, Food safe dowel, Dresden tool, Nested set of fluted cutters, Foam pad, Rolling pin, Tin foil, Non-slip matting, Cornflour dusting pouch, Paintbrush, Medium fluffy dusting brush, Cake steamer, Airbrush
To create the stone tile-effect cake board::
Step 2
Begin by colouring 500g of Renshaw Extra Ready to Roll Icing with the Rainbow Dust ProGel grey gel colour, before lightly spraying or brushing cooled, boiled water on to your cake board. Roll out the grey sugarpaste to 3-5mm thick and use it to cover the board before trimming the edges with a sharp kitchen knife.

Step 3
Scrunch up some kitchen foil into a ball and use this to impress texture all over the surface of the sugarpaste.

Step 4
Using a food safe dowel, press into the icing to form the divisions between the stone tiles.


Step 6
Neaten up the divisions between the tiles with the wider end of a dresden tool, before retrimming the edge of the board with your kitchen knife.

Step 7
Fill your airbrush with Rainbow Dust Liquid Colour in black and use this to lightly spray across the surface of the board to highlight all of the texture. Tip: if you find you have a tendency to go too heavy when airbrushing, try diluting down the colour with some food grade alcohol, such as dipping solution.

Step 8
Use some cooled, boiled water and a paintbrush to clean the airbrush colour out of the grooves between the ‘stone tiles.’ You want these to be as pale as possible to create the effect of grouting.

Step 9
If you have access to some titanium dioxide powder, you can mix a little of this with your food grade alcohol to create a white paint that can be used to paint over the ‘grouting’.

Step 10
Set the board aside to dry completely (ideally overnight). Rob has a video demonstrating how to create this style of cake board available at this link – https://youtu.be/YtveLmteAnQ.
. Rob has a video demonstrating how to create this style of cake board available at this link – https://youtu.be/YtveLmteAnQ.")
To Make the Plant Pot:
Step 11
Level your cakes with a cake leveller or kitchen knife and then invert one to sandwich them together.

Step 12
Where possible, I always try to carve my cakes before filling them, simply because it is less messy. Using a sharp serrated knife, begin carving around 1-1.5” from the edge of the top cake in a diagonal downwards direction. You want to meet the bottom of the second cake right at its widest point.

Step 13
Continue to do this all of the way around the cake, ensuring that any sharp corners have been removed entirely.


Step 15
Replace the top layer before crumb-coating the entire cake with your buttercream or ganache.

Step 16
Place in the refrigerator to chill for 20-30 minutes and then apply a second layer of buttercream or ganache, smoothing this to a flawless finish using an edge scraper or flexi-smoother. Once again, place this in the refrigerator to chill for around 30 minutes.

Step 17
Once you are ready to cover your cake, roll out 1kg of Renshaw Ready to Roll Icing in Colour of the Year, Sapphire Blue to around 3-5mm thick, before brushing the chilled cake with cooled, boiled water.

Step 18
Carefully drape the sugarpaste over the cake and smooth to attach. Start at the top and then work your way down the sides (Rob has a YouTube video demonstrating how to do this, which you can find at this link: https://www.youtube.com/watch?v=hQ5foDtXhmc). Trim off the excess around the base of the cake.
. Trim off the excess around the base of the cake.")
Step 19
Hold a flexi-smoother flat against the top of the cake, using a second one to smooth the sides to sharpen the edges.

Step 20
Measure the circumference of your cake using a tape measure or a length of ribbon and then, using the offcuts of Sapphire Blue sugarpaste, roll out a long thin piece of paste to the appropriate length. Use a ribbon cutter (or a sharp knife) to cut a 1-1.5” strip.
 to cut a 1-1.5” strip.")
Step 21
Brush the base of the cake with a little cooled, boiled water and then wrap the strip of paste around the cake, cutting where the ends overlap to form a neat seam.

Step 22
You can use one of your flexi-smoothers to further blend out this join if you wish, before running a finger around the top of the strip to soften and smooth the cut edge.

Step 23
If you have an appropriate mould in your caking kit, you might like to add some decorative detailing to your plant pot. To use Renshaw Ready to Roll Icing in Colour of the Year, Sapphire Blue in a mould, you will need to add some Rainbow Dust Tylo Powder to strengthen it. Simply dip the piece of paste into the powder to pick some up and then knead it through the paste.

Step 24
Follow the manufacturer’s guidance on how to use your mould, before adhering the decorations to the pot with cooled, boiled water.

Step 25
Use a cake steamer to remove any excess cornflour and brushstrokes from the cake and then set it aside to dry (ideally overnight).
.")
To Make the Fantasy Carnations:
Step 26
Begin by forming your centres. These are best made and allowed to dry completely in advance. Roll small pea-sized balls of Renshaw Flower and Modelling Paste in both White and Rose Pink (Rob made 22 pink centres and 11 white centres). Dip cocktail sticks into some cooled, boiled water and then poke them into each of the balls of paste.
. Dip cocktail sticks into some cooled, boiled water and then poke them into each of the balls of paste.")
Step 27
Press the balls flat and then place the finished centres into a polystyrene cake dummy to dry completely. You will need between 30-35 flowers to create the finished cake, depending on what combination of different sized blooms you decide to create.

Step 28
When you are ready to begin creating your fantasy carnations, begin by rolling out a small amount of your Flower and Modelling Paste. Use the smallest fluted circle cutter from a nested set to cut out two circles, returning the rest of your paste to an airtight container or bag to prevent it drying out.

Step 29
Using the wider end of a dresden tool, thin the edge of each ‘flute’ on a foam pad. Do not worry if these fray or tear slightly as this will all add to the carnation-like effect.

Step 30
Brush the centre of the circle with cooled, boiled water, being careful not to make it too wet.

Step 31
Poke the cocktail stick of one of your flower centres through the middle of the circle and slide it down.


Step 33
Brush half one side with more water, before folding the flower over on to itself and sticking it in place.

Step 34
Turn the flower over and repeat step 33, folding in the other side of the bloom. Looking from above, you should have created an ‘S’ shape. Add this first layer to all of your flower centres as this will allow each one sufficient time to dry before you move on to the second layer.


Step 36
This time, pinch the petal in around the first layer allowing it to bunch randomly. Again, allow this layer to dry before adding a third.

Step 37
To create blooms of varying sizes, you can add between one and four layers of petals to each centre. You may find that you need to use a flower former to support the flowers, once you get to the third and fourth layers of petals. Allow your flowers to dry completely (ideally overnight) before attempting to dust them.
 before attempting to dust them.")
Step 38
To dust your flowers, use a medium-sized fluffy brush to brush Rainbow Dust Powder Colour across the edges of the petals. Rob used Rainbow Dust Powder Colour in Strawberry to dust his pink flowers and Rainbow Dust Powder Colour in Rose to dust his white flowers.

Step 39
Use your cake steamer to set the dusts by holding each flower in the stream, being careful not to burn your skin. Return the flowers to the polystyrene cake dummy to dry completely.

To assemble the cake:

Step 41
Invert the dried stone-tile effect cake board and carefully place it on top of the cake. Check that it is centred and then place one hand flat on top of the board and one hand underneath the base board. Carefully, flip the cake over before removing the original board, leaving the cake sat on the decorated board.


Step 43
Take your Renshaw Chocolate Flavour Ready to Roll Icing and knead it until soft. Hand shape the sugarpaste into a shallow hemisphere shape.


 with cooled boiled water.")
Step 46
Place your Oreos and bourbon biscuits into a food processor and blitz on full power until they are reduced to crumbs. Carefully spoon these onto the surface of the cake, ensuring that the hemisphere of icing and any exposed ganache/buttercream are hidden.

Step 47
You should be left with a mound of ‘soil’ on top of your plant pot. Use a clean, dry brush to remove any overspill from the cake board.

Step 48
To arrange the flowers, start at the centre of the top and push the flower’s cocktail stick directly into the mound of Renshaw Chocolate Flavour Ready to Roll Icing. Continue to add additional flowers working in a circular motion, gradually working your way around the central flower, making your way down to the edge of the plant pot.

Step 49
Spoon a small amount of the soil around the base of the pot – you can also add a ‘fallen flower’ if you have any left over. To remove one from the cocktail stick, gently twist the stick until you feel it come loose.

Step 50
To personalise your cake, why not add a gift label created by layering up some leftover pink and white Flower and Modelling Paste and cutting them to shape using your kitchen knife.

Step 51
A hole can be removed using a medium plunger cutter or a piping tip, while another thin strip of white Flower and Modelling Paste makes a simple ribbon. Use a thin paintbrush and some edible paint, a Rainbow Dust Food Art Pen or even an edible print to add a personalised message to the gift tag before placing it on to the cake board and then you are done!