Realistic Avocado Cake
Trick your friends and family with this realistic avocado cake creation at your next celebration party! This showstopper is decorated using a variety of Rainbow Dust powder colours to bring it to life.
Top Tips:
- Rainbow Dust powder colours can be highly pigmented. Practice using them on leftover fondant or modelling paste if you are new to using them. Remember to brush on with light pressure first and then add more on top to build up the colour.
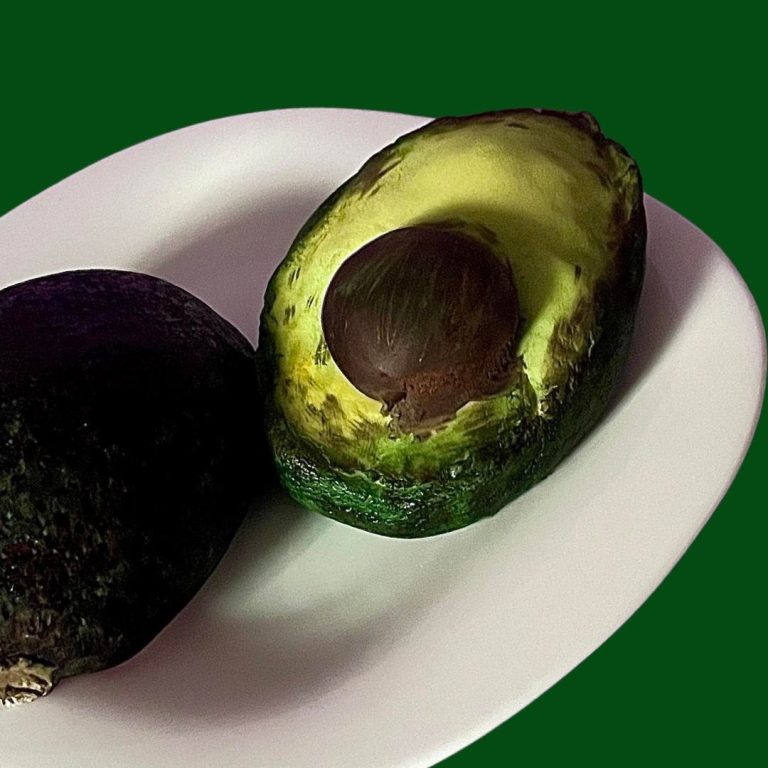
- Use a realistic Avocado for reference to ensure you are matching the correct colours and shape. You can also roll the avocado on top of the flower and modelling paste to create the skin texture to make it even more realistic.
Uploaded by Chloe Edwards
Skill Level
Intermediate
Baking ingredients
- Prepare your equipment: serrated knife, cake board, turntable, real avocado, scissors, modelling tools, different sized food safe paint brushes, non-stick rolling pin, sharp knife, icing sugar (for dusting), palette knife.
- 8” Prebaked Sponge Cake (Recipe of your choice)
- Premade Chocolate Ganache, enough to cover x1 8” sponge (Recipe of your choice) Chocolate ganache will be used in this recipe.
Decorating ingredients
- 500 g White Flower and Modelling Paste
- 25 g Brown Rainbow Dust ProGel Food Colour Gel
- Rainbow Dust Click Twist Edible Glue Brush
- 4 g Rainbow Dust Pale Pear Powder Colour
- 2 g Rainbow Dust Moss Green Powder Colour
- 2 g Rainbow Dust Holly Green Powder Colour
- 4 g Rainbow Dust Citrus Green Powder Colour
- 2 g Rainbow Dust Sunset Yellow Powder Colour
- 2 g Rainbow Dust Milk Chocolate Powder Colour
- 2 g Rainbow Dust Black Powder Colour
- 25 g Black Rainbow Dust ProGel Food Colour Gel
- 250 g ‘Choc & Roll’ Chocolate Flavour Fondant Icing
Renshaw products used

Email this recipe
Instructions
Carving the Avocado Cakes::
Step 1
Begin by cutting your 8” sponge in half using a sharp serrated knife. Place 1 half to the side. With the other, use a real avocado to help you carve out the shape. Start by cutting the sides to create a rectangle shape.
Step 2
Next carve away the top layer of the sponge to make it the same height as the real avocado. Then carefully carve away the corners and sides at an angle to create the egg dome shape that resembles a real avocado. Repeat this with the other half of the sponge from step 1.
Crumb coating the Avocado Cakes::
Step 3
To create the crumb coat, place your carved sponges onto a cake board and cover with a thin layer of chocolate ganache using the end of a palette knife. Spread the ganache all over the outside of the sponge to prevent any crumbs from falling out. This will give you a smooth base to cover in fondant.
Step 4
Ensure to keep the round dome shape by scraping away any excess layers of chocolate ganache. Once both carved sponges are covered in a crumb coat layer, place them both in the fridge to harden for at least 30 minutes.
Decorating the Avocado Cakes::
Step 5
Once set, bring out 1 of the ganache covered cakes from the fridge. Roll out 250g of White Flower and Modelling Paste on a dusted surface.
Step 6
To create the realistic avocado texture, roll a real avocado across the surface to leave an impression of the texture onto the modelling paste.
Step 7
Next, cover the crumb coated cake with the rolled-out fondant. Remove it from the cake board and flip over to reveal the plain sponge. Cover the remaining plain sponge with a layer of chocolate ganache and fold over the excess white Modelling Paste. Squeeze the ends together and cut away using scissors as it may be difficult to cut with a sharp knife.
Step 8
Turn the cake back over. Using a ball tool, make a small hole on the smaller end of the avocado shape for the stem to go into. Then, roll out a small ball made from the white flower and modelling paste and press it into the hole. Add some texture by pressing it with a veining tool.
Step 9
To create the avocado colour, start by brushing on a thin layer of Rainbow Dust Holly Green Powder Colour on a fluffy paint brush. Slowly build up the colour layer as the colours can be highly pigmented.
Step 10
Next add a layer of Rainbow Dust Moss Green Powder Colour 2g all over the covered sponge. Then, in some sections across the sponge, brush on a thin layer of Rainbow Dust Milk Chocolate Powder Colour. Buff the colour into the green using a dry fluffy paintbrush.
Step 11
For the smaller details such as the spots and holes, use a combination of Black Rainbow Dust ProGel Food Colour Gel and Rainbow Dust Black Powder Colour on a small brush and create small dots across the surface of the covered sponge. Then add additional spots on top using a small amount of Brown Rainbow Dust ProGel Food Colour Gel.
Step 12
To make the other avocado sponge, cover it with a layer of White Flower and Modelling Paste using the same techniques from steps 5-7.
Step 13
For this half, keep the flat side face upwards and the round dome side downwards onto the surface.
Step 14
Use a selection of modelling tools to create a border around the edge of the avocado. Don’t worry about making the texture smooth as the rougher the texture, the more realistic it will be!
Step 15
To make the hole for the avocado seed, press one end of the non-stick rolling pin on top of the larger end of avocado shape. Next roll out roughly 20g of ‘Choc & Roll’ Chocolate Flavour Fondant Icing into a ball and attach inside the hole with a layer of edible glue.
Step 16
Use a veining tool to break of small sections of the seed to blend it into the main avocado cake.
Step 17
To colour this half of the cake sponge, begin by brushing on a small layer of Rainbow Dust Citrus Green Powder Colour all over the top. Next using a smaller brush, add on a thin layer of Rainbow Dust Sunset Yellow Powder Colour to the edges of the covered sponge, where the border was created.
Step 18
Next, go over the top of the edge and slightly down the sides with a layer of Rainbow Dust Moss Green Powder Colour. Build up your layers of colour as the edible powder colours can be highly pigmented.
Step 19
Finally repeat steps 9-11 to create the realistic avocado texture on the sides of the cake using the selection of Rainbow Dust Powder Colours.