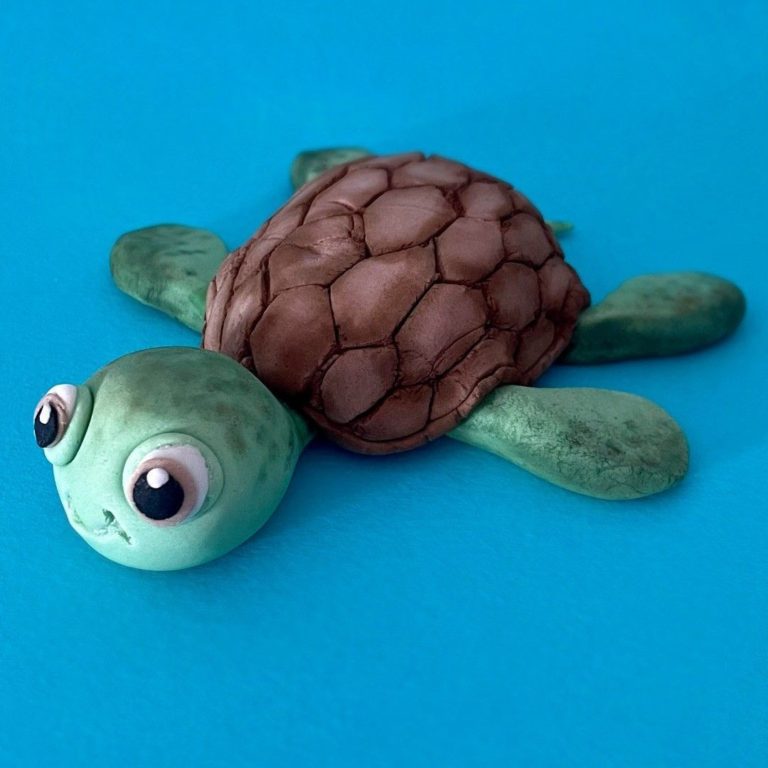
Sea Turtle Cake Topper
Learn how to create this adorable sea turtle cake topper using our White Flower and Modelling Paste. It is a perfect addition to sit on top of a delicious cake! Why not bring it to life by using a selection of Rainbow Dust’s wonderful edible Powder Colours- see the range here.
Top Tips:
- Place your Flower and Modelling Paste into a freezer bag or container to prevent it from drying out when you are not using it.
- Rainbow Dust Powder Colours can be highly pigmented. Practice using them on leftover fondant or modelling paste if you are new to using them. Remember to brush on with light pressure first and then add more on top to build up the colour.
Uploaded by Chloe Edwards
Skill Level
Intermediate
Baking ingredients
- Prepare your equipment: non-stick rolling pin, freezer bags (to prevent your fondant from drying out), sharp knife, icing sugar (for dusting your surface), selection of cake modelling tools such as a veining tool and ball tool, food safe paint brushes.
Decorating ingredients
- 250 g White Flower and Modelling Paste
- 25 g Leaf Green Rainbow Dust ProGel Food Colour Gel
- 25 g Brown Rainbow Dust ProGel Food Colour Gel
- 50 g White ‘Just Roll With It’ Fondant Icing
- 20 g Jet Black ‘Just Roll With It’ Fondant Icing
- Rainbow Dust Click Twist Edible Glue Brush
- Rainbow Dust Pale Pear Powder Colour
- Rainbow Dust Moss Green Powder Colour
- Rainbow Dust Milk Chocolate Powder Colour
Renshaw products used

Email this recipe
Instructions
Making the Cake Topper:
Step 1
Split one pack of White Flower and Modelling Paste 250g in half. Colour one half with 2 drops of Leaf Green Rainbow Dust ProGel and the other with 2 drops of Brown Rainbow Dust ProGel, and mix both separately until the colour is fully blended.
Step 2
Shape the brown half into a ball and press down gently on the top to make the side touching the work surface completely flat. It should now look like a round dome. You can use a modelling tool to smooth out any bumps or cracks that are noticeable.
Step 3
Use a veining tool to create a small border around the bottom of the dome. You can create extra details on the shell such as vertical lines going along the border. To create the design on top of the sea turtle’s shell, use the same tool to draw a hexagon shape and then add other hexagon shapes around it until the fondant dome is fully covered.
Step 4
Next, cut the green half of the Flower and Modelling paste from Step 1 into 8 small equal sized pieces. It might help to roll it out into a sausage shape and cut it that way to ensure all the sections are the same size.
Step 5
To make the arms/legs, begin by rolling one piece into a long teardrop shape. To create the fin, use the end of your rolling pin to gently flatten down the larger side of the teardrop shape. Repeat this with 4 of the pieces of the green Flower and Modelling Paste. Place aside for later.
Step 6
To make the tail, take a small section of the green Flower and Modelling Paste and roll it into a smaller tear drop shape and flatten it using the same technique from the previous step. The flattened side will attach onto the underside of the finished turtle shell.
Step 7
To make the head, take the same sized piece used for the legs/arms and roll it into a short teardrop shape (the larger end needs to be big enough to add the face).
Step 8
First begin by creating the eye socket by using a ball tool and press the large end into the front of the face where you would like the eyes to go. Next roll out 2 very small balls of the leftover green Flower and Modelling Paste and press them into the eye socket holes. You can add a small about of the edible glue to help them attach.
Step 9
Next, use the same ball tool and create a hole again in each socket for the white eyeball to go into. To make the eyeballs, use a small amount of White ‘Just Roll With It’ Fondant Icing to create 2 small balls and attach them into the holes. Use the end of your finger to make them flat for the other parts of the eye to attach onto.
Step 10
To create the iris, use 2 even smaller pieces of the leftover brown Flower and modelling paste used to make the turtle shell and roll them into 2 small balls. Press them down flat and attach them on top of the white eyeballs.
Step 11
Lastly, create 2 smaller ball shapes using Jet Black ‘Just Roll With It’ Fondant Icing for the pupils and attach them on top of the iris using a thin layer of edible glue. You can also add a highlight each eye with an extra small piece of White ‘Just Roll With It’ Fondant Icing on the top corner of each black pupil.
Step 12
For the mouth, drag along the modelling paste below the eyes using the end of a veining tool to create the arch shape of your choice.
Step 13
To bring your turtle to life, you will need Pale Pear and Moss Green Powder Colour and food safe paint brushes. Begin with a small amount of pale pear and gently brush on top of the head and the arms and fins. Start with a small layer and build up the colours by adding more to make the colour bolder.
Step 14
To create spots, use a smaller brush and dip just the end into a pot of Moss Green Powder Colour and gently dab the end on the top of the head and on the edge of the fins. Brush off any excess powder colour using a larger brush. Repeat this for each fin, the head and tail.
Step 15
To add depth to the shell, brush on a small layer of Milk Chocolate Powder Colour in between the marked lines on the sea turtle’s shell. Again, start with a small layer and slowly build up the colour by adding more. Brush off the excess powder colour using a larger brush.
Step 16
Finally, attach all the pieces to the bottom of the sea turtle shell using the Click Twist Edible Glue Brush. You can go back over any of the sections with a final layer of powder colours and allow for the glue to set before placing it onto your finished cake.