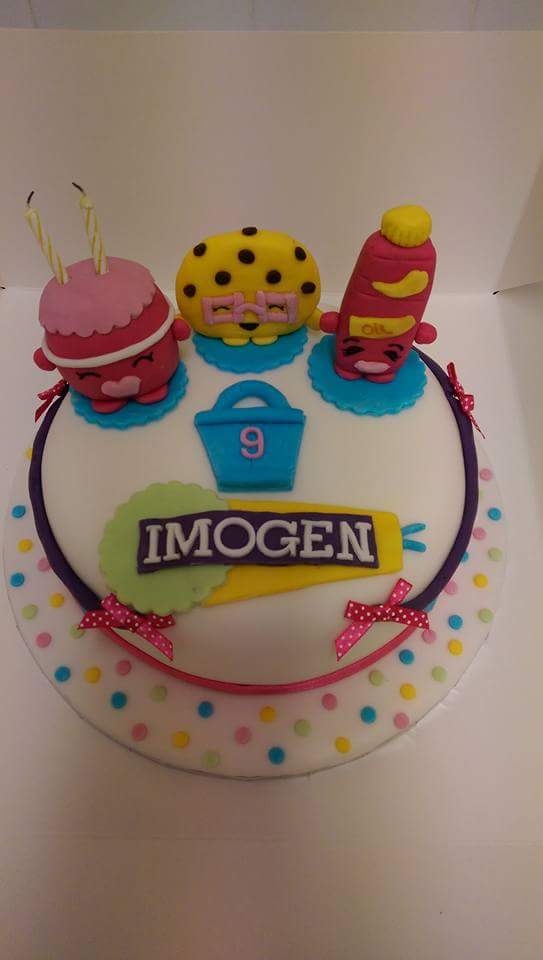
Super Shopkins Cake
Colourful Shopkins themed birthday cake!
Recipe by Claire
Uploaded by Claire
Time to make
Skill Level
Intermediate
Serves
20 people
Baking ingredients
- 300 g butter
- 300 g caster sugar
- 6 eggs
- 1 tsp vanilla
- 300 g self-raising flour
- 50 g strawberry jam
- 150 g butter (for buttercream)
- 500 g icing sugar (for buttercream)
Decorating ingredients
- 700 g Renshaw White Ready to Roll Icing
- 50 g Renshaw Turquoise Ready to Roll Icing
- 250 g Renshaw Pink Ready to Roll Icing
- 150 g Renshaw Yellow Ready to Roll Icing
- 50 g Renshaw Pastel Green Ready to Roll Icing
- 50 g Renshaw Deep Purple Ready to Roll Icing
Renshaw products used


Email this recipe
Instructions
Step 1
I added the mixture into a large bowl and whisked for approx. 2 minutes until smooth. I then poured into a greased and lined cake tin and baked in the oven at 180°C for approx. 40 minutes.
Step 2
Once cooked, I removed from oven and left to cool on a wire rack. I then mixed the butter and icing sugar together and added a small amount of vanilla and left to one side.
Step 3
I then moulded and cut out the characters and the rest of the decorations with as much detail as I could. You can create the basic shape of each character by first rolling your icing into a ball, and then gently shaping from there. You could flatten the ball to create a round disc shape, or gently roll against your work surface or between your hands to create more of a cone shape.
Step 4
Once the cake had cooled, I cut into 2 and filled with the jam and buttercream, then covered the whole cake in a thin coating of buttercream as well and left to cool in the fridge for approx. half an hour.
Step 5
I then kneaded and rolled out the white fondant icing to the right size to fit the cake. I carefully rolled it over the cake and smoothed it all and trimmed neatly.
Step 6
Now it was time to add the decorations to the cake one by one. Carefully fix them into position using cooled boiled water, or you can use extra support such as dried spaghetti or cocktail sticks, but you’ll need to insert these into the models while the icing is still soft. I then finished the cake with a ribbon.