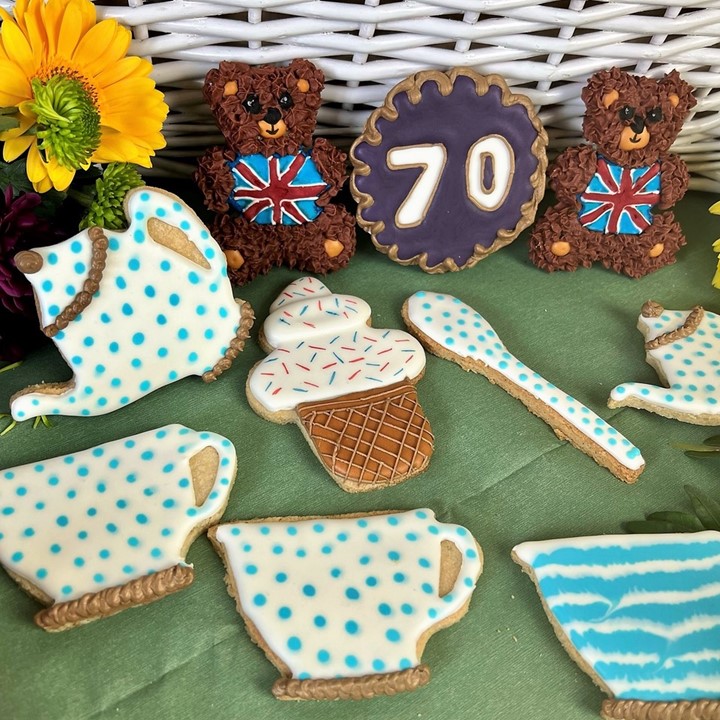
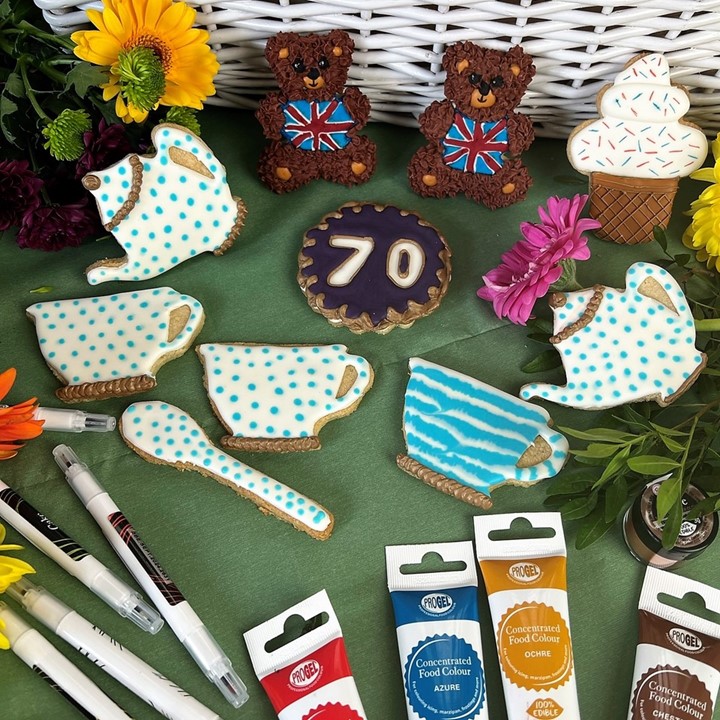
Jubilee Teddy Bear’s Picnic Biscuits by Rosie Brandreth-Poynter
The Queen’s Platinum Jubilee is the perfect excuse to make and decorate some fun, very British themed celebratory biscuits.
The wonderful Rosie Brandreth-Poynter has created these adorable Jubilee themed biscuits, with cute teddy bears in jumpers and a polka dot tea set.
Create your own teddy bears picnic, or customise your own biscuits using Rosie’s helpful tips.
Uploaded by Kayleigh McDonough
Baking ingredients
- 100 g unsalted butter (softened/at room temperature)
- 100 g caster sugar
- 100 g plain flour
- 1 egg
- 2 zest of lemons (can substitute for 1 tsp vanilla extract if preferred)
Decorating ingredients
- Royal Icing (homemade or Renshaw ready-made)
- Rainbow Dust ProGel Colours
- Rainbow Dust Metallic Golden Sands Lustre Dust
Email this recipe
Instructions
Making the biscuits:
Step 1
Cream together the butter, sugar and lemon zest until smooth

Step 3
Place the dough between two sheets of baking paper and roll out to about 5mm thick
Step 4
Cut out your chosen picnic shapes (either with cutters or by cutting round home-made templates)
Step 5
Place the cut-out biscuits on a baking tray lined with baking paper and chill in the fridge for an hour
Step 6
Bake in a pre-heated oven at 1600C fan for 8-10 minutes until slightly golden around the edges, transfer to a wire rack to cool once firm enough to move (they will come out of the oven very soft)
Decorating the biscuits:
Step 7
The biscuits are iced with royal icing (very appropriately named!) which is a mixture of egg whites and icing sugar. You can buy pasteurised egg whites in a carton which makes life very easy. The biscuits need to be outlined with a firmer icing, then flooded (filled in) with a slightly thinner version.
Step 8
To make the icing for the outlines, sift some icing sugar into a bowl then slowly add very small amounts of egg white until the mixture is just thin enough to pipe. Transfer this to a small piping bag and snip off the smallest tip you can, pipe a thin line of icing around the biscuit, or the shape within the biscuit you wish to fill.

Step 9
To flood the biscuit, add a little more egg white to the icing you have already made, pipe thin within the outline you have created and spread gently to the edges using a cocktail stick if needed.

Step 10
Repeat with different colours for different areas, trying to use the same colour outline as flooding icings. Colour each batch of icing with a small blob of Rainbow Dust ProGel Colours, or for the gold, use the Rainbow Dust Gold Lustre Dust.

Step 11
To create the polka dot effect on the tea set, pipe dots of coloured icing onto the white flooding immediately while still wet, the icing will then set smooth.
Step 12
Allow the flood icing to fully set before using Rainbow Dust Food Art Pens to draw on final details – like the sprinkles on the ice cream. Alternatively, you can pipe more details using an icing of the outline consistency – like the details on the ice cream cone.

Step 13
For a simpler decorating technique (and great fun for all the family!), knead and roll out a block of Renshaw Ready to Roll white icing to a few mm thick (dusting the work surface with corn flour will help this), cut out shapes to match your biscuits before wetting the backs and sticking the icing to the biscuit shapes. Allow to dry out overnight before decorating with Rainbow Dust Food Art Pens.
Renshaw's Jubilee top tip:
Step 14
You can buy ready-made Renshaw Royal Icing which you can add ProGel colours to, for an even easier creation.