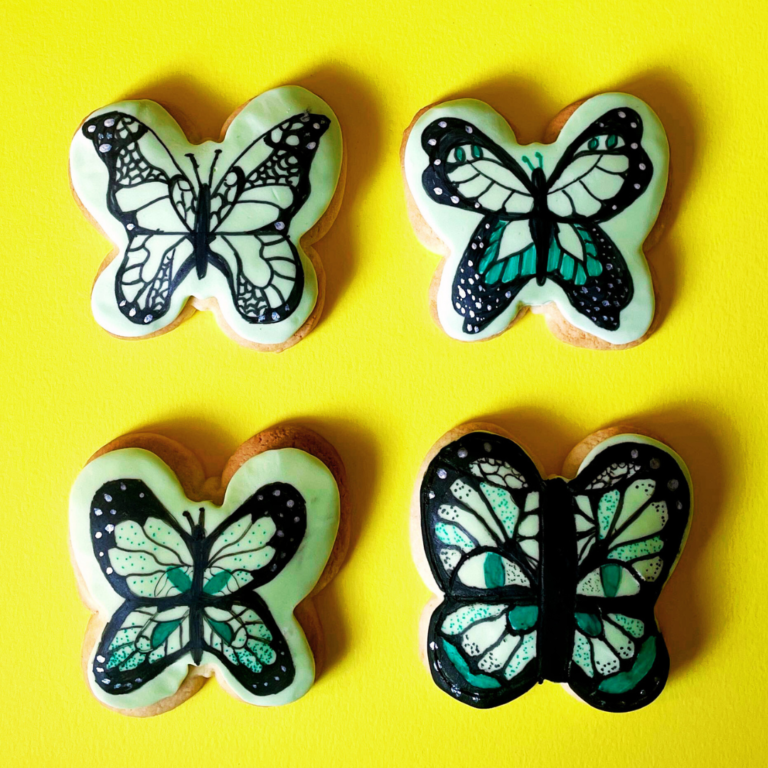
Beautiful Butterfly Biscuits
These beautiful butterfly biscuits are super easy to create. Release your inner artist using the Rainbow Dust edible craft pens and create your own design on a prebaked butterfly shaped biscuit.
Top Tips:
- Use a variety of Rainbow Dust Cake Craft Pens to create any design you would like on your biscuits. You can check out the range of colours by clicking here
- Let the biscuits with the fondant icing topping sit for a little while before drawing on your designs. This will create a firm surface to write on.
Uploaded by Chloe Edwards
Skill Level
Easy
Serves
4 people
Baking ingredients
- Prepare your equipment: non-stick rolling pin, butterfly biscuit cutter (same one used to create the biscuits), icing sugar (for dusting surface), food safe paint brush.
- 4 Prebaked biscuits
Decorating ingredients
- 250 g Pastel Green ‘Just Roll With It’ Fondant Icing
- Click Twist Edible Glue Brush
- Rainbow Dust Black Cake Craft Pen
- Rainbow Dust Teal Cake Craft Pen
- Rainbow Dust Metallic Paint Pearlescent White
Renshaw products used
Email this recipe
Instructions
Decorating the Biscuits:
Step 1
Knead the Pastel Green Fondant Icing on a clean, dry surface until pliable, and roll out on a surface lightly dusted with icing sugar until it is roughly 1cm in thickness.
Step 2
Cut out 4 butterfly shapes using the same cutter you used to bake the biscuits.
Step 3
Attach each butterfly fondant shape to the biscuits using the Click Twist Edible Glue Brush.
Step 4
If the biscuits changed shape slightly in the oven when they were baking, push the butterfly shaped fondant to reach the edges with a non-stick rolling pin. Push the fondant gently from the centre outwards towards the end of the wings.
Step 5
Now it is time to create your own design. Create an outline of the wings and body of the butterfly using the Rainbow Dust Black Cake Craft Pen.
Step 6
Next add thicker sections on the top corners of each wing. Colour in a circle for the head on the top of the body and add 2 lines for the antennas.
Step 7
Once you have a base outline for your butterfly, it is time to add the extra details using Rainbow Dust Teal Cake Craft Pen (or you can use a different colour of pen instead).
Step 8
Using either the thick or thin side of the pen, repeatedly press lightly onto areas of your biscuit to create a dotting technique. To create a gradient using this technique, press down heavily with your pen, keeping the spots close together to start with and then gradually press lighter and keep your spots further apart.
Step 9
Draw lines starting from the centre body out towards the edges on the wings. At the point end where it meets the edge of the wings on the line, create a triangle shape and fill it in.
Step 10
Lastly, fill any spaces you would like to, using the larger ends of the Rainbow Dust Teal Cake Craft Pen to add some extra colour.
Step 11
Once you are happy with how your butterfly biscuit is looking, it is now time to finish it with some highlights. Dip the end of a food safe paintbrush into a small amount of Rainbow Dust Metallic Paint Pearlescent White.
Step 12
Lightly dot some of the paint onto the darkened edges of the butterfly wings to lighten up your design.
Step 13
Optional- Why not finish it off with a little bit of Rainbow Dust Sparkle Dust Spray. You can check out the range on the Rainbow Dust Colours website.