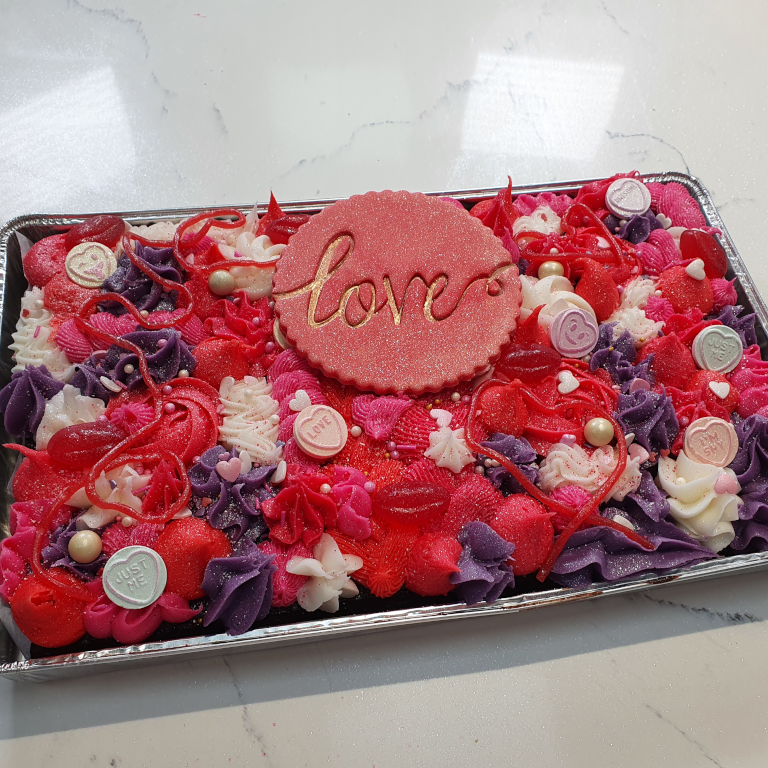

Valentine’s Traybake
This Valentine’s Traybake is great for those less experienced in cake decorating, as the design is completely random. It’s also easily personalised to your favourite flavouring, colours, decorations, or sponge cake.
Don’t forget to check out our top tips at the bottom of the recipe, or find more Valentine’s recipes here.
Uploaded by Freya Mowbray
Baking ingredients
- 31 x 19cm vanilla or chocolate sponge traybake
Decorating ingredients
- 800 (2 Pots) g Renshaw Personalise Me! Frosting
- 250 g Carnation Red Flower and Modelling Paste
- Rainbow Dust Progel Red
- Rainbow Dust Progel Strawberry
- Rainbow Dust Progel Purple
- Rainbow Dust Progel Ruby
- Rainbow Dust Progel Claret
- Rainbow Dust Metallic Paint Dark Gold
- Rainbow Dust Lustre Gold Fusion
- Rainbow Dust Twinkle Dust Snow White
- Rainbow Dust Glitter Frosty Pink
- Food flavouring or extract
- Sprinkles
- Sweets
Renshaw products used
Email this recipe
Instructions
You will need the following equipment:
Step 1
10.5cm round fluted edge cutter, Icing embosser/cookie stamp, Rolling pin, Icing sugar shaker, Spray pump, 1 paintbrush, Dusting brush, Kitchen paper, Paint palette, 6 x small bowls, 6 x spoons, Piping bags, and an assortment of piping nozzles (such as 2D, 1M, 1A, 104, 199, 32 coupler/nozzle)
Assembling the decoration:
Step 2
Knead 150g Renshaw Flower & Modelling Paste on a clean, dry surface until smooth and pliable. Lightly dust surface with icing sugar and pin out to 2-3mm thick.
Step 3
Emboss chosen message with the icing embosser then cut out the message with the fluted edge cutter. Leave the plaque aside for 24 hours to set.
Step 4
Add flavouring to the Plain Frosting and mix well. Divide the Frosting equally between 6 bowls. Add a small amount of the 5 ProGel colours to the Frosting and mix until blended completely. Leave one bowl uncoloured.
Step 5
Fit the nozzles into the piping bags and fill with the Frosting. Using 2 different style nozzles per colour gives a broader range of textures to the finished cake.
Step 6
Pipe a range of swirls, ropes and bulbs onto the traybake alternating between colours until the surface is completely covered.
Step 7
Sprinkle over Rainbow Dust Glitter, top with sprinkles and then add the sweets of your choice.
Step 8
Shake the Metallic Paint well and decant a small amount into a paint palette. Using a 0 paintbrush, paint the embossed lettering of the plaque. Dab a small amount of Gold Fusion Lustre onto a piece of kitchen paper and brush over the plaque using a dry dusting brush.
Step 9
Place the plaque onto the traybake. Fill a spray pump with Twinkle Dust Snow White and lightly dust all over to finish.
Top Tips:
Step 10
If your piping nozzles are similar sizes, try fitting a piping bag with an icing coupler/nozzle converter. This means you can swap and change nozzles easily without needing to fill extra piping bags.
Step 11
Flavour the Plain Frosting in the tub before dividing between bowls to save time.
Step 12
Can’t decide on a flavour? Choose 2 complimentary flavours like orange and lemon, vanilla and almond, strawberry and vanilla to add extra depth to the overall flavour of the traybake.