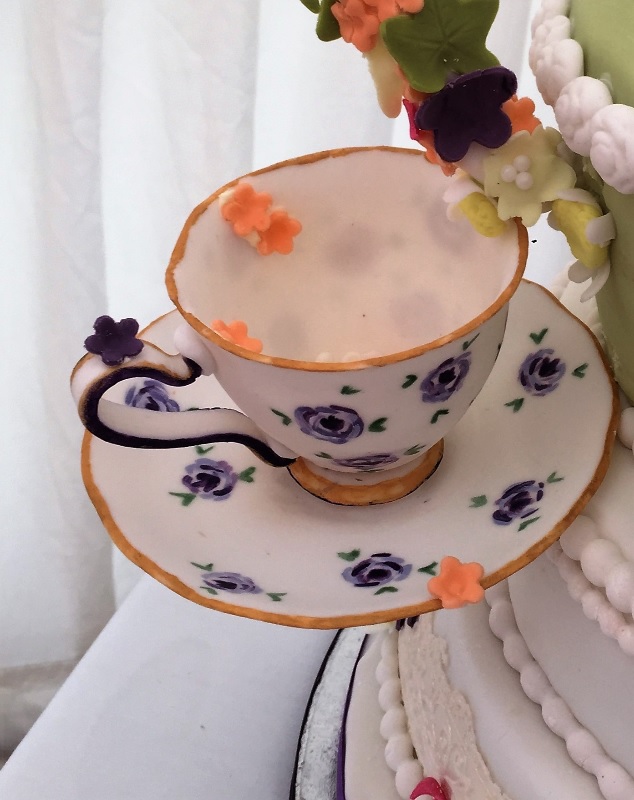
Vintage Tea Cup and Saucer
Natalie @ Sweet Devotion: The first thing I will say is you absolutely do not need a mould to achieve this beautiful Vintage Cup & Saucer, all you need is your favourite china duo & a packet of Renshaw Flower & Modelling Paste (250g).
Uploaded by Kayleigh McDonough
Skill Level
Experienced
makes
1
Decorating ingredients
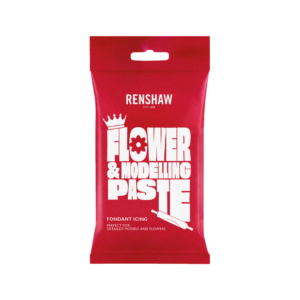
- 250 g Renshaw White Flower & Modelling Paste
- Corn starch
- Gum Tragacanth
- Cocoa butter
- Powder food colours
Renshaw products used
Email this recipe
Instructions
Preparation:
Step 1
Prepare your tools: 250g Renshaw White Flower & Modelling Paste, china cup and saucer, small rolling pin and clean dry surface, corn starch, small craft knife (or sharp kitchen knife), Gum Tragacanth, fine paint brushes, cocoa butter, powder food colours, small pieces of foam (for drying and support), dress makers tape measure, large ball tool.
Step 2
Make sure your china duo is clean and thoroughly dried. We don’t want any sticky business when you come to remove your sugar paste cup! Take the pack of flower paste and warm by manipulating in your hands, add a pinch of Gum Trag (not too much though or you will end up with strange pleats of powder in it). Once you are happy it’s nice and pliable, place in a plastic bag to rest for about 5-10 mins.
Step 3
Whilst you are waiting (ah you thought you would have a rest? No time for that), using your tape measure, measure the inside of the top rim of the cup, the bottom rim and the height. Draw this out on a piece of card to form a template, slightly curve your line between the top corners and between the bottom corners (don’t panic, it’s just a guide, you can always tweak as you go). The shape should be rainbow like.
Making the saucer:
Step 4
Roll out half the softened flower paste in to a circle until it is approx. 2-3mm in thickness and just larger than your saucer.
Step 5
Dust the saucer with corn starch then with the saucer the right way up, place your rolled out paste on to it. With your finger gently smooth the paste in to the centre following the circular line to form the centre of your saucer. Then smooth outwards gently, not too hard or your flower paste will stretch. Run your finger firmly around the outer edge, following the shape of your saucer.
Step 6
Pick up the saucer carefully and using the craft knife, cut away any excess paste. Like you would when making apple pie (Ummm distracted now), I like to run my finger around the edge again just to make sure it’s nice and smooth.
Step 7
Place the saucer where it will not be disturbed to dry – I like to leave them for about 1 week to ensure it is totally dry and free from any moisture. You could use a de-humidifier to speed up the process.
Making the tea cup:
Step 8
Roll out the rest of the flower paste to the same thickness, place the template you made on & carefully cut around it.
Step 9
Sprinkle the inside of the cup with corn starch. Remove the excess paste and place the cut piece inside the cup. It’s a little bit fiddly but take it nice and slow. Line the open ends up to form a seam where your cup will join the handle. Once lined up and you are happy, dampen one side of the seam & place the other just slightly over it. Be careful not to form a ridge. (Remember it’s a delicate piece of china we are imitating not a truckers mug!) Smooth the inside of the formed tea cup & repeat the cutting of the top edge as you did with the saucer. Remember to follow the shape of the edges especially if you are using a scalloped cup/saucer.
Step 10
Cut a small circle of flower paste slightly bigger than the hole in the centre, dampen the edges and put in place. Smooth all edges one more time with your finger and set side to dry with the saucer.
Making the handle:
Step 11
Roll out a length of flower paste in to a sausage shape, 1 and a half times the depth of your tea cup and approx. the thickness of a pen (10mm). Very gently roll your pin across it to flatten slightly. Cut the ends to make sure they are nice and neat.
Step 12
Place it on its edge and tease the ends in to a scroll shape to replicate the handle. The top of the handle should be slightly more curved than the bottom. Offer it up to the side of the cup and tweak into the shape of handle you would like. Again set this aside to dry thoroughly (I usually lay this on a foam sheet).
Making the base:
Step 13
Cut a circle of flower paste 1cm wider than the base of your cup centre and 15mm thick. Using a ball tool work around the outside to push the side in at an angle to form a tapered finish. Place with the handle to air dry.
Step 14
Drying note - About half way through the week gently tip the cup out and turn upside down on to the foam sheet to complete the drying process, then do the same with the saucer.
Assembly:
Step 15
Use the smallest amount of water to adhere the base to the cup. Use 2 small flattened balls of flower paste to adhere the handle to the side of the cup (use the smallest amount of edible glue for this too) then leave to dry overnight. You may need to support it with some foam whilst it dries. I bet your getting quite excited now!
 then leave to dry overnight. You may need to support it with some foam whilst it dries. I bet your getting quite excited now!")
The finishing touches:
Step 16
Now that all the pieces are totally dry we can begin the finishing touches. First, use a dry cotton wool ball to dust away any excess corn starch.
Step 17
Warm a few drops of cocoa butter on a saucer over a bowl of hot water. Choose your colours and blend with the butter. Remember a little goes a very long way. Then paint away your design. It may be good to try your design out on a sheet of paper first.

Step 18
Use a gold edible paint along the rim and edge of the saucer to give a real look of gilded class.

Step 19
Tutorial created by Natalie @ www.sweetdevotion.co.uk This tea cup and saucer made up part of the decoration on a wedding cake.