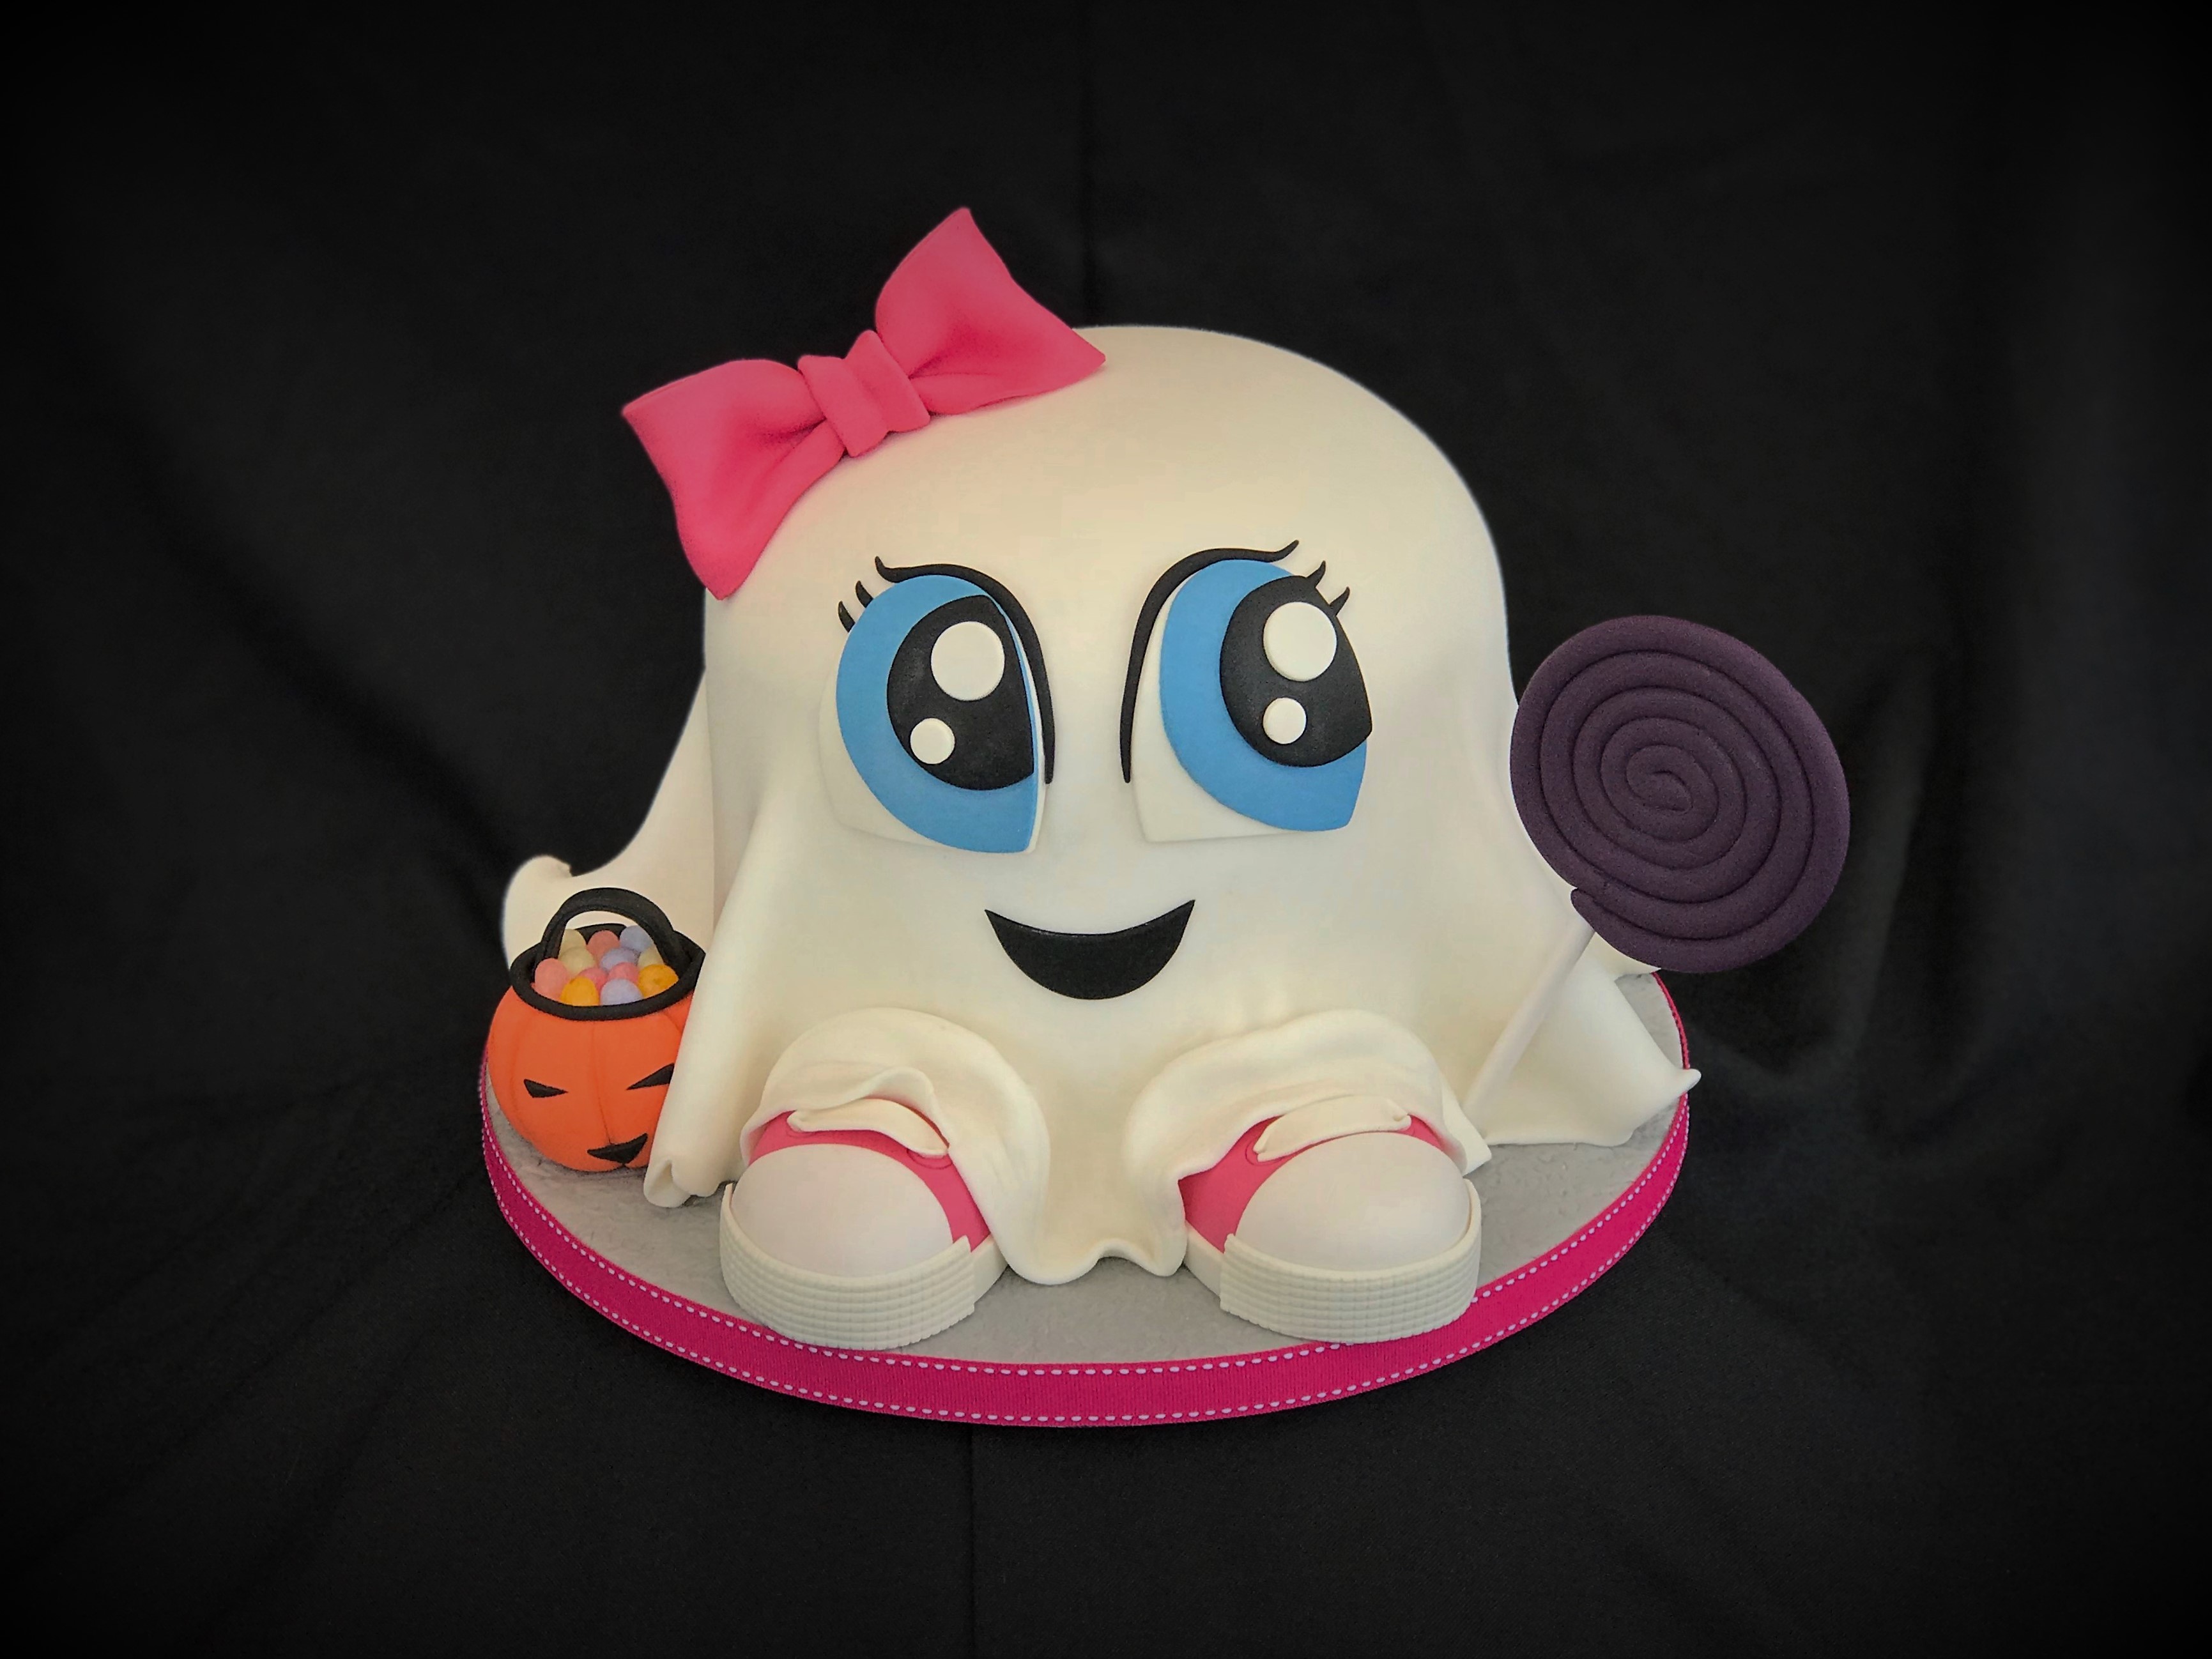
‘Trixie Treat’ Ghost Cake by Rob Baker-Gall
Rob Baker-Gall is the mastermind behind Mr Baker’s Cakes – an award-winning hobby and passion project that keeps him sane alongside a very demanding full-time career as a primary school teacher.
In the four years since he exploded on to the cake scene, Rob has become well-known for his fun-packed sculpted cakes, with multiple appearances in both print media and on television, and he loves that his passion for all-things-sugar is able to bring joy to so many.
Rob also runs the hugely successful Mr Baker’s Blog – one of the UK’s top-rated baking and caking blogs and the home of his weekly online magazine, Something Sweet. His blend of topical articles and posts, recipes, tutorials and interviews with some of the most recognisable faces in cake have made Rob’s blog an essential resource for any caker and he is passionate about sharing and celebrating the incredible talents out there in the world of cake.
He loves any holiday that gives him an opportunity to create a new and exciting cake for his family and friends, and that is particularly true of Halloween. It is the one holiday where there really are no rules or traditions to abide by and that means true freedom when planning a special bake.
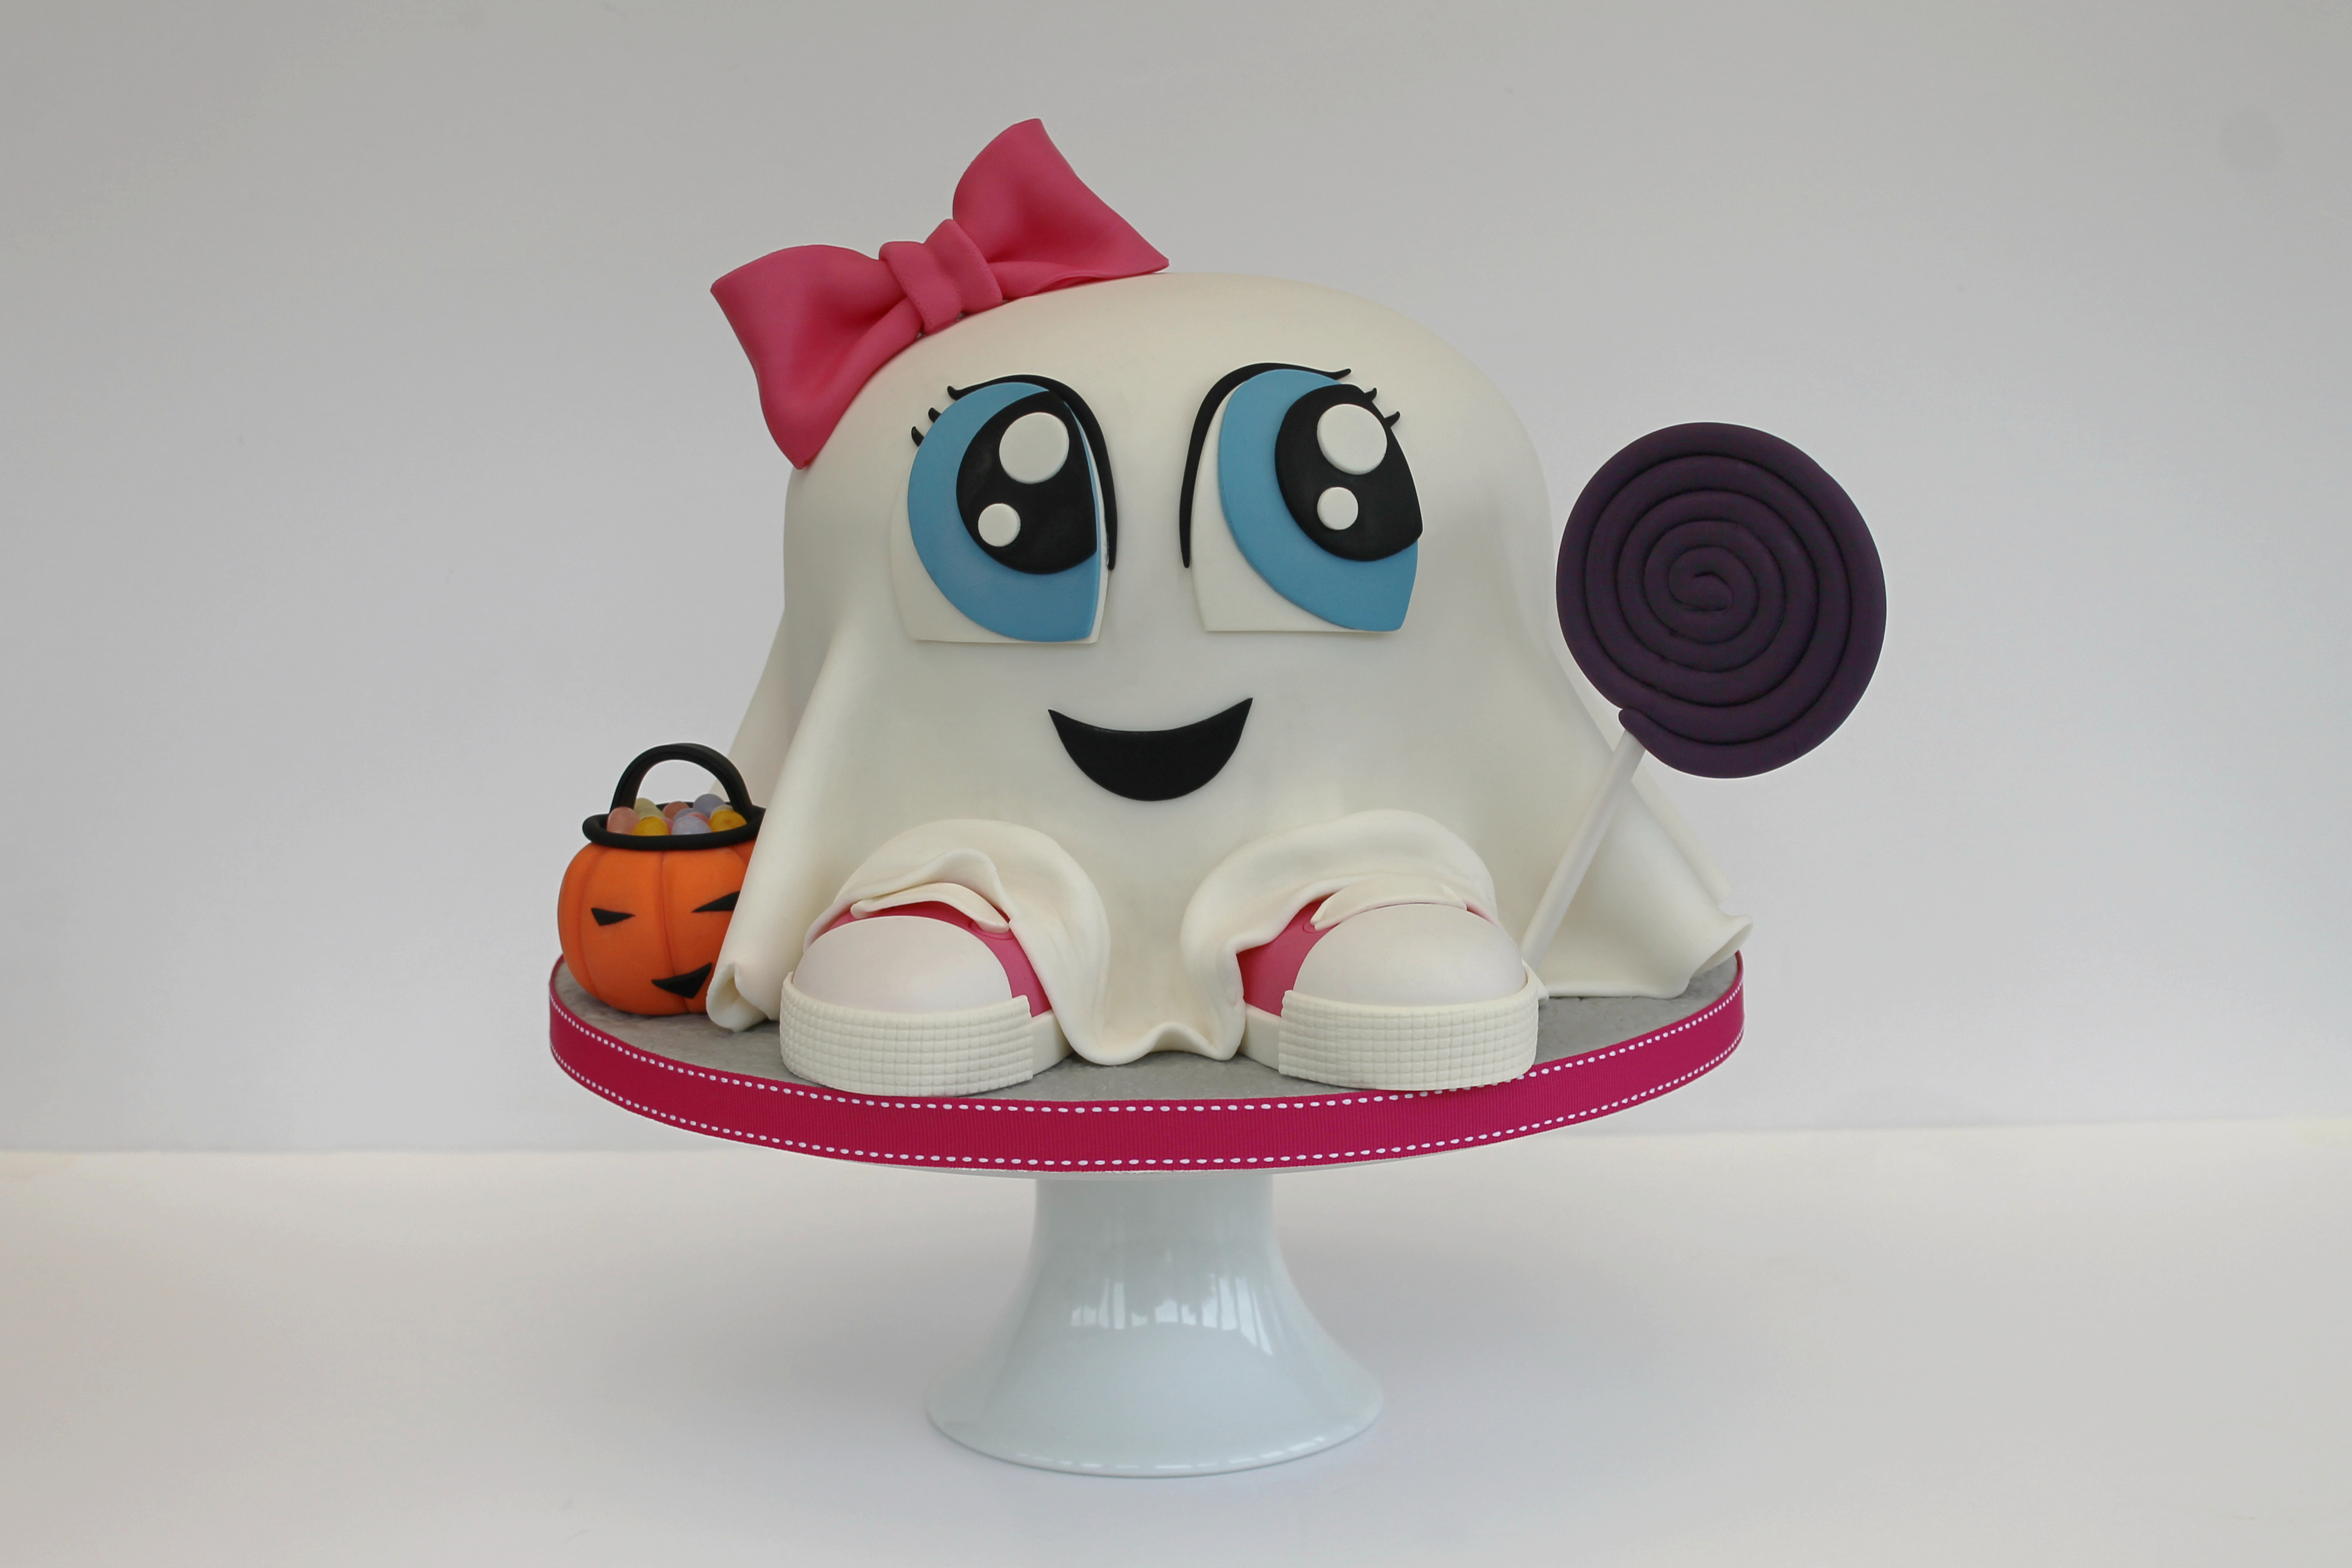
Rob’s latest creation, Trixie Treat is not only an adorably cute centrepiece for your family celebration this Halloween, she is also deceptively simple to make. Read on to find out more.
Uploaded by Kayleigh McDonough
Decorating ingredients
- 3 x 7" cakes
- Buttercream (Rob used a ratio of two parts icing sugar to one part butter)
- 2 x 1kg Renshaw Extra Ready to Roll Icing
- 2 x 180g Renshaw Modelling Paste
- 1 x 250g Renshaw Flower & Modelling Paste in Black
- Rainbow Dust ProGel Grey
- Rainbow Dust ProGel Pink
- Rainbow Dust ProGel Tangerine
- Rainbow Dust ProGel Purple
- Rainbow Dust ProGel Baby Blue
Renshaw products used
Email this recipe
Instructions
Prepare your equipment:
Step 1
You will need: 12” cake board, 1m pink ribbon, Skewer, A hollow plastic dowel or straw, Palette knife, Edge Scraper, Flexi smoother, Cake smoother, Craft knife, Sharp kitchen knife, Dresden tool, Small ball tool, Ribbon cutter, Nested set of circle cutters, Set of circle plunger cutters, Rolling pin, Tin foil, Non-slip matting, Bradawl, Cornflour dusting pouch
Covering the board:
Step 2
Begin by colouring 500g of your Renshaw Extra Ready to Roll Icing with the Rainbow Dust ProGel grey gel colour.

Step 3
Lightly spray or brush cooled, boiled water on to your cake board, before rolling out the grey sugarpaste to 3-5mm thick and using it to cover the board.

Step 4
Scrunch up some kitchen foil into a ball and use this to impress texture into the sugarpaste. This should give you the effect of tarmac.

Step 5
Use the kitchen knife to trim the excess icing around the edge of the board using only a downward motion and regularly cleaning the knife to avoid any dragging or tearing.


Step 7
Colour the remaining 500g of your first packet of Renshaw Extra Ready to Roll Icing using the Rainbow Dust ProGel pink gel colour.

Step 8
Roll the pink sugarpaste into a sausage shape, before flattening the top and sides with your cake smoother.

Step 9
Using the kitchen knife, cut the flattened sausage in half to create the approximate shape of two shoes.


Step 11
Take around 120g of Renshaw Modelling Paste and colour this with the Rainbow Dust ProGel tangerine gel colour.


Step 13
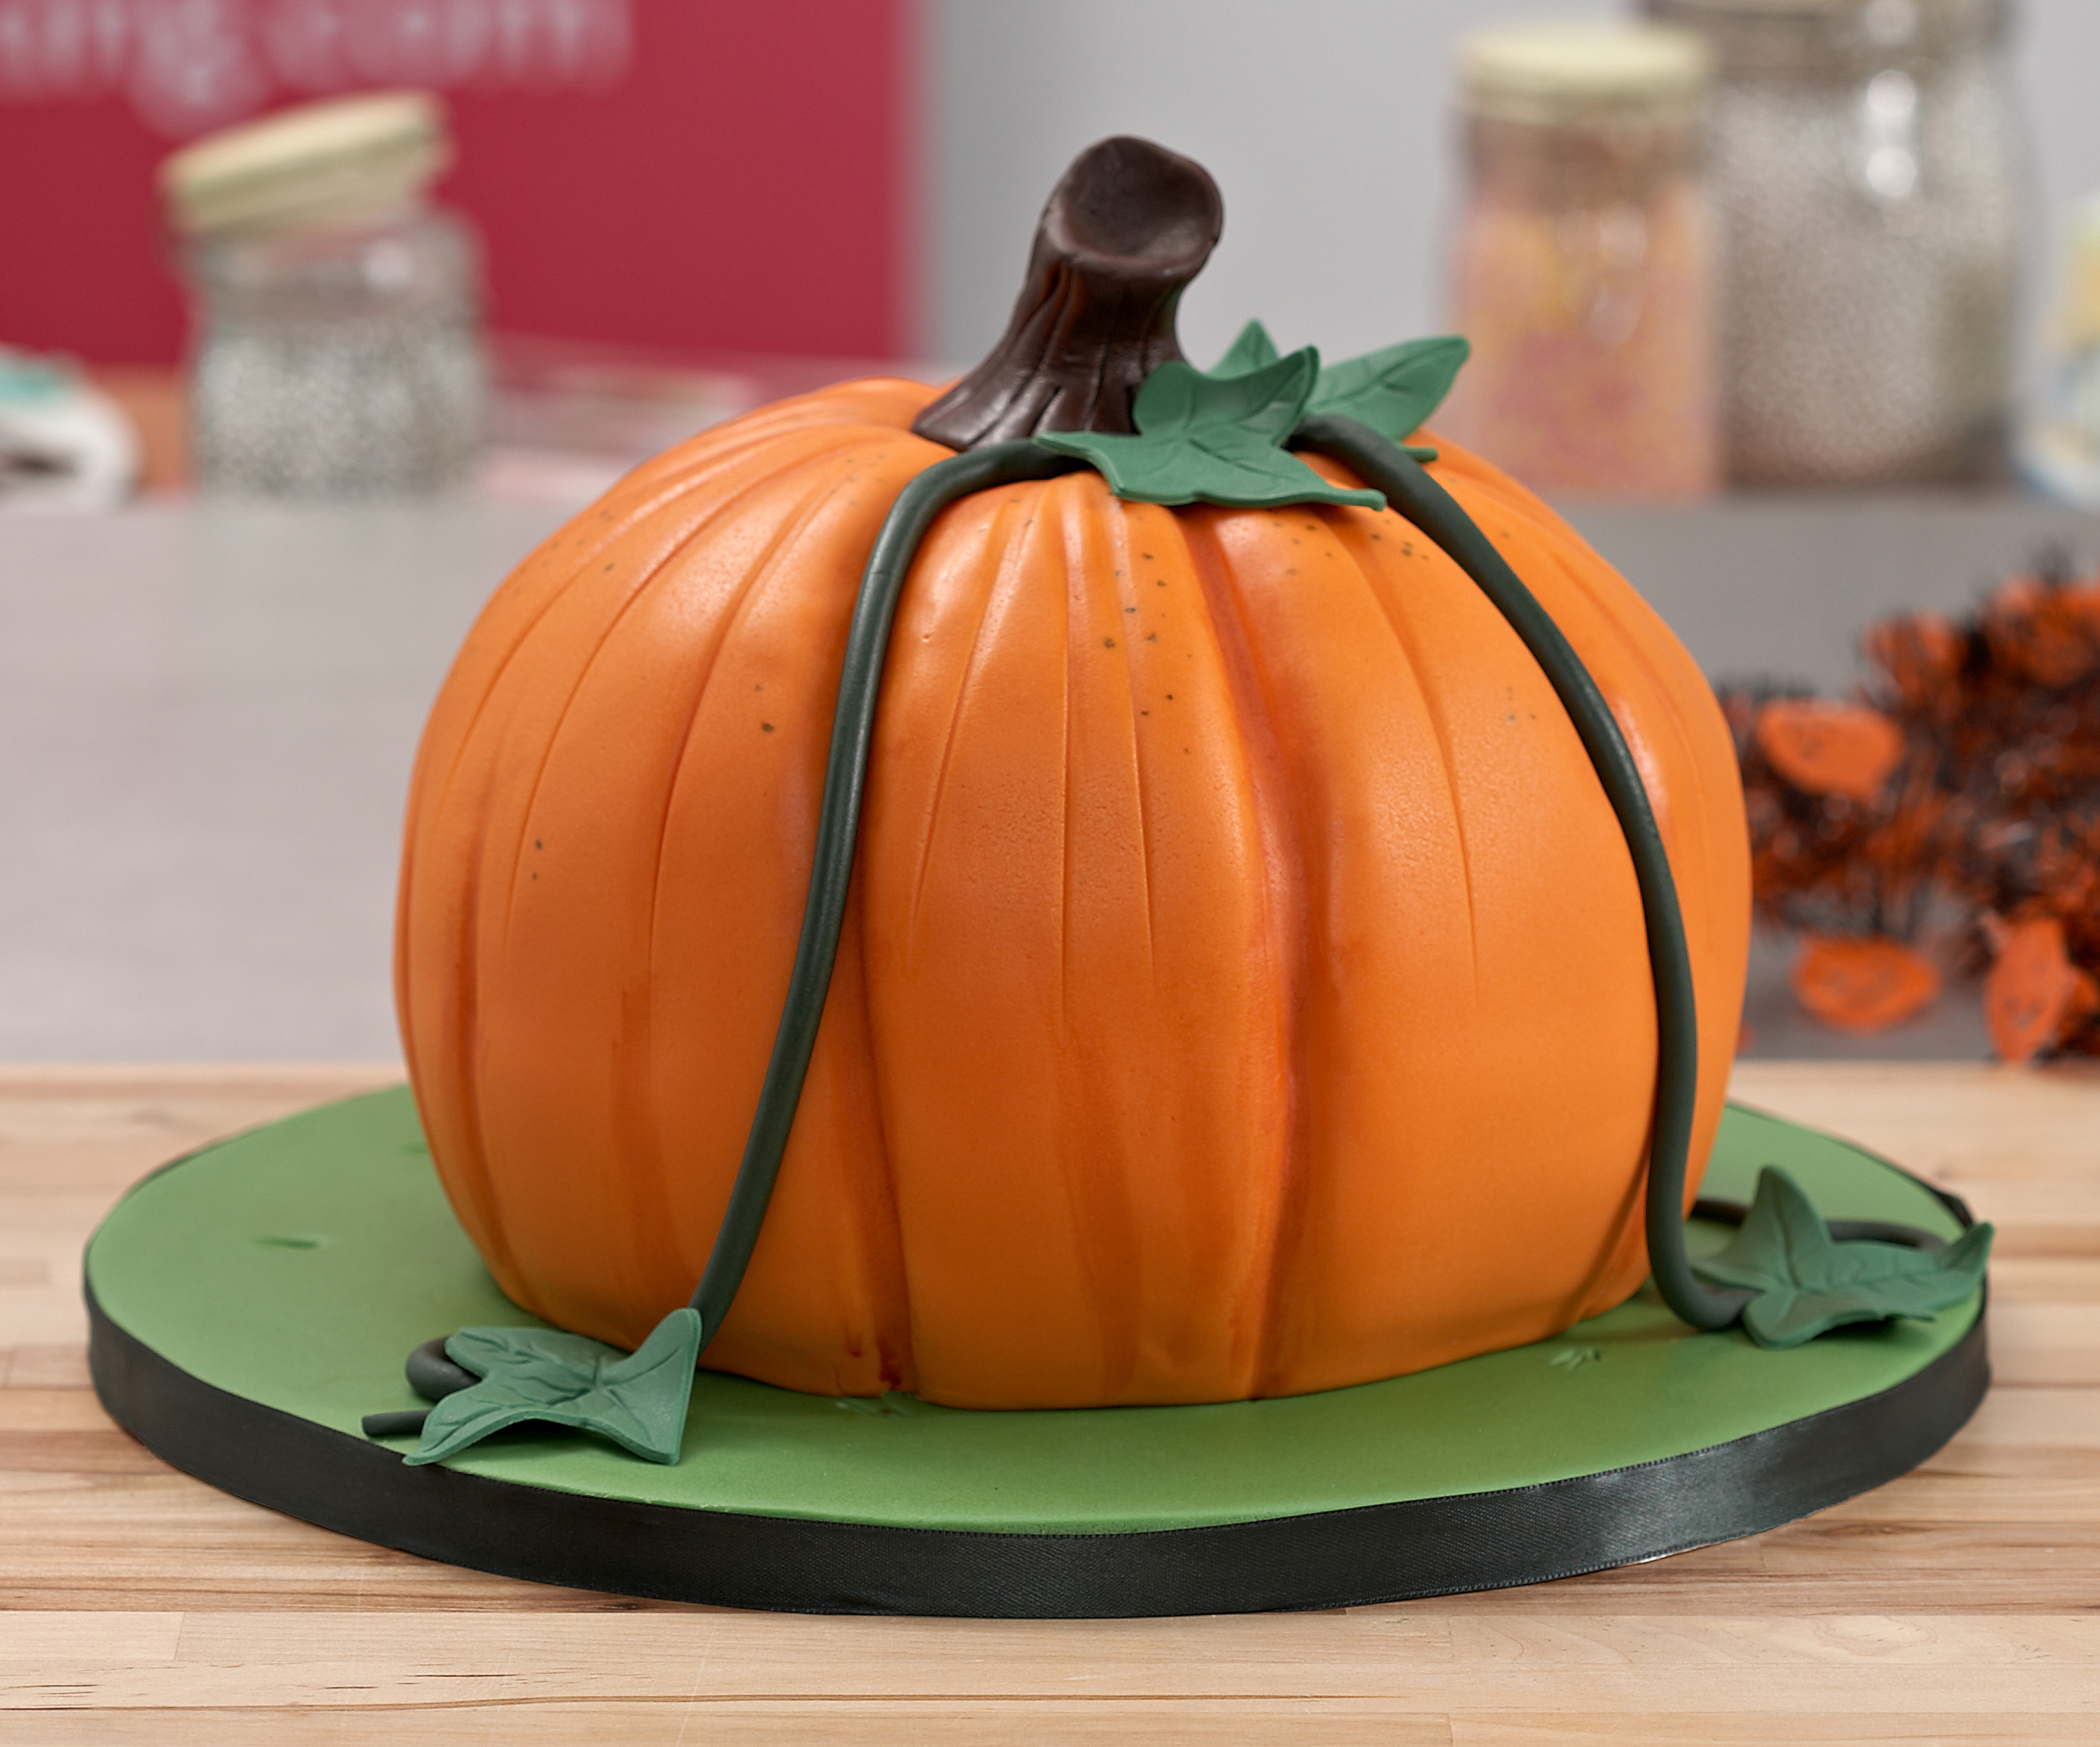
Using the dresden tool, gouge lines into the sides of the flattened ball to create the characteristic shape of a pumpkin.

Step 14
Try to resist the temptation of making these too neat and tidy as real pumpkins are neither perfect or even. Once happy with the shape of your pumpkin, set this aside to begin to dry.

Step 15
Take your three layers of cake. Neatly trim the tops, before filling them with generous layers of buttercream. It is best when you are starting to carve cakes to avoid using jam as this can make your cake less stable – of course, once you are more confident, you may wish to experiment with other fillings too.

Step 16
Place the assembled cake into the refrigerator to chill the buttercream for around 30 minutes.

Step 17
Next, we are going to create some of the more recognisable details of the Converse-style shoes. Start by taking the remaining 60g of Renshaw Modelling Paste from your first packet and roll it out into a long strip.

Step 18
Split this in half lengthways using a craft knife or your kitchen knife, setting one half aside.

Step 19
The strip around the front of a pair of converse has a textured finish. To replicate this, I used some non-slip matting. Lay it over the modelling paste and press down using your cake smoother. Note: if you do not have access to non-slip matting, you can use your Dresden tool to impress the pattern by hand instead.

Step 20
Use the ribbon cutter to cut a 15mm-wide strip out of the textured modelling paste and then slice two 90mm lengths from this. Cut a 10mm-wide strip out of the remaining non-textured modelling paste and set all of these aside.

Step 21
Open your second packet of Renshaw Extra Ready to Roll Icing and take out a small amount. Roll this out thinly and cut two circles using an 8cm circle cutter.

Step 22
Using cooled, boiled water, stick the circles on to the front of the shoes, trimming off the excess.

Step 23
Glue lengths of the non-textured strips onto the sides of the shoes – stopping where it meets the circles at the front.

Step 24
Use your textured strips to wrap the front of the shoes- just overlapping onto the ends of the side strips.

Step 25
Use your circular plunger cutter to impress the outline of four eyelets into the top of each of the shoes, before punching a hole through the centre of these with a small ball tool.

Step 26
Reroll the remaining white modelling paste, slicing thin strips to represent the shoelaces. Fold the ends of the strips and attach these to the centre of the eyelets using cool boiled water or a little edible glue.

Step 27
Set the shoes aside to dry and retrieve the cake from the refrigerator – it’s time to carve!

Step 28
In the interests of keeping this cake simple, we will only be carving the top layer of cake today and the easiest way to do this accurately is to use a turntable or lazy Susan, regularly turning the cake to check that your carving is regular and equal. Start by slicing off the sharp edge at the top of the cake at a 45° angle. Note: As the cake has been chilled in the fridge, it shouldn’t be too crumbly, but if you find this is the case, you can place it in the freezer for around 30 minutes to chill it even more.

Step 29
Working your way out from the centre of the top of the cake, begin to curve your cuts down until you reach the first layer of buttercream. Do not panic if you feel like you have removed too much - contrary to what lots of tutorials will tell you, do not panic if you slice too much off of the cake, you CAN glue cake back on using buttercream if need be!

Step 30
When you are happy with your carved hemisphere, use your buttercream to apply a thin crumb coat to your cake. To neaten this up, a flexi smoother is perfect for removing any excess as you can bend it to match the curve of your cake.

Step 31
Return the cake to the refrigerator and take out approximately 50g of Renshaw Modelling Paste from the second packet and colour this using the Rainbow Dust ProGel pink gel colour.


Step 33
Apply a small amount of cooled, boiled water or edible glue to the centre of the strip and then loosely fold the ends to meet in the middle.

Step 34
Flip this over from the seam is at the back and then concertina fold the centre of the bow.

Step 35
Make a smaller rectangle of pink paste and fold the long sides into the centre to hide the cut edges. Brush with a little cooled, boiled water or edible glue and then wrap this around the centre of the bow, again hiding the seam at the back.

Step 36
Because Renshaw Modelling Paste is so fabulous, you should be able to stand this up straightaway. Position your bow on an upturned bowl or other similarly curved surface and set this aside to begin drying while we turn our attention to the facial details.

Step 37
Using some more of your Renshaw Modelling Paste (another 50g should be fine), roll this out as thinly as you can – no more than 1-2mm. Take your 8cm circle cutter and cut two circles of paste.
, roll this out as thinly as you can – no more than 1-2mm. Take your 8cm circle cutter and cut two circles of paste.")
Step 38
Offset the cutter and make a second cut, so that you are left with an oval shape 60mm across.

Step 39
Use your craft knife to round off the top sharp points and to cut straight across the bottom removing about 10mm to leave you with a straight edge.

Step 40
Colour your offcuts from the eyes using the Rainbow Dust ProGel baby blue gel colour. Roll the blue paste out as thinly as you can (1-2mm) and cut two more 8cm circles. Repeat this process with the Renshaw Flower & Modelling Paste in Black, cutting two 5cm circles (you can also cut your mouth at this point).
 and cut two more 8cm circles. Repeat this process with the Renshaw Flower & Modelling Paste in Black, cutting two 5cm circles (you can also cut your mouth at this point).")
Step 41
Layer these up, starting with the white flat-bottomed oval, then the blue, then the black. When you are happy with the expression, stick in place with some cooled, boiled water or edible glue and then flip the eyes over to trim the blue and black pastes to match the outline of the white flat-bottomed oval.

Step 42
Finally, cut two small white circles for each eye using your medium and extra-large plunger cutters. Stick in place using some cooled, boiled water or edible glue.

Step 43
Return to the cake and apply a second coat of buttercream, again using a to remove any excess and smooth the surface. Return the cake to the fridge for a quick final chill and retrieve your cake board.

Step 44
Spread a small amount of buttercream in the centre of your textured cake board and then use a cake lifter to transfer the cake on to it. Position the cake slightly back from the centre of the board (use one of the shoes to check that you are happy with the final placement).
.")
Step 45
Roll out your remaining Renshaw Extra Ready to Roll Icing, keeping it as circular as you can. The trick to achieve a perfect circle is to regularly rotate the icing 45° between rolls. Roll, rotate, roll, rotate and so on. Once the paste has reached the desired thickness (around 3-4mm), trim off any untidy parts, before softening the outer edges with the palm of your hands.
, trim off any untidy parts, before softening the outer edges with the palm of your hands.")
Step 46
Lightly spray or brush cooled, boiled water on to your chilled cake, before using a rolling pin to lift the icing and evenly drape it over your cake. Smooth the top to adhere it to the cake, but we want to keep the sides loose to create the effect of a ghost-style costume.

Step 47
Quickly tuck the shoes under the edge of the draped icing, before arranging the draping so that they can just be seen. If you find your shoes are too long, use your kitchen knife to cut off some of the excess.

Step 48
Top tip: To smooth out your icing on an awkward shape, wrap some sugarpaste in cling film. It will mould to the shape you are smoothing and give you a perfect finish!

Step 49
Start adding your decorative elements to the cake, adjusting the drape to make this fit in a pleasing manner. At this point, I decided that I didn’t like the enormous mouth that I had created and so removed this to recut it. Of course, this left a black mark on the sugar paste, but if you ever find yourself in a similar position, use a clean, flat-edged paint brush and a little alcohol (such as vodka) to gently clean away the residue, regularly wiping the colour off onto some kitchen roll or a clean dry cloth.
 to gently clean away the residue, regularly wiping the colour off onto some kitchen roll or a clean dry cloth.")
Step 50
Using cooled, boiled water or edible glue, add the bow to the top of the cake, before taking some more of your Renshaw Flower & Modelling Paste in Black and rolling thin sausages to add eyeliner and eyelashes around the outside of the eyes.

Step 51
While you are working with the black, add eyes, a mouth, a handle and rim to your pumpkin bucket, also topping it with some sweets – I used real jelly beans for a quick and easy, yet realistic finish, but you could also roll small balls of multi-coloured sugarpaste if you’d prefer.

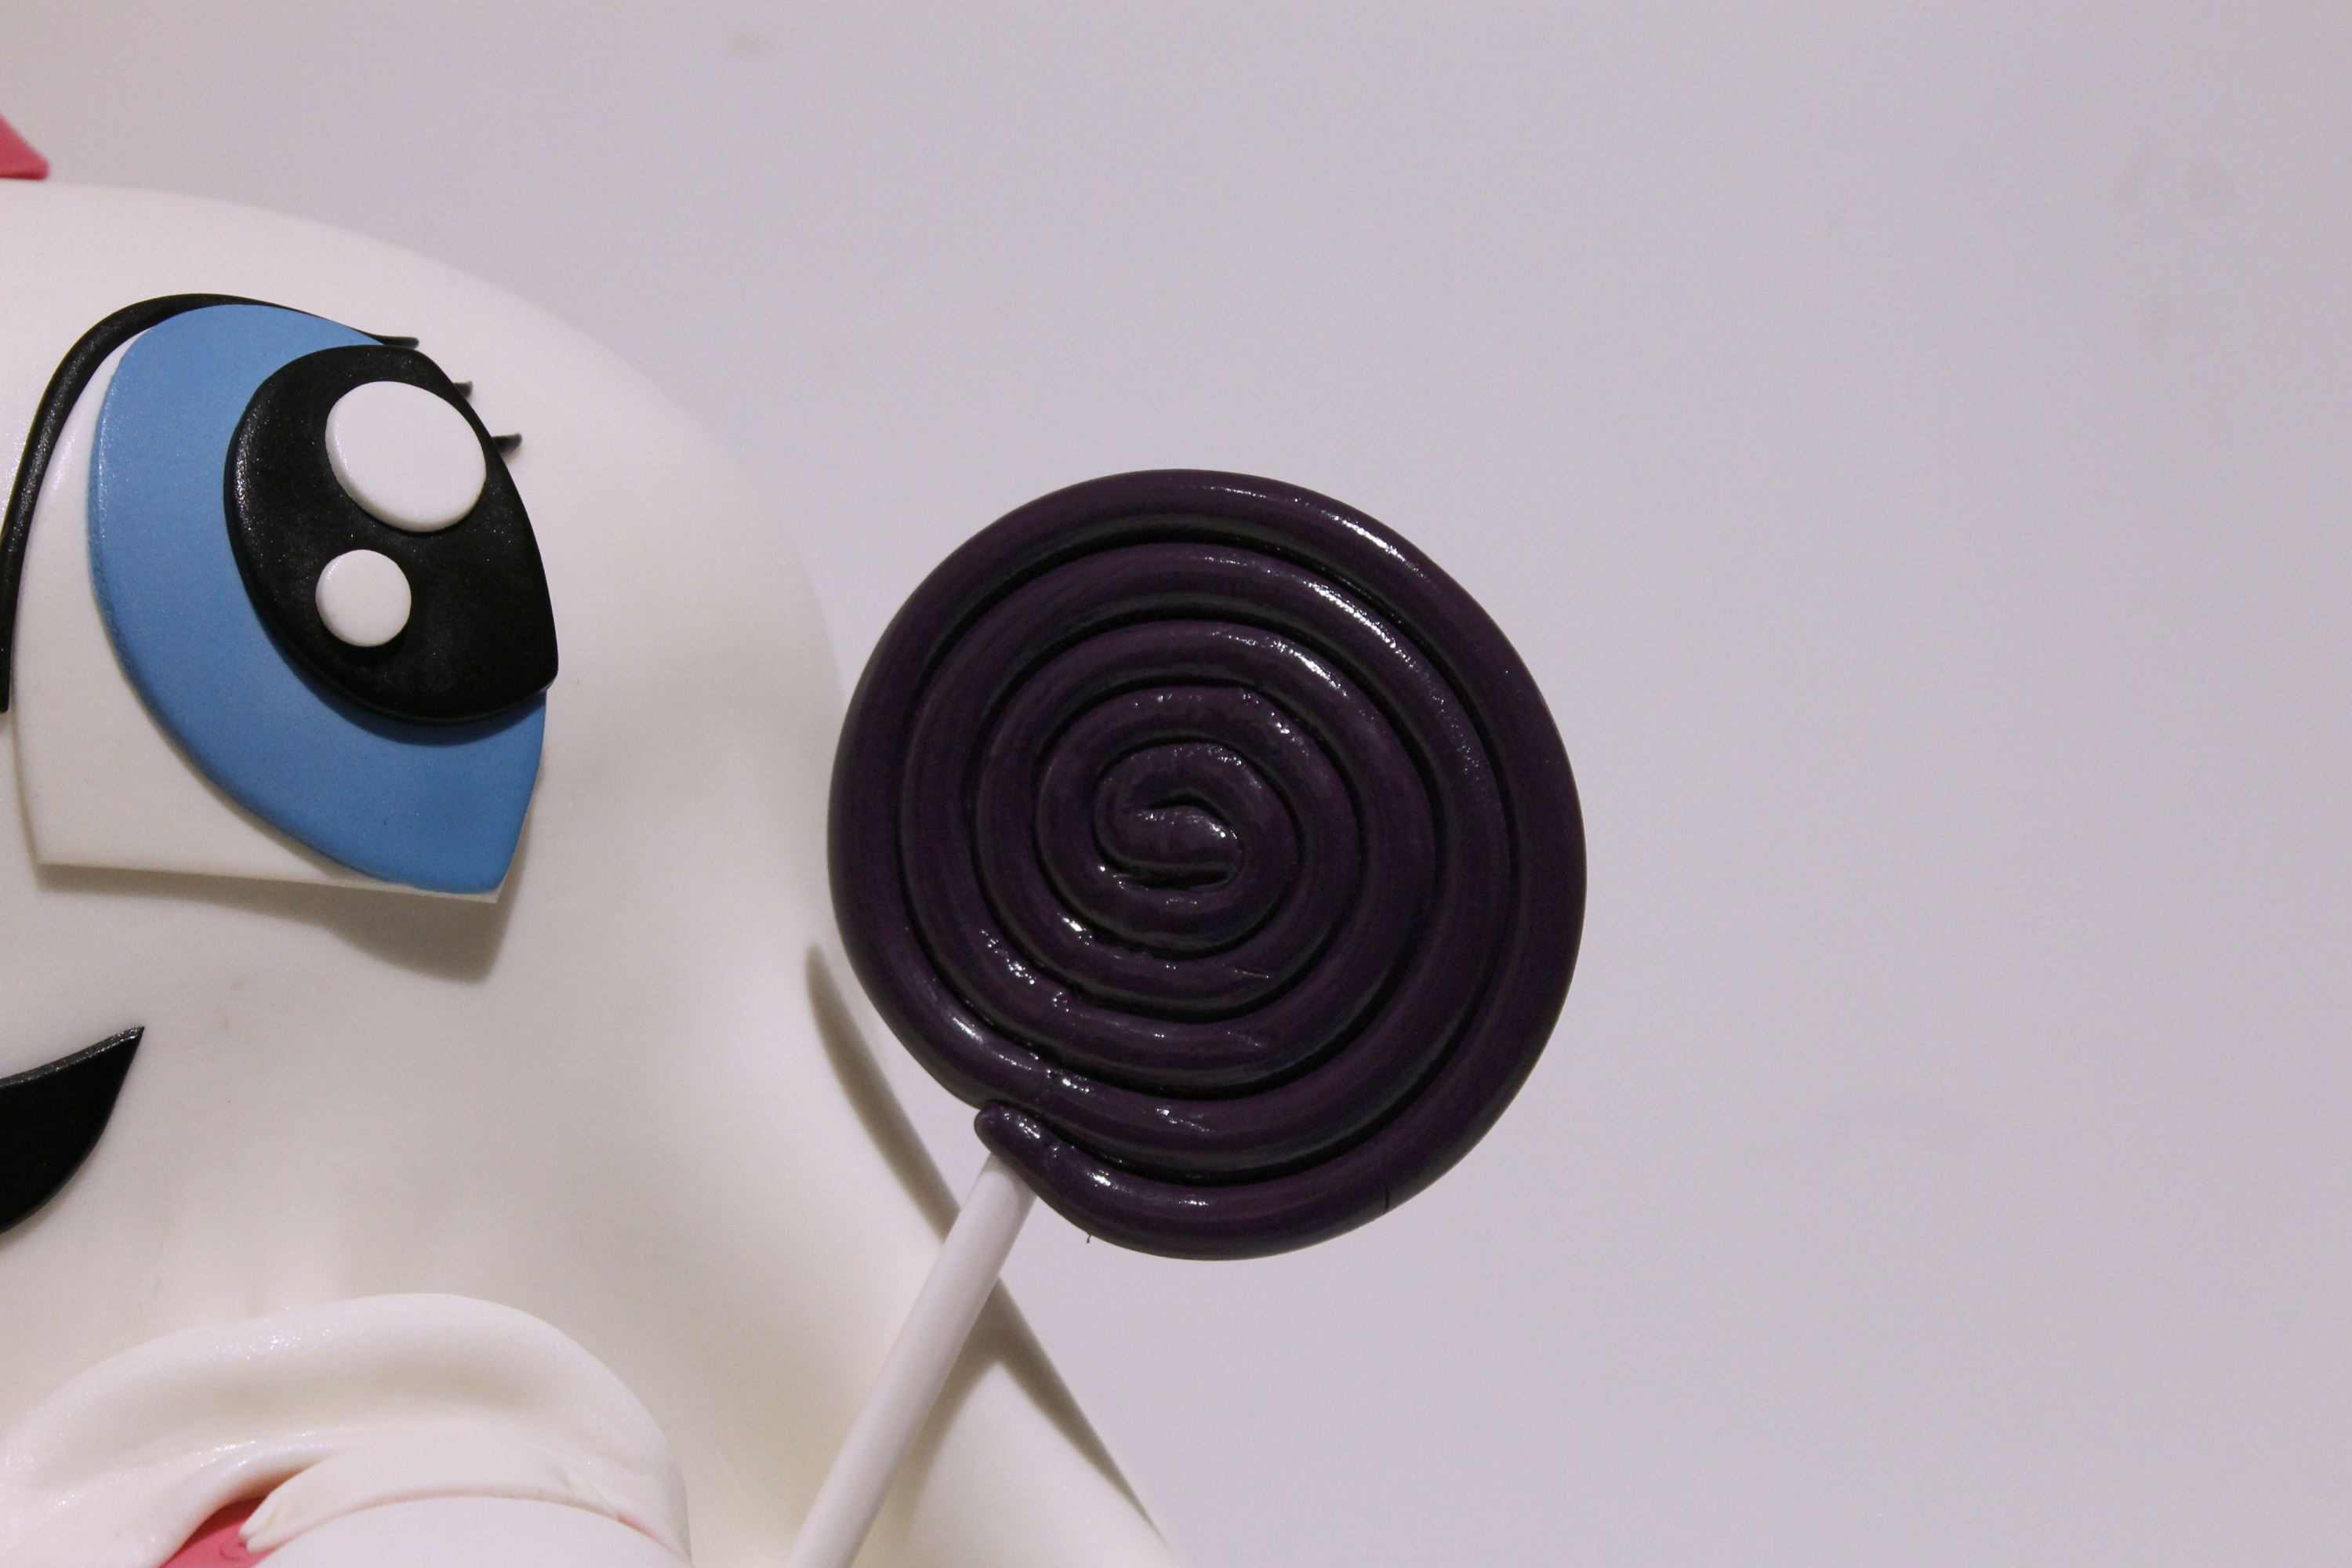
Step 52
Finally, take some Rainbow Dust ProGel purple gel colour and colour the rest of your Renshaw Modelling Paste a nice deep purple to contrast nicely with the bright pinks and blues. Roll this into a long thin sausage and top tip: use a cake smoother to ensure a neat, smooth sausage with no lumps and bumps from your hands.

Step 53
Brush one side with a little cooled, boiled water or edible glue and roll this up like a snail shell. While still soft, slide in a food-safe wooden skewer brushed with more cooled, boiled water or edible glue. Leave to set until you are ready to add the lollipop to the cake. To do this, use a sharp tool, such as a bradawl or similar, to punch a hole directly into the cake board. Cut a hollow plastic dowel or a patterned straw to the desired length and trim the lolly’s skewer to match (remember to leave a little extra length on the skewer to go into the board). Push this firmly into the hole created by the bradawl – it should be strong enough to support the weight without the need for glue – however, if transporting the cake, you may wish to add this at the end of your journey.
Step 54
Optional: To remove any traces of cornflour, finger prints or similar, use a cake steamer to steam the cake in its entirety and leave it to dry at room temperature until the shine has gone and the sugarpaste is no longer sticky.
Step 55
And there you have it, your very own Trixie Treat cake – a cute and fabulous addition to your Halloween table.