Baking ingredients
- 675 g unsalted butter - softened
- 675 g caster sugar
- 12 tsp vanilla extract
- 12 large eggs
- 600 g self-raising flour
- 725 g cornflour
- 8 tbsp milk
Decorating ingredients
- 12 tbsp raspberry jam
- 375 g unsalted butter - softened
- 800 g icing sugar
- 5 tbsp milk
- 3 tsp vanilla extract
- 1 kg Renshaw White Ready to Roll Icing
- 200 g Renshaw Grey Ready to Roll Icing
- 500 g Renshaw Turquoise Ready to Roll Icing
- 100 g Renshaw Lincoln Green Ready to Roll Icing
- 250 g Renshaw Flower & Modelling Paste
- 50 g Renshaw Navy Ready to Roll Icing
- 100 g Renshaw Teddy Bear Brown Ready to Roll Icing
- 100 g Renshaw Ruby Red Ready to Roll Icing
- 150 g Renshaw Pearl Blush Ready to Roll Icing
- 250 g Renshaw Jet Black Ready to Roll Icing
- 50 g Renshaw Deep Purple Ready to Roll Icing
- 100 g Renshaw Yellow Ready to Roll Icing
- 50 g Renshaw Baby Pink Ready to Roll Icing
- 50 g Renshaw Celebration Ready to Roll Icing
- 50 g Renshaw Pink Ready to Roll Icing
- Sugarflair Super White, Chestnut, Blue, Black & Red Colour Paste
- Sugarflair Liquorice Food Colour Pen
- White Royal Icing
Renshaw products used

Email this recipe
Instructions
Baking Instructions:
Step 1
Preheat the oven to 180°C / 350°F / gas mark 4.
Step 2
Grease and line two 4 inch round cake tins, two 6 inch round cake tins and two 8 inch round cake tins.
Step 3
In a large bowl, cream the unsalted butter and caster sugar and add two teaspoons of vanilla extract.
Step 4
Add the eggs, one at a time, adding a spoonful of flour between each.
Step 5
Fold in the rest of the self-raising flour and cornflour and when mixed in, add 8-12 tablespoons of milk.
Step 6
Divide the mixture between the four lined cake tins and bake in batches of two for about 25 minutes each until a cake skewer comes out of each cake clean.
Step 7
Leave cakes in their tins on a wire rack for 10 minutes, then turn out on the wire rack and leave to cool completely.
Decorating Instructions:
Step 8
Take one layer of the smaller 4 inch sponge cake, one layer of the medium 6 inch sponge cake and one layer of the larger 8 inch sponge cake and spread the bottom of each with 4 tablespoons of raspberry jam.
Step 9
To make buttercream, put the butter into a mixing bowl and beat until creamy in colour and light in texture. Sift the icing sugar into the bowl and combine, then add 5-6 tablespoons of milk and 3 teaspoons of vanilla extract and beat until smooth.
Step 10
Take half the prepared buttercream and spread on the top of the bottom layer of both the smaller 4 inch, medium 6 inch and larger 8 inch sponge cakes. Place the top layers of sponge on top of the buttercream layers to create three sandwiched Victoria sponges.
Step 11
Mask each of the three sponge cakes with a thin layer of the remaining buttercream.
Step 12
Knead each of the Renshaw White, Grey, Turquoise and Lincoln Green Ready to Roll Icing until pliable before lightly dusting your work surface with icing sugar and rolling out each to the desired thickness.
Step 13
Lift the green icing over a 12 inch cake drum, smoothing down the sides with the palm of your hand. Trim excess icing. To give a sheen to the surface, smooth with the palm of your hand.
Step 14
Lift the white icing over the large 8 inch sponge cake, again smoothing down the sides with the palm of your hand. Trim excess icing. To give a sheen to the surface, smooth with the palm of your hand. Repeat with the grey icing over the medium 6 inch cake, and the turquoise icing over the small 4 inch cake.
Step 15
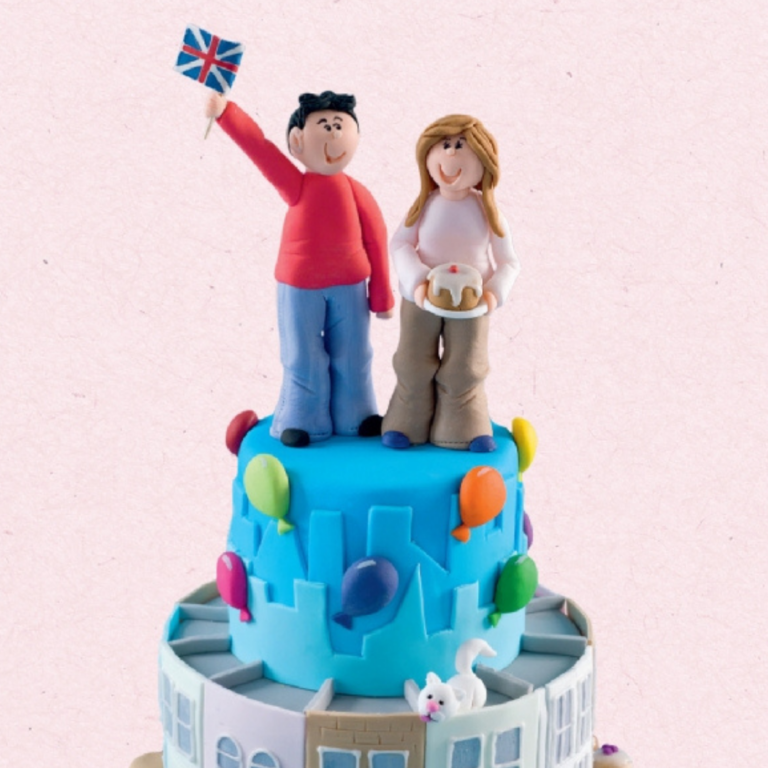
To create the male model's trousers, knead together 40g Renshaw Flower & Modelling Paste with 5g Renshaw Navy Ready to Roll Icing to create a slight marble effect. Roll into a 5.5 inch long sausage, flattening both ends with your fingers. Then fold the sausage in half, pinch to create knees and mark creases with a Dresden tool. Flatten the top of the trousers and mark stitches down each side. Stand up and leave to set. Repeat with 40g flower & modelling paste with 5g Renshaw Teddy Bear Brown Ready to Roll Icing to create the female model's trousers.
Step 16
To create the male model's body, push a spaghetti stick into each leg of trousers. Model 30g Renshaw Ruby Red Ready to Roll Icing into a cone shape. Pinch out the flat edge and check it fits over the trousers. Mark creases with Dresden tool, then wet top of trousers with cooled boiled water and push the top into place over the spaghetti to secure in place. Repeat with 30g flower & modelling paste with 5g white icing to create the female model's body.
Step 17
Stick some spaghetti into the neck of each body to secure the model's heads. Roll 10g Renshaw Pearl Blush Ready to Roll Icing into a ball for each head and shape into an oval. Push thumb gently into the oval to create the contours of face, then add the neck, ears and nose and push the smile into each face with a scallop tool. Push each head gently into the spaghetti. When set, draw on eyes and brows with the Sugarflair Liquorice Food Colour Pen.
Step 18
Use Renshaw Jet Black Ready to Roll Icing to add hair on to the male model and teddy bear brown icing hair for the female. Use the Dresden tool to mark out strands.
Step 19
To create the hand held flag, cut a very thin 1.5 inch x 1 inch rectangle of white icing. Wet the left edge, then put a 4cm cocktail stick onto the damp edge, folding the edge over to secure. When dry, use a drop of Super White, Blue and Red Sugarflair Colour Paste and paint a Union Jack. Leave to dry.
Step 20
For the male's arms, roll a thin 3 inch long sausage of ruby red icing. Cut the sausage in two at an angle. For the male's flag arm, push a stick of spaghetti into the length of the arm to stabilise, wrapping a small ball of flesh icing around the flag stick and securing onto the arm once dry using cooled boiled water.
Step 21
Repeat Step 13 with white icing to create the female's arms, securing in place using cooled boiled water only.
Step 22
For the remaining male hand and female hands, roll two small balls of flesh icing and stick to the end of each arm using cooled boiled water.
Step 23
To create the boy model's torso, use 30g Renshaw Deep Purple Ready to Roll Icing. Bend the body shape up at front, add creases and repeating Step 6, add the arms and hands. Leave to set slightly and make another head as in Step 3, using Renshaw Yellow Ready to Roll Icing for the hair. Secure the head to the body using spaghetti.
Step 24
For the dog, roll out 20g white icing into a ball. Flatten slightly into the work surface with the palm of your hand. Cut off a small section from bottom of the ball shape, then cut two slits into the shape, pulling the two ends down gently whilst rounding and shaping them into the dog's legs and paws. Make a small cone shape for the tail and curve over. Secure the tail with cooled boiled water and create the textured coat using the Dresden tool.
Step 25
Leave the cakes and models overnight to dry to make the cakes easier to stack and models easier to handle.
Step 26
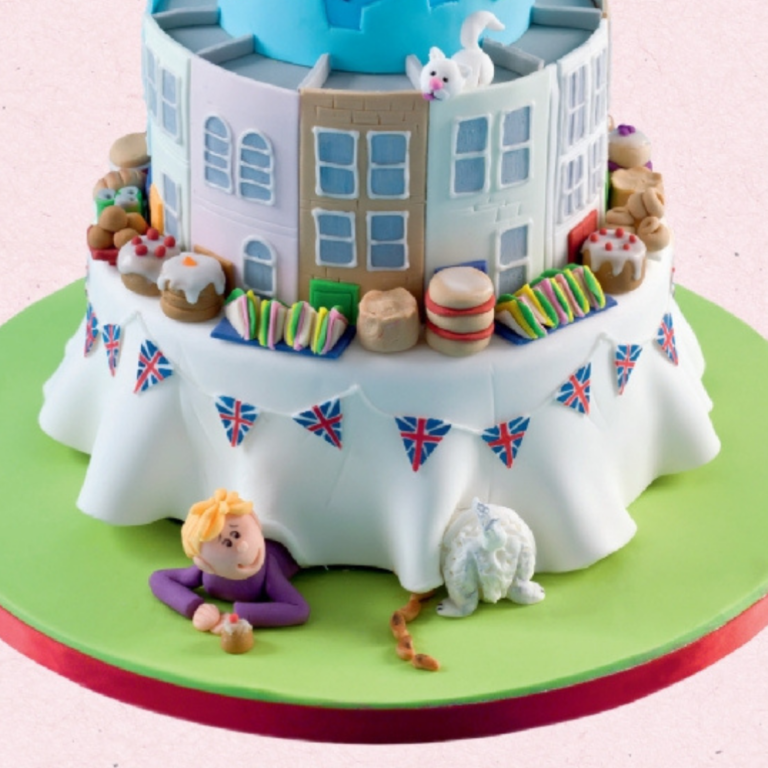
Knead and roll out the jet black icing and cut out a 26 inch x 1 inch strip and roll up gently. Paint cooled boiled water the bottom of the large 8 inch white iced cake and unravel the black icing around the base, securing it as you go. Secure the 8in cake to the iced cake board using royal icing.
Step 27
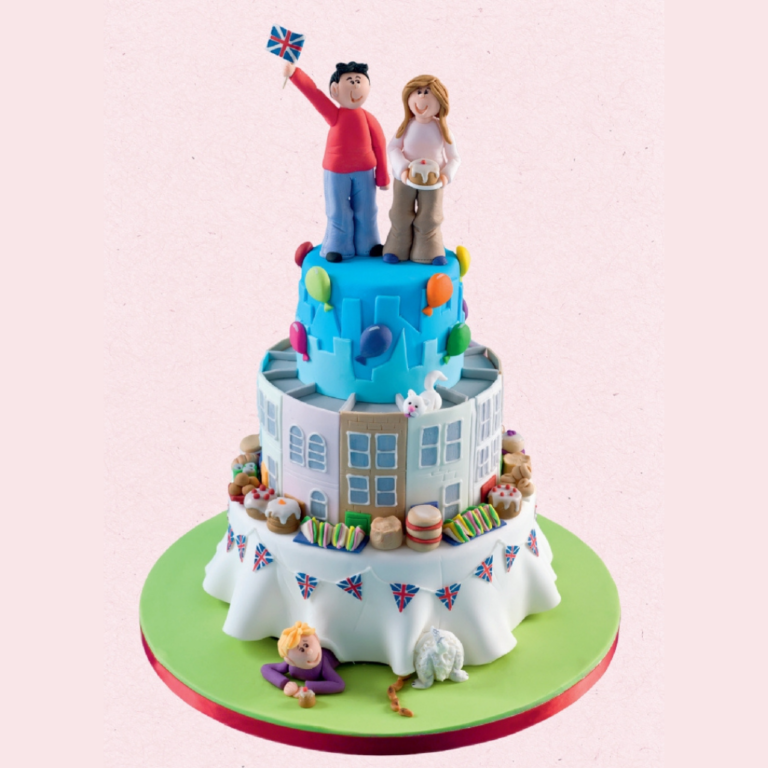
Slightly dampen the top of the large white iced 8 inch cake with cooled boiled water. Knead and roll out the white icing and cut out a 12 inch diameter circle. Working quickly, lift and place the white icing over the cake, smoothing the top to push out any air bubbles and leaving the sides loose to create the tablecloth effect. Score a few pleats and creases into the icing tablecloth using a Dresden tool and whilst pliabl, push the boy model's torso under the cloth so head is popping out and the same with the dog's bottom.
Step 28
Using together Renshaw Grey, Baby Pink and Teddy Bear Brown Ready to Roll Icing, cut out 2.5 inch x 3.5 inch rectangles for base of houses. Score in windows with sharp knife. Paint windows using Black, Super White and Blue Sugarflair Colour Paste. Cut out small rectangles using a range of bright and bold sugarpaste colours to create doors and secure to each house shape using cooled boiled water. Stick each icing house to the side of the medium grey iced 6 inch cake as you complete each whilst still pliable. Pipe window frames around each window using white royal icing.
Step 29
Mix together Renshaw White and Turquoise Ready to Roll Icing to create a slightly diluted turquoise blue. Roll out a 14 inch x 2.5 inch strip and using a sharp knife create a cityscape silhouette by randomly cutting out shapes to create tops of buildings, church steeples and sky scrapers. Stick to the small turquoise iced 4 inch cake using cooled boiled water.
Step 30
Repeat Step 13 with a further diluted 14 inch x 1.5 inch strip and layer over the darker, taller cityscape, sticking in place using cooled boiled water.
Step 31
Evenly space and insert four pieces of plastic cake dowelling into the centre of the large white iced and decorated 8 inch cake, ensuring that the medium grey iced and decorated 6 inch cake will cover the dowels when placed on top. Trim the dowels to the same height as the larger white iced and decorated 8 inch cake using wire cutters or strong scissors, and place on top, securing in place with royal icing. Repeat to place the small turquoise iced and decorated 4 inch cake on top of the medium grey iced and decorated 6 inch cake.
Step 32
Knead and roll five very small sausage shapes between the fingers using teddy bear brown icing. Paint with Chestnut Sugarflair Colour Paste. Paint a few stripes of Black Sugarflair Colour Paste onto each sausage to give barbequed effect. Stick close to the dog model at the base of the cake, trailing out from under the white icing tablecloth, using cooled boiled water.
Step 33
Knead, roll out and cut thirty small triangles of white icing. Paint a Union Jack design onto each using a drop of Super White, Blue and Red Sugarflair Colour Paste. Once the bunting triangles have dried, pipe the cord of the bunting round the large white iced 8 inch cake using white royal icing, securing each bunting flag in place as you go by placing the top of triangle into the royal icing.
Step 34
Roll 8g of teddy bear brown icing into a ball, squashing into the work surface to create the shape of a cake. Dribble running royal icing over the top and using various colours of small balls of icing, decorate the top of each miniature cake to look like berries, lemon and orange segments.
Step 35
To make the sandwiches, cut out two small squares of Renshaw Celebration Ready to Roll Icing, one square of Renshaw Pink Ready to Roll Icing and one slightly larger square of yellow icing, plus a small ball of Lincoln green icing squashed between the fingers and fashioned into random shape to depict a lettuce leaf. Pile together, cut in half and line up on a rectangle plate made with navy icing.
Step 36
To make the buns, roll small balls of teddy bear brown icing between the fingers, flattening the bottom slightly. Cut out a square of ruby red icing and a smaller thicker square of red icing as the base of plate. Stick together using cooled boiled water and pile four buns on to each plate.
Step 37
To create drinks cans, roll out a thin sausage of grey icing, cut into small sections. Roll out very thin strip of lincoln green icing, and lying a section of the grey sausage on the green icing strip, cut to size. Wet the green strip and roll around the grey section, cutting off the excess and neatening up by rolling the whole shape between the fingers. Press the Dresden tool into the top to create an opening in the can. Stick three together using cooled boiled water.
Step 38
Stick the cakes, sandwiches, buns and cans to the top edge of the large white iced 8 inch cake using royal icing to secure in place.
Step 39
Add vertically positioned strips of grey icing around the top edge of 6in cake up to the base of the 4 inch cake where each house meets to create a rooftop effect, securing each strip in place using cooled boiled water.
Step 40
To make the cat, roll 10g of white icing into a teardrop shape. Score each side to create back legs. Roll out a small amount of white icing into another teardrop, lengthen slightly and bend into a tail. Make back paws with small balls of white icing and score two lines in each. Roll a ball 5g of white icing for the head and make a small half circle for mouth area. Score an upside down Y for mouth, then add a small nose and tongue made from pink icing. Out of the white icing, make two small triangles for ears.
Step 41
Secure the cat's tail and feet to the body, then the wet bottom of the body to secure to the grey rooftops on the middle tier of the cake. Once in place assemble the cat's head and secure to the body of the cat.
Step 42
Roll 5g teardrop shapes of brightly coloured ready to roll icing, flattening the back of each shape onto the work surface. Cut out small triangles in the same colour as the bottom of the balloon. Paint a reflection onto each balloon with a small amount of Super White mixed with Blue Sugarflair Colour Paste. Secure each balloon randomly around the small turquoise iced 4 inch cake with cooled boiled water.
Step 43
Add your male and female model to the top of the cake, securing them in place with a spot of royal icing under each leg. Once in place, add small half ball shapes of jet black icing as the model's shoes and secure a modelled cake in the hands of the female using royal icing as glue.
Step 44
Secure a red ribbon around the cake drum with royal icing.