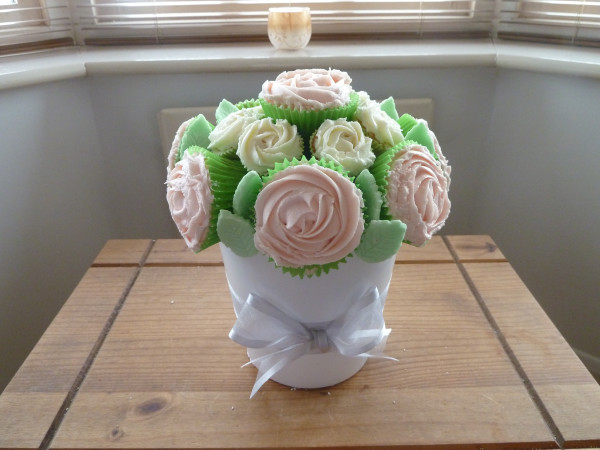
Pink and Cream Wedding Cupcake Bouquet
This is a recipe for a cupcake bouquet which would look perfect as a wedding centre piece on guests tables for them to tuck into!
Recipe by Katrina Richards
Uploaded by Katrina Richards
Time to make
Skill Level
Easy
Serves
8 people
Baking ingredients
- 140 g Plain Flour
- 140 g Caster Sugar
- 1.5 tsp Baking Powder
- 1 pinch Salt
- 40 g Unsalted Butter (Softened)
- 100 ml Whole Milk
- 1 Egg (Medium)
- 0.5 Teaspoon Vanilla Extract
Decorating ingredients
- 100 g Unsalted Butter (Softened)
- 300 g Icing Sugar
- 1 tsp Vanilla Extract
- 3 tbsp Whole Milk
- Pink Food Colouring Paste
- 250 g Renshaw Ready to Roll Icing (Pastel Green)
- 1 Leaf Shaped Icing Cutter
- 1 Ribbon
- 1 Polystyrene Ball
- 35 Cocktail Sticks
- 8 Green Cupcake Cases
- 8 Mini Cupcake Cases
- 1 Green Tissue Paper
- 2 Piping Bag
- 1 Piping Nozzle
- 1 Rolling Pin
Renshaw products used
Email this recipe
Instructions
To make the cupcakes:
Step 1
Preheat your oven to 170°C (Gas 3). Put the plain flour, caster sugar, baking powder, salt and unsalted butter in an electric mixer and beat slowly until you end up with a grainy mixture. Add the whole milk, egg and vanilla extract and beat until smooth. Spoon the mixture into 8 cupcake cases in a cupcake tin and 8 mini cupcakes in a mini cupcake tin and bake for 20-25 minutes. You can test that they are cooked by inserting a cocktail stick and making sure it is clean when you take it out. Leave the cupcakes to cool.
To make the buttercream icing:
Step 2
Put the butter into an electric mixer and beat the butter until nice and soft. Add the icing sugar until it is well mixed. Add the milk and vanilla extract and beat for about 5 minutes until really well mixed and fluffy looking. Separate the mixture, 2 thirds in one bowl and 1 third in another. Add a small amount of light pink colouring paste to the 2 thirds of mixture and mix well until you get a colour that you are happy with.
Piping the cupcakes:
Step 3
You will need a piping bag and a piping nozzle that will create a rose swirl. I use a 2D nozzle for mine. Start with your pink buttercream and your large cupcakes. Hold the piping bag tightly and start piping in the middle of the cupcake. From here swirl in circles towards the edge of the cake and when it is covered stop squeezing and pull the piping bag away to finish. You can find lots of videos online to help with this technique as this is how I learnt. When this is done, take your regular buttercream icing and do the same on the mini cupcakes.
Making your leaves:
Step 4
Firstly dust your counter with icing sugar which will stop your icing from sticking to the surface. Then take your Renshaw Ready to Roll icing and knead it to soften it slightly. Then use a rolling pin to roll your icing out to your desired thickness for your leaves. Take a leaf shaped icing cutter and cut 16 leaves out of your icing. So simple and fun to do!
Putting together your wedding cupcake bouquet:
Step 5
Firstly, make sure that your polystyrene ball fits well into your chosen plant pot as you can get lots of different sizes. Take your polystyrene ball and cover it with some green tissue paper. You can use sticky tape at the bottom to attach the tissue paper to the ball as this will be hidden. Put your polystyrene ball inside your plant pot with the tape hidden at the bottom. Tie your ribbon round the middle of your pot and use superglue to stick it on. I tied the bow separately from another piece of ribbon and glued it on as I found this much easier.
Step 6
Once your pot is looking lovely, carefully take your cupcakes and insert a couple of cocktail sticks into the bottom of the case and into the cake. Note I use the word carefully as you don't want to ruin your lovely icing (as you can maybe see from my picture I wasn't as careful as I should have been!) Then insert the other end of the cocktail sticks into the polystyrene ball. It might be worth making these holes before hand with a spare cocktail stick as it can be a little tough to pierce.
Step 7
Then arrange your cakes whichever way you think looks the best! I put the pink cakes round the edge, with one on top in the centre and arranged the cream mini cupcakes in between them (you will probably only need one cocktail stick in each of these). Then, using cocktail sticks again, carefully place the leaves in any gaps to give it the finishing touch and make it look perfect. And that's it! You can use different colours to fit any colour schemes and make a mixture of different sized cupcakes to suit the design you want. Whatever you choose to do you will end up with a beautiful cupcake bouquet, perfect for weddings and is sure to impress all of the guests!