Baking ingredients
- 500 g unsalted butter – softened for the 6in Cake
- 700 g unsalted butter – softened for the 8in Cake
- 11 kg unsalted butter – softened for the 10in Cake
- 500 g caster sugar for the 6in Cake
- 700 g caster sugar for the 8in Cake
- 11 kg caster sugar for the 10in Cake
- 10 large eggs for the 6in Cake
- 12 large eggs for the 8in Cake
- 18 large eggs for the 10in Cake
- 700 g self-raising flour for the 6in Cake
- 900 g self-raising flour for the 8in Cake
- 13 kg self-raising flour for the 10in Cake
- Splash of milk for each of the cakes
Decorating ingredients
- Raspberry jam ?
- Buttercream
- 2 kg Renshaw White Ready to Roll Icing
- 25 kg Renshaw Jet Black Ready to Roll Icing
- White royal icing
Renshaw products used

Email this recipe
Instructions
Baking Instructions:
Step 1
Preheat the oven to 150°C/300°F/gas mark 2.?
Step 2
Grease and line two 6in square cake tins, two 8in square cake tins and two 10in square cake tins.
Step 3
Starting with the 10in cake ingredients, in a large bowl cream the unsalted butter and caster sugar.
Step 4
Add the eggs, one at a time, adding a spoonful of self-raising flour between each.
Step 5
Fold in the rest of the self-raising flour and when mixed in, add a splash of milk if required.
Step 6
Divide the mixture between the two 10in lined cake tins and bake for 1hr 40 minutes each until a cake skewer comes out of each cake clean.
Step 7
Repeat the mixture process for the 8in cake ingredients and the 6in cake ingredients.
Step 8
Splitting each mixture between the two tins, bake the two 8in cakes for roughly 1hr 20 minutes each until a cake skewer comes out clean. Bake the two 6in cakes for roughly 1hr 10 minutes or until the cake skewer comes out clean.
Step 9
Once the cakes are out of the oven, leave cakes in their tins on a wire rack for 10 minutes, and then turn out on the wire rack and leave to cool completely.
Decorating Instructions:
Step 10
Sandwich the 10in, 8in and 6in cakes separately with raspberry jam and buttercream.?
Step 11
Place the 6in cake onto a 6in square cake board, the 8in cake onto the 8in square cake board and the 1in cake onto a 14in square cake board.
Step 12
Cover each cake with a thin layer of buttercream.
Step 13
Knead 250g Renshaw White Ready to Roll Icing until soft and pliable. Roll out on a work surface lightly dust with icing sugar. Roll out icing to desired thickness.
Step 14
Brush a 4in square cake dummy with cooled boiled water.
Step 15
Lift the icing over the dummy smoothing down the sides with the palm of your hand.
Step 16
Trim excess icing. To give sheen to the surface, smooth with the palm of your hand.
Step 17
Repeat the exercise using 500kg Renshaw White Ready to roll icing for a 6in square cake dummy. Leave to set.
Step 18
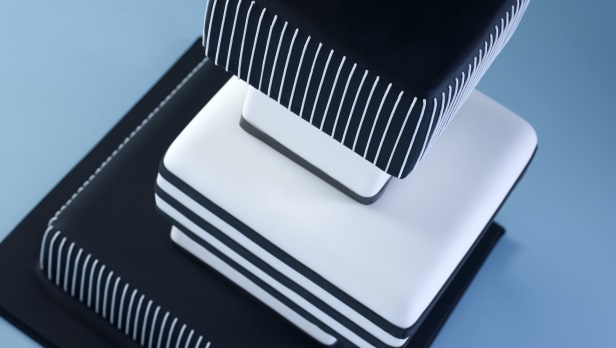
Repeat the exercise to cover the three sandwiched cakes. Use 500g Renshaw Jet Black Ready to Roll Icing to cover the 6in square cake and 2kg jet black icing to cover the 10in square cake and cake board. Use 1kg white icing to cover the 8in square cake.
Step 19
Fill a piping bag fitted with a No'2 icing tube with royal icing.
Step 20
Pipe straight lines down the sides of the 6in and 10in cake.
Step 21
Knead and roll out the remaining jet black icing and cut thin strips. Stick to the side of the iced 8in square cake in an evenly spaced striped pattern with cooled boiled water.
Step 22
Leave the icing to set for 24 hours before stacking the cakes.
Step 23
Place the 6in square dummy on top of the 10in cake.
Step 24
Stabilize the cakes using plastic cake dowels. Use 4 cake dowels and push them through the dummy, through the cake until they touch the bottom cake board. Trim off level with the top of the dummy. This will also hold the dummy pillar in place.
Step 25
Place the 4in dummy on top of the 8in cake to one side and repeat the doweling exercise.
Step 26
Secure the 8in cake on top of the 6in dummy using royal icing, then place the 6in cake on top of the 4in dummy using the same method.
Step 27
Place a thin piece of black ribbon around the base of the dummies, sticking in place using royal icing.