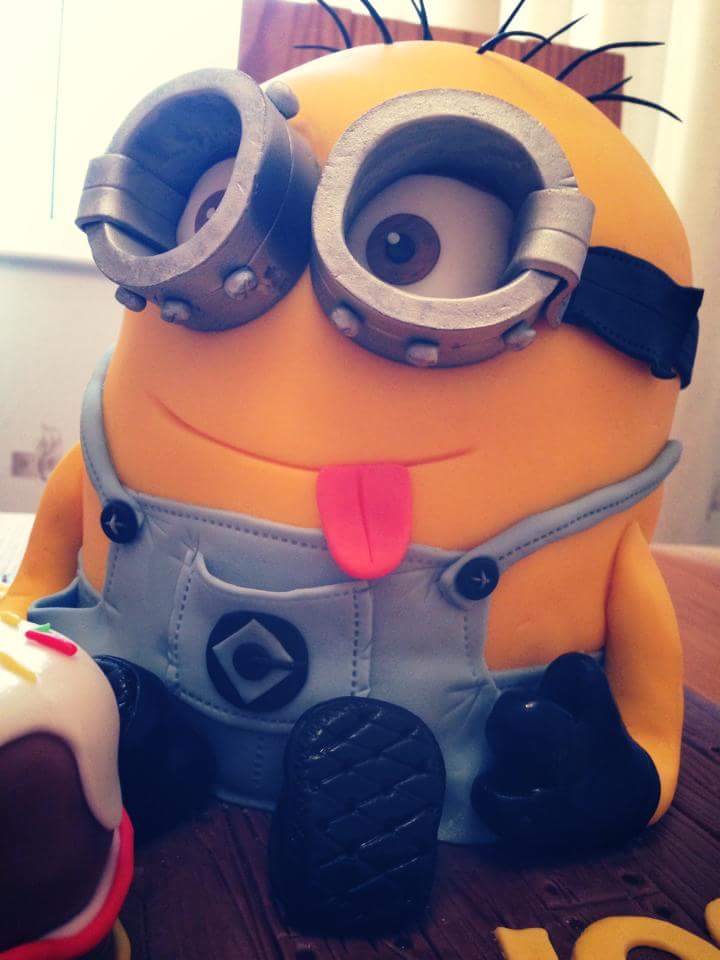
Minions Cake
Fun, detailed yellow Minion cake.
Recipe by Lucy May
Uploaded by Lucy
Time to make
Skill Level
Intermediate
Serves
12 people
Baking ingredients
- 1 cake prepared using three six inch round cakes topped with a domed cake filled with jam and buttercream.
- 1 Cake Board - 10 inch square
Decorating ingredients
- 250 g Renshaw Powder Blue Ready to Roll Icing
- 250 g Renshaw Jet Black Ready to Roll Icing
- 250 g Renshaw White Ready to Roll Icing
- 1 kg Renshaw Yellow Ready to Roll Icing
- 250 g Renshaw Teddy Bear Brown Ready to Roll Icing
- 1 can of Shimmer Spray
Instructions
Step 1
To start, prepare the cake board. To do this you need to knead out the brown sugarpaste until soft and pliable and then dust your work surface with a little bit of icing sugar. Using a non-stick rolling pin, roll out quite thinly a large enough size to cover the cake board. Carefully pick the icing up by rolling over the rolling pin and set in place on the board. Gently smooth over the top of the icing with a cake smoother and then trim away the excess with a sharp knife. Now the board is covered, make a wooden floor board effect. Firstly, using a ruler and a cutting tool, gently score evenly spaced straight lines horizontally across the board then turn over and create small lines vertically to create the individual floor boards. Next, lightly work over the entire surface of the board with short lighter flicks to create the effect of grooves in the wood. Set the board aside to dry for a day or so.
Step 2
Once the board is dry, stack the cake directly onto it and then secure it down with a little buttercream. For this cake, I stacked 3 layers of 6-inch vanilla Madeira cake topped with a cake baked in a domed tin. You can still make the top domed by using a normal cake and carving into a domed shape. Each cake was filled with jam and buttercream and then crumb coated with another layer of buttercream.
Step 3
To start creating the Minion, begin with the goggles as these can be made separately and take longer to dry out. Thoroughly knead together some of the black and white to create a grey colour, roll this to about 1cm thick and then create two equal sized rectangles (about 10cm long, 3cm wide). Roll the rectangles round to create a tube and leave to dry. Once they have dried, add 3 screws to the top and bottom of each tube. Create these by rolling small balls and flattening then adding a straight line across. Spray with a layer of the shimmer spray, then leave to dry and then spray again. The grey with the shimmer spray creates a metallic effect.
Step 4
Next cover the entire cake in yellow. This is when you really see the Minion start to take shape!! Knead the roll out icing until soft and pliable and then roll it out. You'll need to roll out a large enough area to cover the entire cake including the domed top. Roll to about 0.5cm thick. Using the rolling pin, very carefully pick up the icing and place over the cake. Work very fast smoothing the icing over the domed area as this can break very easily. Smooth from top to bottom being careful not to tear the icing. Once the cake is covered, smooth all over with your hands then smooth around the edges with a cake smoother, trimming off the excess.
Step 5
To create the dungarees, mix the blue icing with some white icing by kneading it together thoroughly, and then roll out quite thinly. Cut a long thin rectangle long enough to fit around the base of the cake, with a higher section in the front (main front bit of the dungarees). Secure to the cake using a little cooled boiled water. Cut out three small squares of the blue and place each side and one in the centre, sticking down just the two sides to create a pocket. Create two long thin straps for the dungarees and secure in place using a little bit of water. Lightly go over the edges of the whole dungarees including the straps with a designer cutting wheel to create the stitches effect. You can also add more movement and effect to the dungarees by creating creases here and there with the cutting wheel. Around the pockets and in the folds are good areas for this. Using the black icing create a small circle and stick on each strap as a button. Carefully roll out thin and using a knife and cutting tool cut out the logo and stick in the centre.
Step 6
Now the dungarees are on add the arms, hands and feet. Create the arms by rolling out two large sausages of the yellow icing. Using cooled boiled water stick down to each side of the body. Next, roll out two evenly sized balls of the black icing and mould into hand shapes by hand. Stick one on the end of each arm. To make the boots, roll out two slightly larger balls and again shape by hand into a boot shape. As the base of the boots will be seen, score the bottom with the cutting tool into a cross shape. This creates a realistic tread pattern for the bottom. Secure in place on each side of the body.
Step 7
To create the face of the minion, start by scoring the mouth with the cutting wheel. Do this quite deep so that it shows up, try to do this in one sweep to create a neat edge. Cut out two ovals of white icing, two smaller brown circles and then two circles of slightly smaller black icing. Stick the white in place, followed by the brown and lastly the black for the pupils. Add a small white circle to each side if you wish to add a shine to the minion’s eyes. Next you are ready to secure the goggles. You must make sure these are completely hard and dried before you do this. You will need to apply some edible glue around the base of the goggles and then carefully push them into the cake where the eyes are. They will need to be quite deep as they are heavy. Once you have pushed them in, hold for as long as possible to make sure they are secure. Once they are in place roll out some black icing very thinly and create a strap to go right the way around the Minion’s head, and secure in place.
Finishing touches:
Step 8
The cake is nearly complete! To finish simply roll out small tubes of black icing for the hair and leave to dry out a bit. Using a piece of spaghetti make small holes in the top of the cake and then once the hairs are dry add a small amount of edible glue to the base of each one and stick into the holes. For this cake, I also added a tongue by cutting out a small oval with pink icing. The mini cake at the front is a cupcake decorated with brown and white ready to roll icing, and a handmade cherry, sprinkles and candle. This is an optional extra if you have time. Finished! Now to eat 😀