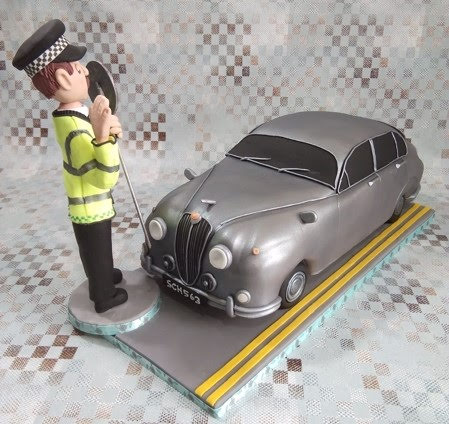
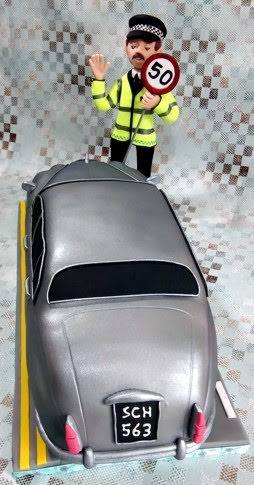
Lemon Madeira 3D Car Cake
Great celebration cake for people who love vintage cars.
Recipe by Rebecca Neave
Uploaded by Rebecca Neave
Time to make
Skill Level
Intermediate
Serves
10 people
Baking ingredients
- 355 g Unsalted Butter
- 355 g Caster Sugar
- 355 g Self Raising Flour
- 215g g Plain Flour
- 8 Large Free Range Eggs
- 3 Lemon Rind Zested
Decorating ingredients
- 250 g Unsalted Butted
- 500 g Icing Sugar
- 200 g Lemon Curd
- 2 kg Renshaw Extra Sugarpaste
- 200 g Renshaw Black Sugarpaste
Renshaw products used
Email this recipe
Instructions
Decoration:
Step 1
Pre-heat the oven to 160°C. Line a 12 inch square and a 12 inch x 6 inch cake tin. Beat the butter and sugar together in a stand mixer till really light and creamy (around 7 minutes). Add the eggs one at a time, beating well after each one. Sift the flour into the mixture and add the lemon zest. Fold through carefully with a large metal spoon. Divide the mixture between the 2 cake tins with 2/3 and 1/3. Bake for around 35 minutes, until well risen and golden on top. While baking, juice the lemons and weigh the juice. Put the juice in a small saucepan and add an equal quantity of light brown soft sugar. Bring just to the boil and leave to cool. As soon as you remove the cake from the oven brush with the syrup and leave to cool in the tin.Make the buttercream by whipping the butter and icing sugar together until creamy. Add the lemon curd and mix till thoroughly combined.
Step 2
Chill the cake in the freezer for an hour to make stacking and carving easier. I have cut a board to the size car I want and fixed small pieces of dowel underneath to lift it off the ground to half the height of the wheels.


Step 4
For the carving stage I found it helpful to source some black and white line drawings to the scale of the car (Jaguar Mark 2 for mine) and then resize to the size cake you need to make. Cut them out and place around the cake as a cutting guide.
 and then resize to the size cake you need to make. Cut them out and place around the cake as a cutting guide.")
Step 5
When you are happy with the shape of your carved cake, cover with a crumb coat of buttercream and refrigerate for half an hour to let it firm up.

Step 6
Put some hot water in a jug and place your small palette knife in the water to warm up. Dry the knife and use it to smooth over any crusty edges of the cake. Repeat as it cools down. Add any extra buttercream to create a smooth finish. Make sure you smooth carefully around any cut out details so as not to lose them.

Step 7
Roll out the Renshaw Extra sugar paste making sure it is large enough to cover the entire cake. Lift onto the cake and carefully smooth around all of the shape with your palms. Make sure you smooth into all the details and the wheel arches. Trim the sugar paste along the bottom of the board with a sharp knife.

Step 8
Using your printed drawings and photos of the car as a guide, draw in any extra detail, like the bonnet, doors and boot, using a sugarpaste shaper/dresden tool (sugarshapers are perfect for this).
.")
Step 9
Use an airbrush to colour your car the appropriate colour. Use long strokes and build up colour gradually, and don't over saturate or the colour may bead up.

Step 10
Add a small amount of black sugar paste to some of the left over white sugar paste to make a grey. Roll long sausages using a fondant smoother to make them nice and even. Use a sharp knife to cut along the length of the sausage so that you have two halves. Using a sugar shaper/dresden tool, run it along the centre of each half to divide it up and add detail. Paint sugar glue along the length of the back (flat side) and attach to the front and back of the car for bumpers.
 and attach to the front and back of the car for bumpers.")
Step 11
Roll out some of the black sugar paste really thinly (I used setting 3 on a pasta roller) and use your pictures/templates as a guide to cut out windows for all 4 sides of the car. Add some Trex (white vegetable fat) to a small amount of the grey sugar paste to make it softer and use an extruder with the finest small circle disc to extrude a long rope of paste. Paint a small amount of sugar glue around the edge of each window and attach the rope. You could pipe royal icing if you don't have an extruder.
 and use your pictures/templates as a guide to cut out windows for all 4 sides of the car. Add some Trex (white vegetable fat) to a small amount of the grey sugar paste to make it softer and use an extruder with the finest small circle disc to extrude a long rope of paste. Paint a small amount of sugar glue around the edge of each window and attach the rope. You could pipe royal icing if you don't have an extruder.")
Step 12
Refer to your photos and add details like head lights, brake lights, number plates, radiator grills, wing mirrors using your sugar paste. Keep on adding until you are happy with the level of detail. Mix some silver lustre dust with a little vodka/lemon juice to make a paint and paint all of the grey details to resemble chrome/metal. I piped the registration plate with a little Renshaw ready made royal icing.

Step 13
Carefully lift your cake onto your presentation board and secure with royal icing. Roll out the black sugar paste really thickly and use a round cookie cutter to cut out the wheels. Hold the cutters up to the wheel arches to select the correct size. To get a rounded edge on the wheel, place a piece of cling film on the sugar paste before cutting out the circle. Use a selection of small round cutters (or the reverse of piping tips) to mark in hub caps. Use royal icing to secure the wheels in place on the car and then paint in the hubcaps with more silver lustre paint.
 to mark in hub caps. Use royal icing to secure the wheels in place on the car and then paint in the hubcaps with more silver lustre paint.")
Step 14
Check your car from all sides to make sure you have painted all the details, and have not missed adding anything. Go and get a well deserved cup of tea and take lots of photos!