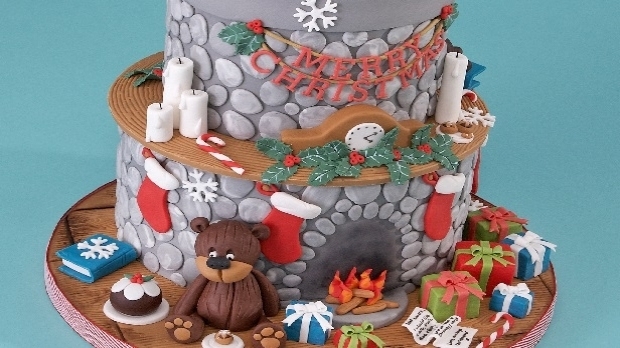
How to make Christmas themed decorations
Uploaded by Kayleigh McDonough
Decorating ingredients
- 250 g Renshaw Teddy Bear Brown Ready to Roll Icing for the teddy bear
- 250 g Renshaw Chocolate Brown Ready to Roll Icing for the teddy bear
- 250 g Renshaw White Ready to Roll Icing for the teddy bear
- 250 g Jet Black Ready to Roll Icing for the teddy bear
- 250 g Renshaw White Ready to Roll Icing for the candles
- Flower stamens for the candles
- 250 g Renshaw Poppy Red Ready to Roll Icing for the gift parcel
- 250 g Renshaw Lincoln Green Ready to Roll Icing for the gift parcel
Renshaw products used


Email this recipe
Instructions
Decorating Instructions - How to make the teddy bear:
Step 1
Take a ball of chocolate brown icing roughly 4-5 cm in size
Step 2
Using the ball create a large cone or tear-drop shape, making sure you keep it chunky at the base and not too tapered off at the top.
Step 3
Take a scribe tool and run a deep line indentation from the base all the way to the top, making sure it's central.
Step 4
Once you have your deep central line, lightly use the scribe tool to make 'fur' like marks in the body. Please note these should all run vertical but can be randomly placed.
Step 5
Next take 2 x small chocolate brown icing balls (2/3cm). Roll into a small cone shape like the body but flatten off the thick end at the bottom to create a foot. Do this to both balls.
Step 6
Using cooled boiled water, dab the thin end of the cone and attach to the side of the body, roughly about halfway. Repeat for the other leg.
Step 7
Using the scribe tool, mark the legs the same way as you have done for the body. Remember the markings should all be in the same direction, and go vertically up the leg.
Step 8
Take a cocktail stick and insert in to the top of the body section. A tip for inserting is to twist as you push, this will prevent pushing the icing down.
Step 9
Take a small amount of teddy bear brown icing and roll 4 balls, 3 at 0.25cm and 1 at 0.5cm. Stick the 3 balls along the top of one foot, flattening down as you stick, then with the larger ball apply centrally, again flattening as you stick. Repeat this process for the other foot.
Step 10
To make the arms, roll 2 x chocolate brown cone shapes, smaller in size than the leg ones. Do not flatten them like the legs but leave rounded and plump. Dab a spot of water on the thin end and apply to the side of the body at the top. Repeat with the other cone. Your teddy should now be taking shape.
Step 11
Use the scribe tool again to make fur marks on the arms.
Step 12
For the head you will need to roll a ball of chocolate brown icing to 3-4cm, checking the size against your own, and set to one side.
Step 13
Roll a sausage shape using teddy bear brown icing. The sausage should have a length the same as the width of the head. The sausage should be 2/3rd the depth of the head.
Step 14
Cut length ways along the sausage to give you a flat edge, stick the flat edge against the front lower portion of the head and flatten slightly, smoothing with your fingers to seal the section in place.
Step 15
Taking the scribe tool, make a deep indentation line, down the centre of the sausage from top to bottom. This will give the face character. Stick a tiny ball of chocolate brown icing above the line to create the nose.
Step 16
Fix the head on top of the body with a little water. (Please note you may need to cut your cocktail stick so that it does not poke through.)
Step 17
Take a ball tool and create 2 x eye sockets either side of the nose, above the added section. Fill with tiny white icing balls and then a dot of black icing.
Step 18
Lastly to add the ears, roll a small ball chocolate brown icing to 1cm. Flatten slightly and cut in half.
Step 19
Dab water on the cut part of the 2 pieces and apply to the head. They should sit at the top of the head, in the position of 10 and 2 on the clock face. Once in position use a ball tool and push down in the centre of each ear.
Step 20
You now have a cute little Teddy Bear.
Decorating Instructions - How to make the candles:
Step 21
Take the white icing and roll into a sausage shape, 1cm thick.
Step 22
Using a sharp knife, cut the sausage into sections of various lengths to create a variety of candle sizes for the mantelpiece.
Step 23
Once cut, give them a little roll to round them off.
Step 24
Stand the candles on their ends. Using a small ball tool, push down slightly in the centre of each candle. This gives the effect the candle has been melting.
Step 25
For the wicks, use the end of a stamen, dusted in black dust and insert into the top of each candle. (Please note the stamens are NOT edible and should be removed before eating.)
Step 26
Lastly you need to add 1 or 2 tiny tear drop shapes to each candle, making them look like they have been melting down the sides. These can be made from the white icing or piped on with a little royal icing.
Step 27
You now have a set of candles that you can apply to the mantelpiece.
Decorating Instructions - How to make the gift parcels:
Step 28
Take red icing and roll into a chunky sausage shape, about 3-4cm in thickness.
Step 29
Using a smoother, flatten the sausage to make a flat surface on the top.
Step 30
Take a sharp knife and cut along the 2 edges of the sausage long ways. Leaving you with a long straight sided sausage.
Step 31
Once you have cut the sides off, you need to cut widthways on the sausage. These can be spaced to create the size you require for the parcel.
Step 32
Now you should have a cube-like shape, to neaten off the edges and square the cube up use a pair of smoothers.
Step 33
Set the cube to one side and roll out some green icing and cut 2 thin strips each about 2mm wide.
Step 34
Take a wet paint brush and draw two wet lines on top of the cube to form a cross on top, continue the lines down the 4 sides.
Step 35
Apply each strip along the wet lines on the cube, taking them down the sides and trimming at the base with a knife.
Step 36
Use a bow cutter to cut out the bow pattern out of the remaining green icing and assemble.
Step 37
Dab water onto the middle of the cube, cover the cross join and stick the little bow over the top.
Step 38
Now you have the basis to recreate various sizes and colour parcels for your cake.