Decorating ingredients
- 1 kg Renshaw Ready to Roll Pearl Blush Icing
- 1 kg Renshaw Ready to Roll White Icing
- 500 g Renshaw Ready to Roll Poppy Red Icing
- 250 g Renshaw Ready to Roll Atlantic Blue Icing
- 250 g Renshaw Ready to Roll Jet Black Icing
- Pre-made 4 inch cake
- Pre-made middle and bottom tiers of the Christmas story cake
Renshaw products used

Email this recipe
Instructions
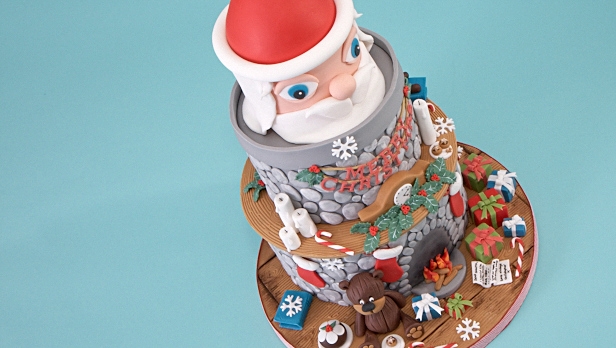
How to decorate the top tier of our Christmas story cake, Santa's face:
Step 1
Cover a 4 inch cake in Pearl Blush Icing, smooth and trim as normal.
Step 2
Place the freshly covered 4 inch cake on top of the other 2 iced tiers. Smooth the icing down to make a nice seal at the base of the cake. Watch our 'How to stack cakes' video for some helpful tips: https://www.youtube.com/watch?v=pEjaxpS90ts
Step 3
It is now time to add the features to create Santa. Starting with the nose, roll a ball about 2cm in diameter out of Pearl Blush Icing. Take a paint brush and with a dab of cooled boiled water apply the nose to the iced cake on the front half way up in the centre. Once your nose is firmly in place, you can see where your eyes need to be placed.
Step 4
Take some White Icing, roll and cut out 2x oval shapes, roughly 2-3cm in width. Apply either side of the nose, slightly up a level from the nose and a fraction away. (If you get stuck, use a mirror to see the correct spacing of your own eyes and nose.)
Step 5
Take a 1cm circle cutter and cut out 2x Atlantic Blue Icing discs. These will form the pupils of the eyes.
Step 6
Dab a little water on the whites of the eyes and apply each blue disc to each eye. (They should be placed central to the white)
Step 7
Repeat the above process using a smaller circle cutter and Jet Black Icing to create the iris of the eye. Once cut out, stick the 2 black discs on the previous blue disks, but offset them towards the base of the blue discs.
Step 8
Once you have both the pupil and iris, you can add a very tiny dot of White Icing to bring the eyes to life. The white dot acts as a light spot in the eye.
Step 9
Take a small amount of Pearl Blush Icing and roll a small sausage shape, tapering it off at both ends. The sausage shape should reach the whole length of the top of the eye. This will create the top lid. Stick with a little water and repeat for the other eye.
Step 10
Repeat the above process but making the sausage slightly thinner and affix it to the base of the eye. This will create the bottom eye lid. Repeat for the other eye.
Step 11
To achieve Santa's beard, cut out a large oval shape using White Icing, large enough to wrap half way around the cake.
Step 12
Cut a 1/3 of the oval off, leaving you a long narrow oval shape with a straight side.
Step 13
Take a paint brush with water and wet under the nose and below, place the cut out shape, straight side up under the nose and round the cake, letting the bottom overlap onto the lower tier, this gives fullness to the beard. If required use a little more water.
Step 14
Take 2 small balls of White Icing (2cm), and shape into 2 small tear-drop shapes.
Step 15
Using a smoother press down and flatten each tear drop.
Step 16
With a little water stick each tear drop under the nose, touching in the middle. Flick the thin end of each tear-drop up to create a little bit of character for your Santa.
Step 17
Now for the hair, roll out White Icing big enough to wrap just over half way around the cake and deep enough to match the cake and a little over hang. Cut along the top to create a straight edge to work with.
Step 18
Once you have the correct size for your cake, apply the hair by sticking with water.
Step 19
The hair should come just over half way round, overlapping the beard. (Tip: using your thumb and forefinger manipulate the icing to give it a shape and movement.)
Step 20
To create the hat, you will need to take a large ball of Poppy Red Icing and create a cone shape.