Decorating ingredients
- 1 kg Renshaw Ready to Roll Emerald Green Icing (to cover)
- 500 g Renshaw Ready to Roll Poppy Red Icing for the board (to cover)
- 250 g Renshaw Ready to Roll Fuchsia Pink Icing for the bow (to cover)
- 250 g Renshaw Ready to Roll Emerald Green Icing (to decorate)
- 250 g Renshaw Ready to Roll Poppy Red Icing (to decorate)
- 250 g Renshaw Ready to Roll Fuchsia Pink Icing (to decorate)
- 250 g Renshaw Ready to Roll White Icing (to decorate)


Instructions
Covering the cake:
Step 1
Bake 2x half dome cakes ideally 6ins, leave to cool.
Step 2
Once cooled, cut the excess off so they fit together to create a ball.
Step 3
Apply a thin layer of buttercream to one half of the ball and sandwich the other on top. Cut a little bit off the bottom so it can sit flat.
Step 4
Apply a thick crumb coat of softened buttercream to the whole cake, smoothing it out evenly.
Step 5
Place the cake in the fridge for about 30 mins, this will harden the cake and make it easier to work with.
Step 6
Take out of the fridge and set the ball on an upside down saucer. This is so you have a little more work room with your fingers.
Step 7
Then apply a fresh thin coat of buttercream so the fondant will stick.
Step 8
Roll out the Emerald Green Icing to roughly 8/9mm thickness.
Step 9
Lift the icing using your rolling pin to prevent any finger prints and lay over the top of the ball, centering it as best you can.
Step 10
Once the icing is on let it drop down, and then smooth it as far as you can towards the base of the ball without causing wrinkles, using the palm and sides of your hands to guide it down. You should work fast to prevent the icing from tearing. It should stick easily to the fresh layer of buttercream.
Step 11
Once at the base of the ball, use a smoother to push the icing under and this will create a cutting line.
Step 12
Using a sharp knife, cut as far under as possible making sure the icing sticks to the bottom of the cake.
Step 13
Once this is done use the palm of your hands and smooth out any finger marks or blemishes as best you can.
Step 14
Use a cake slice to transfer the ball on to a pre-iced cake board, in Poppy Red Icing.
Step 15
You can now add a Fuchsia Pink Icing ribbon band around the base of the ball. Roll out the Fuchsia Pink Icing long enough to fit all the way around the base of your bauble, and 4/5cm wide. Semi-wrinkle/fold the icing before you stick it to the base of the cake. This will give it a great fabric effect to resemble ribbon.
Step 16
Apply cooled boiled water around the base of the bauble and attach the icing band.
Step 17
Make the join at the front slightly to the right; this will be covered with your icing bow.
Step 18
Create an icing bow out of a little more Fuchsia Pink Icing and attach over the join. For tips on making a bow, watch our helpful video: https://www.youtube.com/watch?v=X0YsFQtHyiQ
Step 19
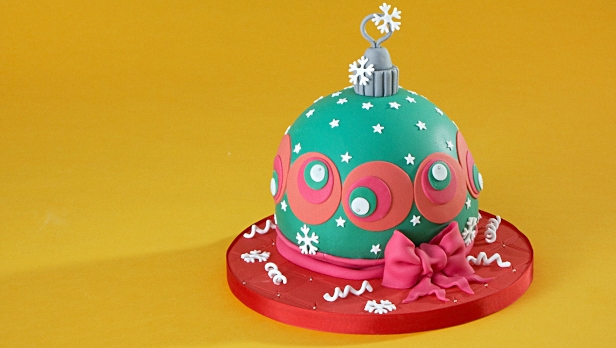
Now you have your bauble covered and sealed with a ribbon and bow, you can start decorating it.
Decorating the cake:
Step 20
To decorate your bauble you will need 4 different sized circle cutters, the biggest being about 5cm and the smallest 1.5cm (roughly).
Step 21
Take some Poppy Red Icing and roll out to a thickness of about 1-2mm.
Step 22
Using the largest circle cutter, cut out a circle.
Step 23
Take a paint brush and cooled boiled water and wet a small area on the pre-iced Bauble cake, roughly central from top to bottom and side to side.
Step 24
Carefully apply the pre-cut circle to the wet area and smooth down.
Step 25
Repeat this process all the way around the bauble until the circles meet at the back, taking care not to misshape any of the circles.
Step 26
Take the Fuchsia Pink Icing and roll out to a thickness of 1-2mm.
Step 27
Using your next size down circle cutter, cut out enough circles to go around the bauble (same amount as the Poppy Red ones).
Step 28
Dab a spot of water on to the middle poppy red circle, offsetting it slightly to one side and apply the small Fuchsia Pink circle, and smooth down the edges.
Step 29
Repeat above process for all the remaining circles, offsetting them in different angels.
Step 30
Repeat again with the next size down cutter and the Emerald Green Icing, and once more with the smallest cutter and the White Icing.
Step 31
Having applied all of the circles to the Bauble, take mini silver dragees, and press 1 in each of the white circles.