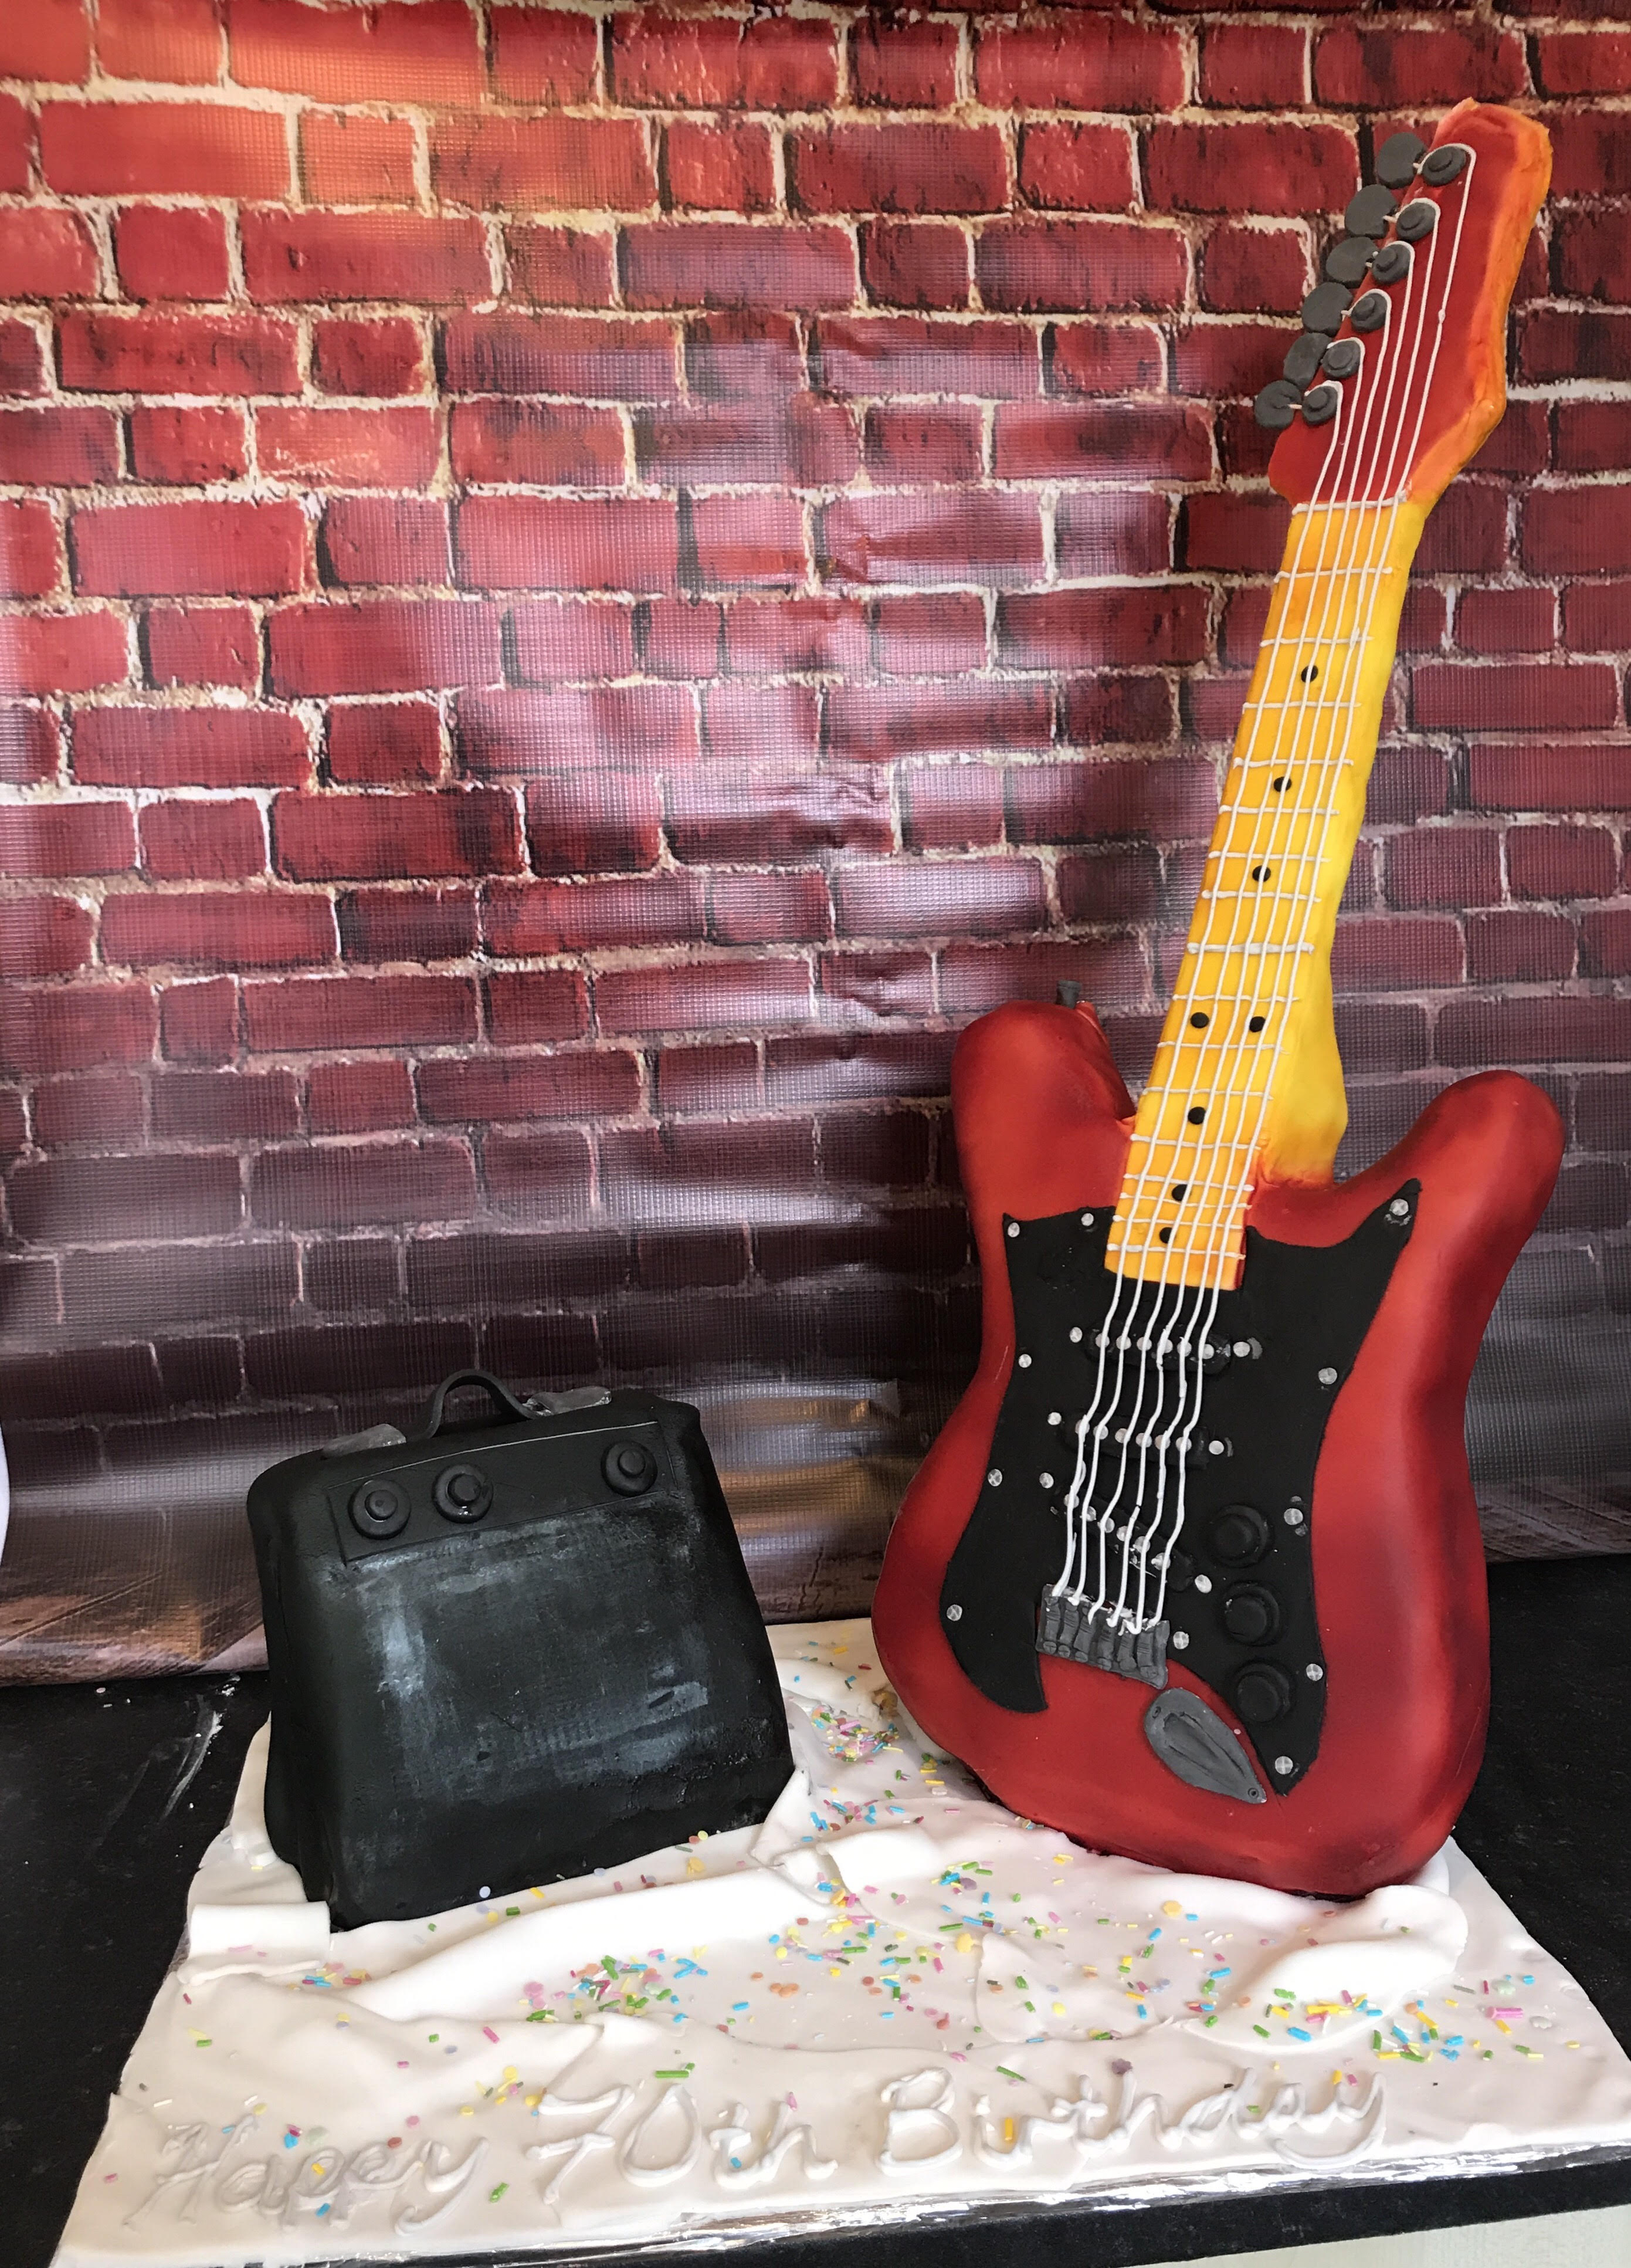
Electric Guitar and Amp Cake
This tutorial was uploaded as part of the Renshaw ‘Battle of the Bakes’ competition.
How to make a freestanding electric guitar and amp.
I’ve never made something as big and technical as this before, but I’m so glad I ‘picked’ up the courage to do it. I surprised myself and it made my father in law’s 70th birthday.
Be brave and push yourself to try something out of your comfort zone, you may surprise yourself!
Recipe by Helena M
Uploaded by Helena M
Time to make
Skill Level
Experienced
Serves
80 people
Baking ingredients
- 1 10" Square Madeira Sponge
- 1 7" Square Madeira Sponge
- 750 g Buttercream
- 6 tbsp Raspberry Jam
Decorating ingredients
- 3 kg Renshaw Ready to Roll Icing – I used white, as I airbrushed the cake, but you can cover your guitar in any of the Renshaw Colours
- 1 kg Renshaw Ready to Roll Icing - Jet Black
- A one 'egg white' mix of Royal Icing
- You will also need, a large piece of cardboard, plywood, jigsaw, gate hinge, foil, an airbrush tool (not essential), a selection of circle cutters, lustre dust.
Renshaw products used

Email this recipe
Instructions
Step 1
Firstly, you will need to draw out a cardboard template in the guitar shape. Mine was 10" wide by 31" tall. When you are happy with the shape cut it out. Next, trace around the template onto a piece of plywood and cut out using a jigsaw. Sand around the edges with sandpaper till smooth. Next, you will need to add some supports for the cake to sit on. I added one to the bottom of the guitar body, measured 5" up and added another (screw them into place from the back of the board). Cut the neck from the body and reattach using a block of wood, so that when the cake is in place it will be at the same height as the neck (see picture). You will also need a custom-made board. Using plywood again, cut out the desired size. You need to make it big enough for the guitar and the amp. To attach the guitar cake board to the board you will need a gate hinge (from a hardware/DIY shop). Open it back on itself and fix in place using screws. It should stand the guitar board at a slight angle leaning slightly backwards.
. Cut the neck from the body and reattach using a block of wood, so that when the cake is in place it will be at the same height as the neck (see picture). You will also need a custom-made board. Using plywood again, cut out the desired size. You need to make it big enough for the guitar and the amp. To attach the guitar cake board to the board you will need a gate hinge (from a hardware/DIY shop). Open it back on itself and fix in place using screws. It should stand the guitar board at a slight angle leaning slightly backwards.")
Step 2
If you want to cover the back of the guitar in Renshaw Ready to Roll Icing do this before assembling the cake. I did cover the back but it couldn't be seen when set up on the table at the party so it’s not essential.
Step 3
Fill your 10” Madeira cake with buttercream and jam and cut it in half. Position half in between the cake supports and the other half above. Carve the guitar body shape.


Step 5
Next cover the cake in Renshaw Ready to Roll Icing in desired colours or white if airbrushing. I found it easier to work in sections. Starting with the guitar body and then the neck then the head. Add indentations to the neck using a sugarpaste tool for the frets.

Step 6
If airbrushing do this now. Start by spraying the body and then the head. Allow to dry. Next spray the neck, you may need to hold some paper or card to stop over-spray, or make a foil cover

The Pick Guard:
Making and Adding the Details:
Step 7
On a piece of paper draw out the scratch plate/pick guard. When you are happy with the shape cut it out. Roll out Renshaw Ready to Roll Icing in desired colour (I used Jet Black) and cut out using the template as a guide. Position the cut out icing on the cake and attach with a little bit of water.
 and cut out using the template as a guide. Position the cut out icing on the cake and attach with a little bit of water.")
The Dials:
Step 8
Make six dials, three for the guitar and three for the amp. To make the dials, roll out the Jet Black Renshaw Ready to Roll Icing quite thick about 1cm, then use a piping nozzle/circle cutter to cut out. You will need two circles for each dial, one slightly smaller than the other. Attach to each other with a little water and position on the cakes.

The Pick Ups:
Step 9
Using Jet Black Renshaw Ready to Roll Icing, roll out three sausage shapes identical in size and flatten to make the three pickups, set aside.

The Fret Markers and Screws:
Step 10
Using Jet Black Renshaw Ready to Roll Icing, pick off a tiny amount and roll into a tiny ball flattened slightly for the fret markers. You will need about 8 of these. Position in place along the neck of the guitar.

Step 11
Repeat using White icing for the screws that go around the pick guard and the detailing to the pickups. You will need about 35. Attach 6 to each pickup with a little water. Position the pickups in place.
Step 12
Attach the rest around the pick guard.
The Bridge:
Step 13
Make a grey colour using Jet Black and White Renshaw Ready to Roll Icing mixed together. Roll out the grey and cut out a rectangle. Make 6 small sausage shapes and 12 tiny balls flattened. Assemble as on the picture and position on the cake.

The Jack:
Step 14
Using the grey, cut out a teardrop shape and add indentations using a sugarpaste tool and position on cake. See picture.

The Tuners:
Step 15
Make six grey balls, insert a cocktail stick into each, then using your thumb and index finger flatten slightly both sides of the cocktail stick to make the tuners. Insert onto the head of the guitar (see picture). Using the same technique as you did for the dials, make six in the grey icing and position on the cake next to the tuners.
. Using the same technique as you did for the dials, make six in the grey icing and position on the cake next to the tuners.")
Carry Strap on the Amp:
Step 16
Cut out a rectangle shape in Jet Black icing, score lines down the length. Next make two semi-circles and position on both ends of the strap then attach to the amp, lifting the middle slightly to create the handle.
Finishing Touches:
Step 17
Use grey Royal Icing in a number 3 nozzle to pipe over the indentations of the frets. Using white Royal Icing of a stiff consistency (adding extra icing sugar if yours is not) in a number 3 nozzle, pipe the strings. Start from the top with a steady hand and as you pipe lift away slightly so the strings drop onto the cake in place, and attach at the bridge. Repeat five times until you have six strings.
Step 18
Using a texture mat or a sheet of kitchen roll, press into the speaker of the amp. Bring out the markings with a little Lustre Dust. I used grey/silver.
Step 19
Finally, roll out White Renshaw Ready to Roll Icing and drape over the board in sections around the guitar and amp, ruffling to look like material. .... aaaaannnnd you’re done, dance around the kitchen to 'Hey hey I wanna be a rockstar' with your cardboard template guitar to celebrate.