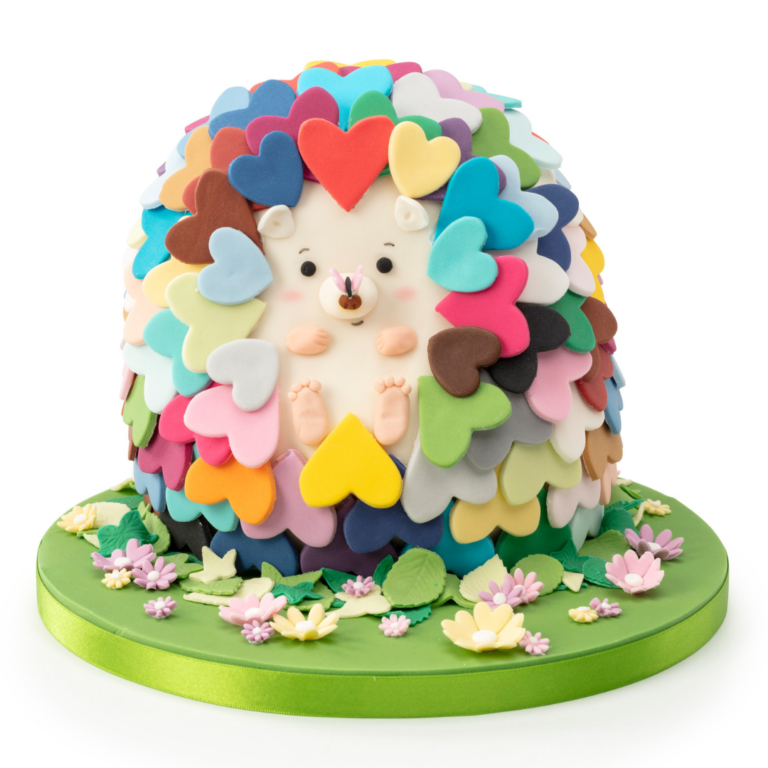
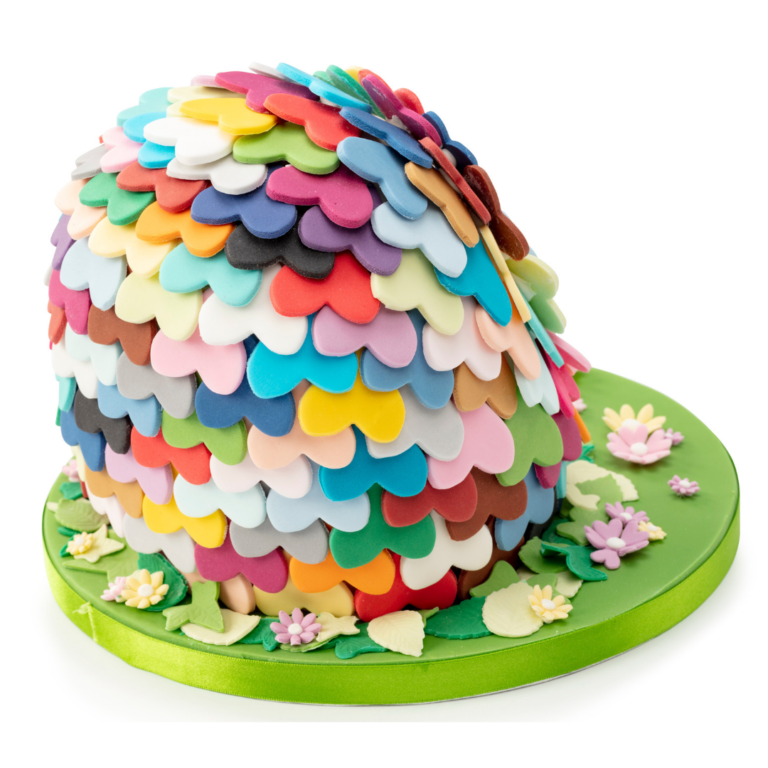
Colourful Hedgehog Cake
This cute hedgehog cake celebrates the range of colours in the Renshaw Ready to Roll Icing range. We used 30 colours to create this cake! We hope you enjoy creating your own textured hedgehog cake in your favourite icing colour.
Uploaded by Kayleigh McDonough
Decorating ingredients
- All Renshaw Ready to Roll Icing colours
- Rainbow Dust Black Food Art Pen
- Rainbow Dust Edible Glue
- Renshaw Royal Icing
Email this recipe
Instructions
Step 1
Prepare your equipment: Rolling pin, heart shaped cutters in various sizes, Dresden tool, cone tool, paintbrush, sharp knife, flower and leaf plunger cutters, ribbon, cake board.
Step 2
Knead Lincoln Green Icing on a clean, dry work surface. Lightly dust the surface with icing sugar to roll out. Rotate the icing between each roll to prevent sticking, until wide enough to cover your cake board. Use your paintbrush to brush a little cooled, boiled water over the board, then lift the icing over and smooth it down with a smoother. Hold a sharp knife flat against the edge of the board and cut away the excess icing. Leave the board to firm up before adding your cake and decorations, to prevent leaving marks in the icing.
Step 3
Once you've filled, stacked, carved and coated your cake into your desired shape (we've carved the front side flatter and gradually curved out the rest of the cake), then you can cover it with Ready to Roll Icing. Knead a little Cream Rainbow Dust ProGel into 500g White Ready to Roll Icing for a soft, fleshy shade. Knead the icing on a clean work surface, and when you're ready to roll it out, lightly dust the surface with icing sugar. Rotate the icing after each roll to prevent sticking. Once the icing is wide enough to cover your cake, you can use your rolling pin to help lift this and cover the cake. Use your hands to gently smooth the icing over the surface, lifting out any pleats and smoothing them down as you go along. You can use a smoother to go over the surface and to press the bottom edges down, sealing the icing to the cake. Hold a sharp knife flat to the bottom edge of the cake and trim away the excess.
Step 4
Use a cake lifter or knife to transfer your cake to the cake board, securing in place with Renshaw Royal Icing.
Step 5
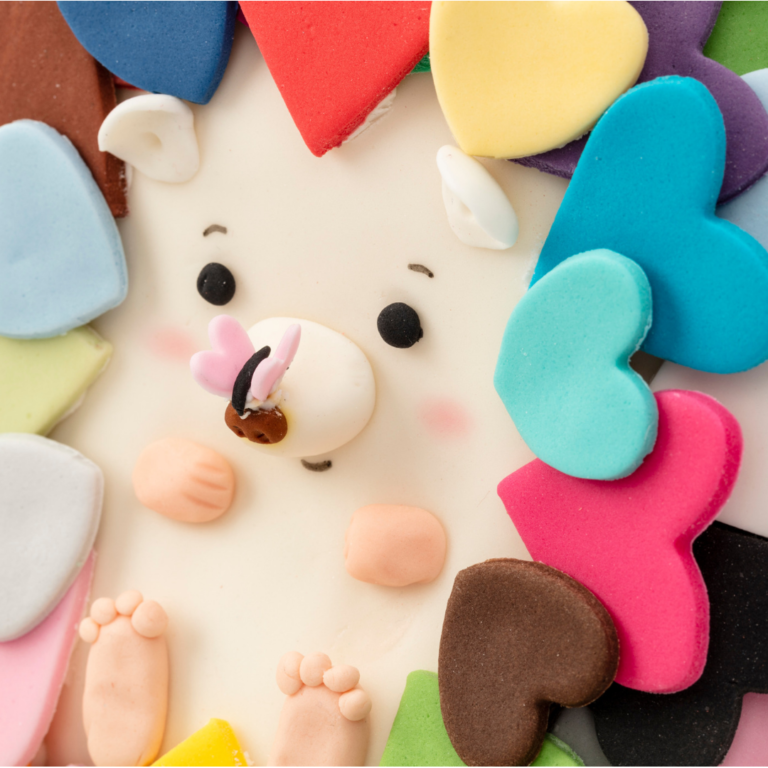
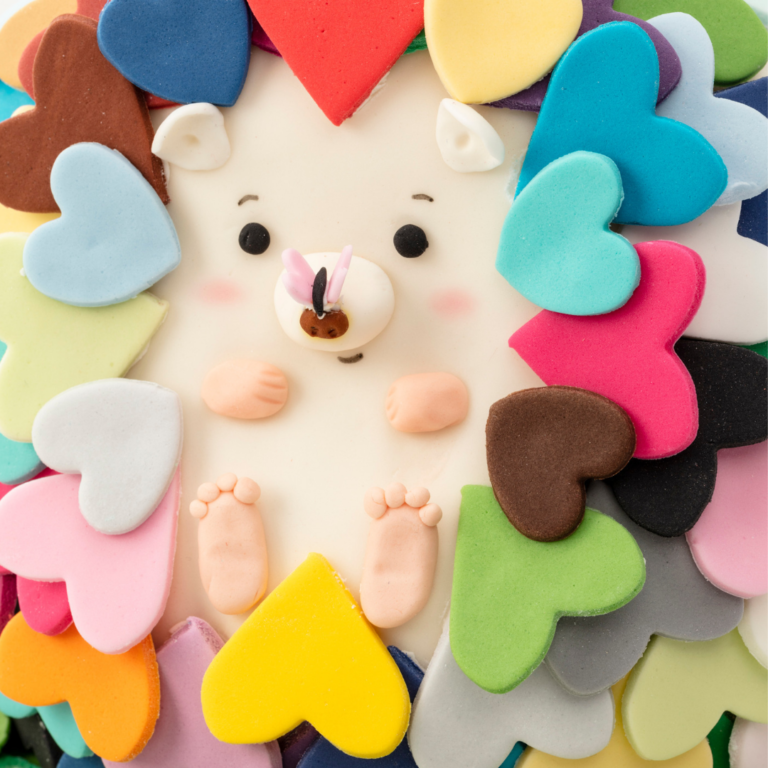
We've used 30 colours of Ready to Roll Icing for the hearts on this cake, so only a small amount of each colour was needed. Knead your chosen colour of icing on a clean, dry surface until smooth and pliable. Lightly dust the surface with icing sugar and roll your icing out to 2-3mm thick. Use heart cutters in a variety of sizes to cut shapes out. Leave these to firm up slightly so that they hold their shape when you attach them to the cake. You won't need as many smaller hearts, as these will be used around the face.
Step 6
Beginning at the bottom edge of the cake, turn your hearts upside down and using a paintbrush, brush a small amount of Edible Glue to these and stick in place in one row around the bottom.
Step 7
Overlap the next layer of hearts half way over the first row, and stick in place with a small amount of Edible Glue. Use a small amount of glue to prevent the hearts from sliding out of place. Continue this around the cake, leaving free space for the face and paws.
Step 8
Use the smaller heart shapes to fill in gaps around the face.
Step 9
Roll a small ball of leftover cream coloured icing, and cut in half. Add to the middle of the face with Edible Glue to form the nose. Roll a small ball of brown icing and glue this to the end. Use a cone tool to add in nostrils.
Step 10
Roll 2 small balls of cream coloured icing, flatten and shape into ears, attaching to the top of the face with Edible Glue.
Step 11
Roll 2 small balls of black icing for eyes and glue these to the face.
Step 12
Roll 2 ovals of Pearl Blush icing and flatten slightly for the front paws. Attach to the cake with Edible Glue. Use a Dresden tool to add paw marks in.
Step 13
Roll 2 larger Pearl Blush ovals, shape and flatten slightly into the back paws. Attach to the cake with a little Edible Glue. Roll 4 very smalls balls of Pearl Blush icing for the toes and attach to the back paws.
Step 14
Use the Rainbow Dust Black Food Art Pen to draw on eyebrows and a smile. This will work best if the icing has firmed up.
Step 15
Knead and roll out pastel shades and green shades of icing, then use plunger cutters to create leaves and flowers to add to the board.
Step 16
Finish by adding a ribbon around the edge of the cake board.