Recipes and Cake Decorating from Ruth Clemens (aka The Pink Whisk)
Tuesday 29th October 2013
Would you love to know the secret to delicious bread sticks? Or how to create ready to roll icing Halloween motifs? The Pink Whisk shows us how…
The Pink Whisk’s Halloween Toppers
Cat

You will need:
- Renshaw ready to roll icing in jet black, amethyst purple and Lincoln green
- Small sugarpaste cutter – cat
Steps:
- Roll out the black sugarpaste on the worksurface lightly dusted with icing sugar to prevent it from sticking to a depth of approx. 3mm. Allow the sugarpaste to dry out a little for a couple of minutes before cutting out the cat shape with the cutter – this makes the cat less likely to pull out of shape when cutting out.
- Indent 2 eyes in the cat’s face using a skewer and set to one side.
- Roll out a little of the amethyst purple and Lincoln green paste to a depth of 3mm and cut out a silhouette for each jet black cat.
- Take one silhouette at a time and lightly roll your rolling pin across it to slightly enlarge the cat shape.
- Set the jet black cat into the centre of the silhouette securing in position with a light brush of water.
- Transfer to a plate or cake card lightly dusted with icing sugar and allow to dry out for 24 hours.
- Once the topper has dried out, brush gently with a soft paintbrush to remove any dusty marks and use as decoration.
Witches Hat

You will need:
- Renshaw ready to roll icing in jet black, amethyst purple and orange
- Round pastry cutter approx. 6cm diameter
Steps:
- Roll out the black sugarpaste on the worksurface lightly dusted with icing sugar to prevent it from sticking to a depth of approx. 3mm. Allow the sugarpaste to dry out a little for a couple of minutes before cutting out a large rectangle. Divide the rectangle into triangles with sides approx. 4.5cm using a sharp knife. Set the triangles to one side.
- To create the brim of the hat roll out more of the jet black sugarpaste and cut out 6cm circles, cut away the very bottom of the circle and shape the small piece with your fingertips into a pointed oval shape.
- Roll out a little amethyst and orange sugarpaste, cut out long 1cm wide ribbons. Apply a light brush of water to the base of the triangles for the hats and lay the ribbon across. Trim the ribbon to fit the hat neatly at either side of the triangle.
- Apply a light brush of water to the brim of the hat and sit the triangle part of the hat on top, pressing lightly to secure.
- For the buckle cut a small square of coloured paste and a slightly larger black square. Set them on top of each other and secure to the ribbon across the hat.
- Transfer to a plate or cake card lightly dusted with icing sugar and allow to dry out for 24 hours.
- Once the topper has dried out, brush gently with a soft paintbrush to remove any dusty marks and use as decoration.
Ghost

You will need:
- Renshaw ready to roll icing in white and jet black
- Small sugarpaste cutter – ghost
Steps:
- Roll out the white sugarpaste on the worksurface lightly dusted with icing sugar to prevent it from sticking to a depth of approx. 3mm. Cut out the ghost shapes.
- For the ghosts eyes roll small balls of jet black icing, flatten slightly with a fingertip and position onto the white body securing with a light brush of water. Indent the eyes with a skewer.
- Transfer to a plate or cake card lightly dusted with icing sugar and allow to dry out for 24 hours.
- Once the topper has dried out, brush gently with a soft paintbrush to remove any dusty marks and use as decoration.
Pumpkin

You will need:
- Renshaw ready to roll icing in orange and Lincoln green
- Small circle cutter approx. 3.5cm round
Steps:
- Roll out the orange sugarpaste on the worksurface lightly dusted with icing sugar to prevent it from sticking to a depth of approx. 3mm. Cut out 3.5cm circles.
- Using the wrong end of a paintbrush gently indent the groves in the body of the pumpkin.
- For the leaves roll small balls of Lincoln green icing and taper one end. Press lightly with a fingertip to flatten. Secure 4 leaves at the top of the pumpkin, slightly overlapping, with a light brush of water. Using the tip of a sharp knife indent the central vein down each leaf.
- Roll a small sausage for the stalk, tapering one end and secure in place at the top of the pumpkin.
- Transfer to a plate or cake card lightly dusted with icing sugar and allow to dry out for 24 hours.
- Once the topper has dried out, brush gently with a soft paintbrush to remove any dusty marks and use as decoration.
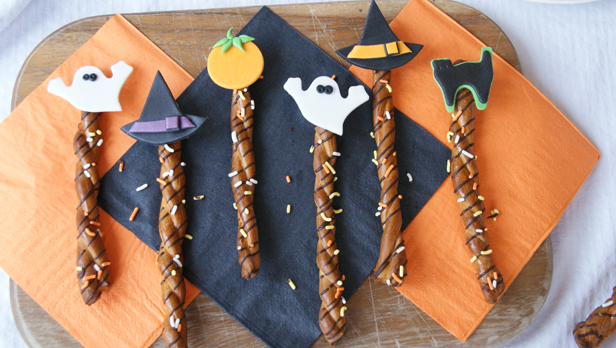
We love Ruth’s unusal way of displaying these spooky Halloween motifs, here’s her sweet bread stick recipe.
The Pink Whisk’s Sweet Bread Stick Recipe

Ingredients:
- 200g strong white flour
- 20g caster sugar
- 1 tsp fast action yeast
- Zest ½ orange
- 65ml milk, lukewarm
- 1 egg, large, beaten
- 25g melted butter
- 1 egg, for egg wash
To decorate:
- 50g dark chocolate, melted
- Halloween sprinkles
- Halloween sugarpaste toppers
Makes: 24
Oven Temp: 180c(fan)/200c/GM6.
Method:
- In a large bowl combine the strong white flour, caster sugar, orange zest and fast action yeast.
- Make a well in the centre and add the lukewarm milk, beaten egg and melted butter.
- Combine in the bowl to form a rough dough.
- Turn out onto the worksurface and knead for 10 minutes by hand until smooth and elastic.
- Transfer to a clean lightly oiled bowl, cover with clingfilm or a clean tea towel and set aside in a warm draught free spot to rise for 2 hours or until doubled in size.
- Pinch off small balls of dough (approx. 1.5”) and roll into a short sausage shape until the dough will stretch no further. Set to one side whilst shaping more sausages of dough.
- Return your attention to the first sausage and roll again to lengthen, repeat working through all the sausages of dough, allowing the dough to rest for a minute or two before lengthening again.
- Keep lengthening the pieces of dough until they are approx. 40cm long and 5mm in thickness.
- Cut each length in half. Pinch the two pieces together at one end and wind the strips around each other to form the twirl, pinch again at the end to secure them together.
- Transfer to a well greased or lined baking tray and allow to rest for 15 minutes.
- Brush the sweet breadstick twirls with egg wash and bake in the oven for 15 minutes until golden.
- Transfer to a wire rack and cool completely.
- Melt the dark chocolate and drizzle over the sweet breadsticks, sprinkle with Halloween sprinkles. Add a small blob of melted chocolate to the end of each sweet breadstick and secure a Halloween topper in place.
- Allow to set before serving.