How To: Shape and Cover a Toffee Apple Cake
Thursday 16th October 2014
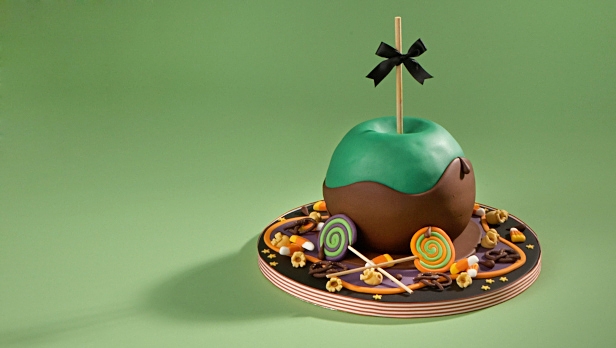
If the traditional square cake doesn’t take your fancy and you’d like a new challenge, have a go at shaping and covering our Halloween Toffee Apple Cake.
You will need:
- 250g Renshaw Chocolate Ready to Roll Icing
- 4x 250g Renshaw Emerald Green Ready to Roll Icing
How to make:
- Bake 2x Half Dome Cakes ideally 6 inches. Leave to cool.
- Once cooled cut the excess off so they fit together to create a ball.
- Apply a thin layer of buttercream to one half of the ball and sandwich the other on top (cut a little bit off the bottom so it can sit flat).
- Take a teaspoon and gently scoop out a small section at the top of the ball. This will create the look of the apple. Take care not to take too much out. Using a shape knife take off the edge around the hole to soften it.
- Once you are happy with the shape, you need to apply a thick crumb coat of soften buttercream to the whole cake, smoothing it out evenly.
- Place the cake in the fridge for about 30 minutes, this will harden the cake and make it easier to work with.
- Take out of the fridge and set the ball on an upside down saucer. This is so you have a little more work room with your fingers.
- Then apply a fresh thin coat of buttercream so the fondant will stick.
- Roll out Renshaw Emerald Green Ready to Roll Icing to your desired thickness, roughly 8/9mm.
- Lift the Icing using your rolling pin to prevent any finger prints and lay over the top of the ball, centering it the best you can.
- Once the icing is on let it drop down, and then smooth it as far as you can without causing wrinkles, using the palm and sides of your hands to guide it down. You should work fast to prevent the icing from tarring.
- The Icing should stick to the fresh buttercream. Using the sides of your hands guide the icing towards the base of the ball, trying not to crease or finger print the icing.
- Once at the base of the ball, using a smoother push the icing under and this will create a cutting line.
- Using a sharp knife, cut as far under as possible, making sure the icing sticks to the bottom of the cake.
- Once this is done, use the palm of your hands and smooth out any finger marks or blemishes as best you can.
- Use a cake slice to transfer the ball on to a pre-iced cake drum.
- Then cut out a wavy band of Renshaw Chocolate Ready to Roll Icing to place around the ball flat on the cake board. This gives you the ‘Toffee Apple’ look, and seals the joins.
