Gardening Cake Tutorial by Richard Burr
Tuesday 30th May 2017
Guest Blog by Richard Burr
With Father’s Day coming up on the 18th of June, Renshaw is challenging people to share their hobby–themed decorated cakes and bakes.

My own hobbies are really important to me. It was my baking hobby that led directly to my appearance on The Great British Bake Off three years ago and I’m so lucky that the opportunities I’ve had since have given me even more time to spend on my hobbies. When I’m not building or baking I try to spend as much time outside as possible. I love the great outdoors: camping, fishing, running, cycling, gardening and walking my Vizsla, Leia. I’m also passionate about wildlife and completed a part-time BSc in Biodiversity & Conservation a few years ago. The fruit and vegetable patch in my garden provides the inspiration for so many of my recipes, and also for my hobby-themed cake.

As a father of three daughters, I really look forward to Father’s Day as the girls usually make me something special. My elder two daughters spend a lot of time in the kitchen with me and always ask to help. My middle daughter (pictured above) takes baking really seriously and is incredibly precise in what she creates. They spend all year planning what their next birthday cakes are going to look like and I love the looks on their faces when they come down to the kitchen in the mornings and see what I’ve made.

The beauty of a cake like this is that you can have any type of sponge as the base. I used two layers of 8 inch chocolate sponge cake sandwiched with raspberry jam and chocolate buttercream, but there are so many different options to choose from. I like to use normal buttercream, chocolate buttercream, Italian meringue buttercream or chocolate ganache under fondant. For cake ideas, have a look in my book, B.I.Y. Bake It Yourself, or scroll through the cake recipes on my website, www.richardburr.london. It’s worth remembering that both Renshaw fondants and the Wilton food colourings I use are suitable for vegans. I use specific royal icing sugar for my piping (which contains dried egg white) but if you’re making a vegan cake, regular icing sugar mixed with the water from a tin of chickpeas works really well.

To buttercream my cakes, I use a cake turntable, which cost me about six quid but has paid for itself many times over with how useful it is. As I bake so often, I have a cake wire to make sure the tops of my cakes are flat but it’s pretty easy to level them off with a serrated knife before you coat the sponges in buttercream. When I’m making a fondanted cake, I usually cut out a thin cardboard base from an old cereal box to build the cake on. I like to cover my cake boards with fondant too but I still need a base to construct the cake on. I chill my cakes in the fridge for a few hours to firm-up the buttercream or ganache.

One of my favourite things about Renshaw fondant is the range of colours it comes in. This saves me so much time and means I get consistent colours. But I also really appreciate the quality of Renshaw fondant – it’s very easy to work with and cracks much less than supermarket fondants. My local baking suppliers (Sugar Shack) stocks all Renshaw’s different colours so for this cake I picked up five packets of 250g Renshaw Ready to Roll Lincoln Green fondant icing. Once I’d rolled it out on a clean surface dusted with a little corn flour (or icing sugar if you don’t have corn flour) and measured it to ensure it would cover the cake, I rolled it onto my rolling pin to lift it and transfer it onto the cake. I then smoothed the fondant down with my cake smoother. A cake smoother is one of those tools you can pick up for about £1 online, but it’s so useful for working with fondant. I used the fondant off cuts to cover my 10 inch cake board. I then lifted the cake onto the covered cake board and put it back onto the cake turntable to continue decorating.

I made the picket fence from white Renshaw fondant and stuck the fence panels to the cake with a little water brushed on the back of each panel. I then mixed some royal icing with Wilton’s leaf green colour gel and using a star-tipped nozzle, piped foliage all around the cake. As you’ll see in the picture above, when I pipe royal icing I use a plastic coupler with my piping bags, which means I can change the nozzles without needing to use a new piping bag. The good thing about piping around the bottom of the cake is that it hides any rough edges of fondant that you might have created when you moved the cake onto the cake board. I’ll often stick ribbon or washi tape around the edge of the cake board but this looked so neat on top of the silver board that I didn’t think it was necessary. A lot of beautifully decorated cakes can be let down by what they’re mounted on, so have a look around your own local baking suppliers and get the right size board and box to transport it in – for the effort you’re going to to make the cake, it’s worth it to get it to its destination in one piece.

I kept building up the foliage on my cake to make three beds for my vegetables. I then made the chocolate soil pictured above. This is so much fun to make as it looks so realistic. To make the chocolate soil, I put 100g of caster sugar in a small saucepan with three tablespoons of water and heated this up. While this was heating I chopped 75g of dark chocolate. Once the sugar mixture started to turn yellow, I took it off the heat, added the chocolate and whisked this together by hand. It turns into chocolate soil almost immediately. Amazingly quick and easy.

This part of cake making always takes the longest and no matter how much time I allow for it, guaranteed I’ll end up staying up until 2am finishing it! Whenever I’m making fondant decorations for a cake I find it hard to know when to stop as I get so absorbed I could play with fondant all night. At this point, my regular cake making routine is to find a film or series on Netflix, set my laptop up in front of me and to settle down and get creating. I find fondant as easy to work with as modelling clay and the kids love to have a go at making things too.

I had a set of plastic fondant tools that I used to use, but one of my Christmas stocking fillers last year was a roll of metal wax carving tools (see above), which are fantastic for working with fondant. It also makes you feel like a real pro when you unroll all the tools, like you’re about to go into an operating theatre!

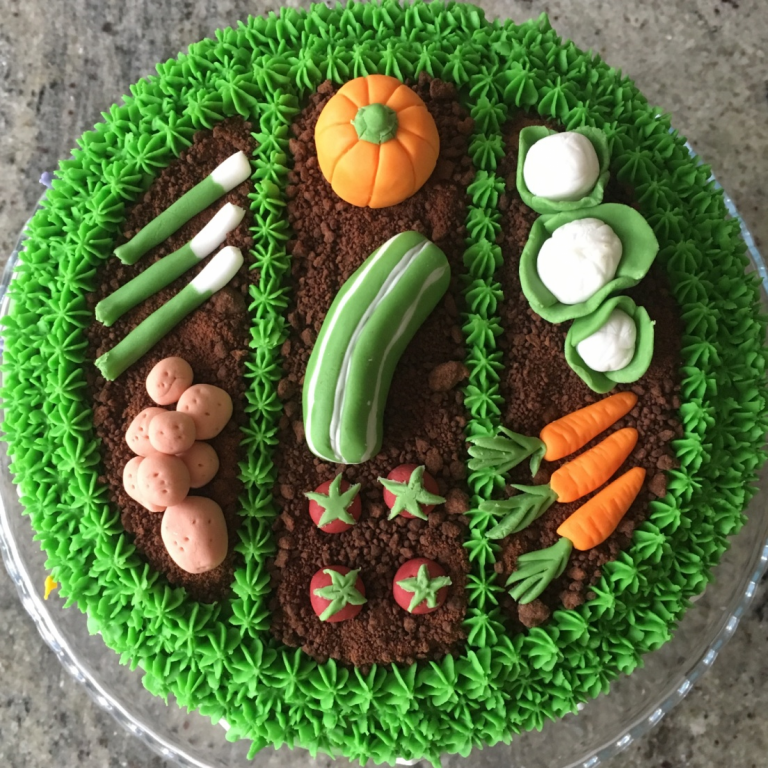
With just green, orange, red and white Renshaw fondants I was able to make the vegetable garden above. You can see how I’ve used each of the tools to cut, shape and texture the vegetables. Renshaw colours have reseal-able packaging, which is so useful when you’re only using small amounts of fondant, as with the red above.

I changed the nozzle on my green royal icing piping bag from a star-tipped nozzle to a 3mm round nozzle and piped the trailing greenery all around the fence. I mixed up small amounts of yellow and purple royal icing to add the final flowers to the cake’s sides.

The finishing touch to the allotment cake was adding the little sign, made from a broken lolly stick glued to a cocktail stick. This is where you could write “Happy Father’s Day” or a birthday message to the recipient. My top tip for a cake like this is to leave enough time for it. I made it over two evenings – the first evening was making the sponges and covering them with buttercream to chill. The second evening I did all of the fondant and royal icing work. However, once a cake is covered in buttercream it seals the freshness. So my advice would be to tackle a cake like this over three evenings:
- Evening 1: make the sponge cakes and buttercream, cover the cake, and chill overnight
- Evening 2: cover the cake in fondant, add the fence panels, pipe the star-tipped foliage and make the chocolate soil
- Evening 3: make the fondant vegetables and pipe the flowers around the sides of the cake
I really look forward to seeing what hobby cakes you create for Father’s Day so good luck and Happy Baking!
Thank you to Richard Burr for writing this tutorial blog for Renshaw Baking.